The theme editor enables you to adapt the VCOM interface to your own corporate design, including your logo, personal background, and colors. This feature is exclusively for service level premium. Otherwise, contact sales to purchase the service separately.
Note
A user can only be assigned to one user-defined theme.
Create a user-defined theme
Prerequisites
-
User group administrator
-
Service level premium
-
At PORTFOLIO LEVEL , navigate to
.png?cb=12102cf9ad8b8bc5c973d4c89009819a)

-
Select

Note
The difference between the light and the dark design is the color scheme. The light design uses dark text on a light background, while the dark design uses light text on a dark background. Both have different advantages.
-
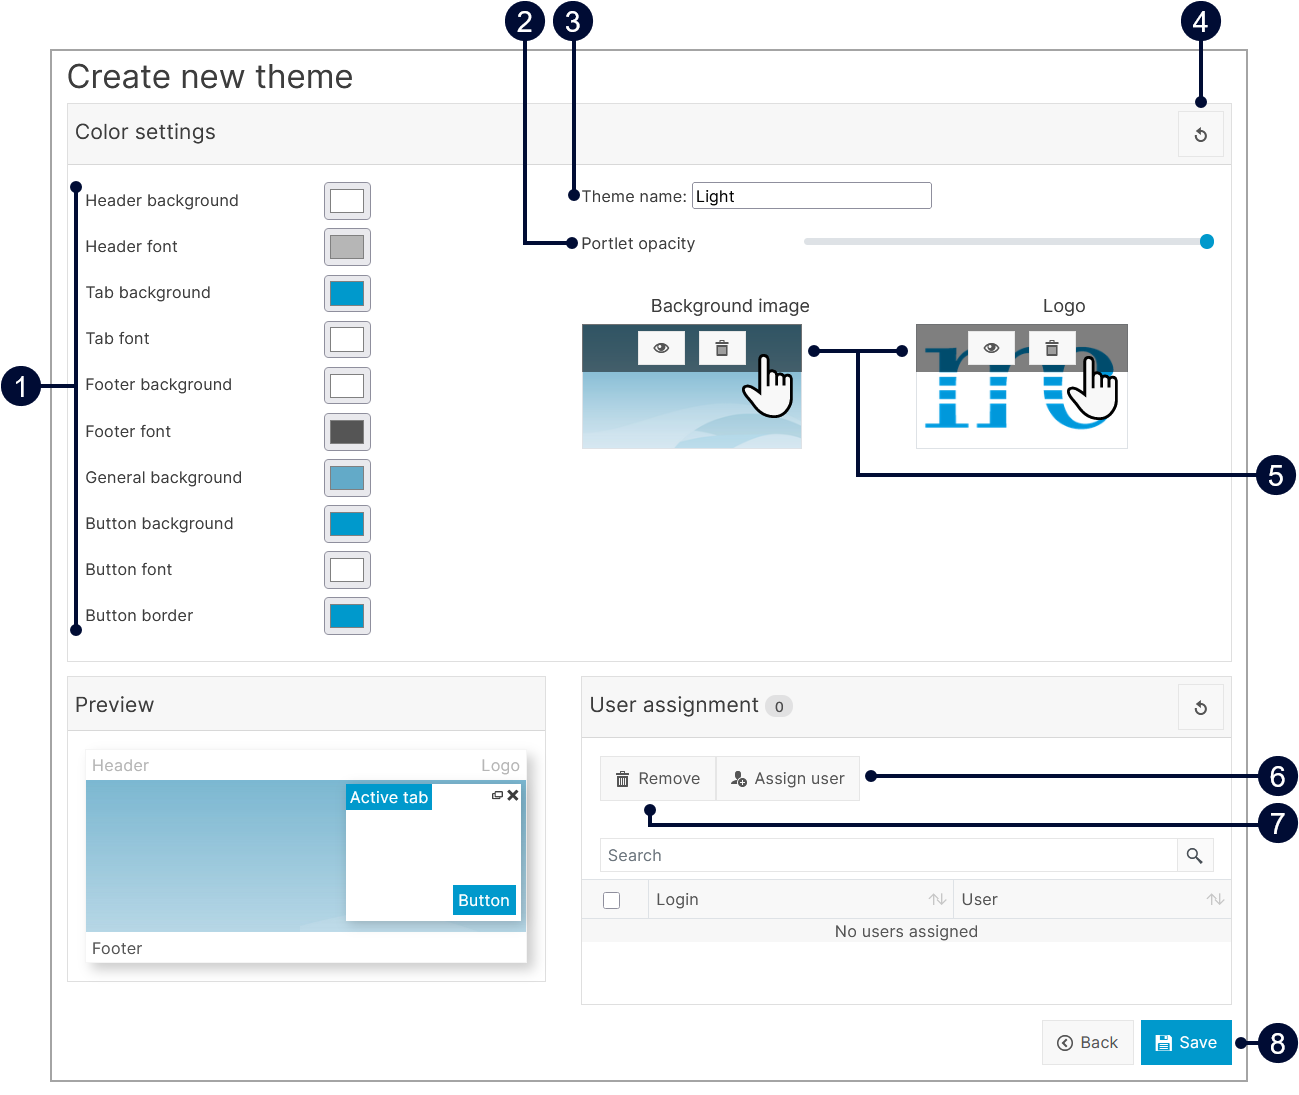
Apply your desired settings in the color settings menu:
-
Select your preferred colors.
-
Give your theme a name via Theme name.
-
Set the portlet opacity.
-
Change the Background image and Logo. Remove the current images and insert yours, both images have a limit of 1 MB in seize.
|
Name |
Details |
|
|---|---|---|
|
1 |
Colorpicker |
Choose the color of the described area. |
|
2 |
Portlet opacity |
Set the background opacity of the portlet. |
|
3 |
Theme name |
Name your theme. |
|
4 |
|
Reset your settings to the default. |
|
5 |
Background image and logo |
Hovering over the background image and the logo reveals two options:
If you want to change the image, remove the current image first:
|
|
6 |
|
Open list with users. |
|
7 |
|
Unassign a user from a theme. |
|
8 |
|
Save your changes. |
-
Check your theme in the Preview area.
-
Select

The theme is now created.
Further actions-
If you want to change your theme settings look for your theme in the user-defined themes list and select

Assign a user to a user-defined theme
Note
When creating or managing a user there is an option to assign a theme. See also Users and contacts.
-
User group administrator
-
Service level premium
-
A user-defined theme exists for your organization.
-
At PORTFOLIO LEVEL , navigate to
-
Find the theme you want to assign.
-
Select
-
Select

-
Confirm the user by selecting their name or press enter.
-
Select
The user now appears in the list of assigned users and the theme is now assigned to them. The user now only has this one theme and no access to the default themes.
Remove a user from a user-defined theme
Prerequisites
-
User group administrator
-
Service level premium
-
A user-defined theme exists for you organization.
-
At PORTFOLIO LEVEL , navigate to
-
Find the theme you assigned the user to.
-
Select
-
Tick the checkmark next to the user.
-
Select

-
Select
The user is now removed from the list and can only use the default themes.