Last modified:
With CMMS, forms provide a structured work report from technicians performing on-site work orders. The collected data also serves as the basis for creating a CMMS report.
Configure form templates to reuse in work orders. Manage all templates in the Form templates list, where you can add, edit, or delete them as needed.
Form templates overview
Prerequisites
-
The module VCOM CMMS is activated for the respective system. See Activate CMMS.
-
User group operations or higher
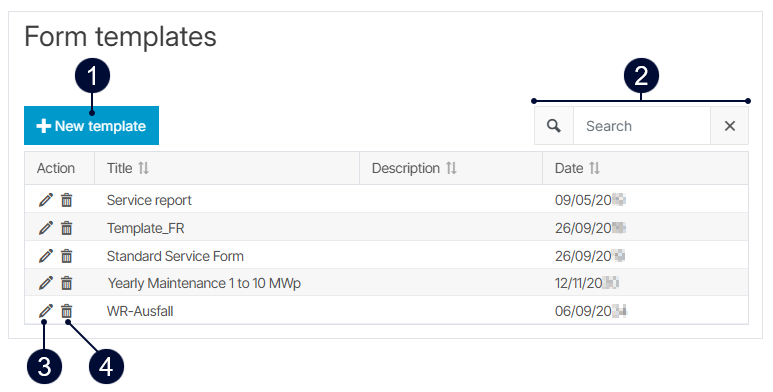
Find all your form templates at Portfolio level under ![]()
![]()
Note
We provide the default form template Maintenance protocol to help you get started. You can edit it to suit your needs or delete it if you prefer to use only your own templates.
|
Name |
Description |
|
|---|---|---|
|
1 |
|
Create and configure a new form template with the form template configurator. |
|
2 |
|
Quickly search for form templates within the list. |
|
3 |
|
Edit an existing form template with the form template configurator. |
|
4 |
|
Delete a form template permanently from the list. |
Configure a form template
A form consists of input fields, check boxes, and image upload fields. A form template defines the type and order of these components. To save time, templates can be reused for multiple work orders.
Recommendation
Before creating a new form template, familiarize yourself with the available components in the configurator. Then plan the form you want the technician to fill out later: How many pages, what headlines, description texts, check boxes, signature fields, and so on should the form have? Create a sketch as a basis for your configurations.
Note
The pages and components you add to your form template are the basis for your CMMS reports. The report will have the same page structure and the filled out component fields. Keep this in mind to avoid empty pages in your CMMS reports. See also Create a CMMS report.
-
The module VCOM CMMS is activated for the respective system. See Activate CMMS.
-
User group operations or higher
-
At Portfolio level , select
.png?cb=12102cf9ad8b8bc5c973d4c89009819a)

-
Select


-
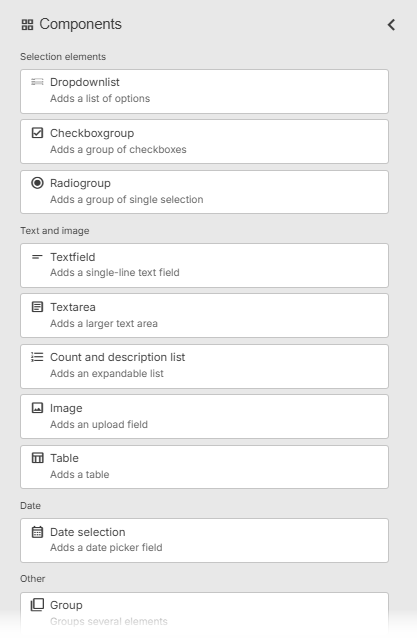
The configuration of form templates is done in 4 steps that are represented in 4 columns: 1)

.png?cb=f084148e7c2fa730ed5ea8ddd1a476ca)


The configuration of form templates is done in 4 steps
Components
-
In the first column, choose a component you wish to add to your form.
-
Use the


Examples
-
To create a checklist or list of tasks for a technician to perform, choose the component

-
The

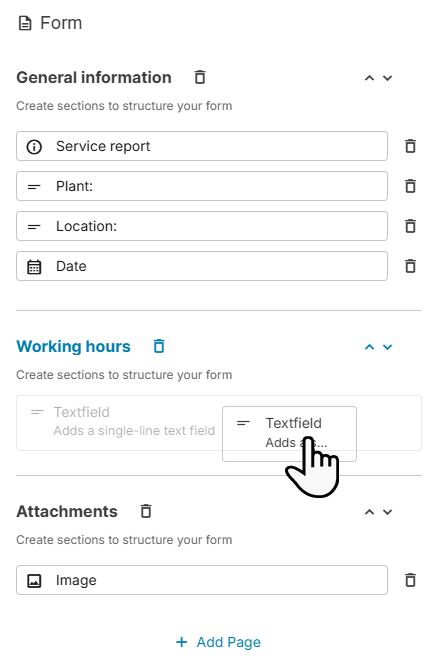
Form
-
Drag and drop the desired component from the first column into the respective area in the second column.
-
Add more components by dragging them from the first column and placing them above or below existing ones. You can also rearrange them later.
-

-


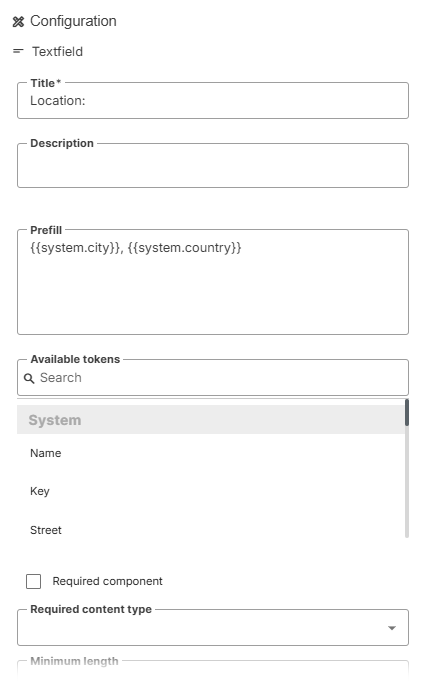
Configuration
-
Select a component or a page in the second column and configure its details in the third column.
Example
Add a component Title and Description. You can also determine if a field is Required, or if it should have a Maximum length. You can use a Trigger to define if-then relationships between components in order to trigger a specific action.
-
You can pre-fill the component

{{info}}.
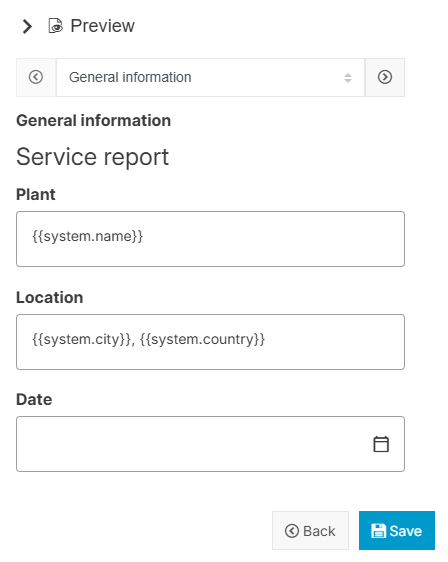
Preview
-
In the preview section, you see a preview of your template where you can check for errors or missing information.
-
The changes update live as you add and configure components.
-
Navigate through the pages of your template with the


-
Use the
-
When you are done configuring your template, select

The template is now added to the form templates overview.
Duplicate a form template
Recommendation
Duplicate a form template if you only want to make minor adjustments.
-
The module VCOM CMMS is activated for the respective system. See Activate CMMS.
-
User group operations or higher
-
At Portfolio level , select
-
Select
-
Make the desired adjustments.
-
Select

The template is now added to the form templates overview.