Last modified:
This topic is intended for users responsible for setting up a new system (= plant) in VCOM.
Caution
If your site has multiple power plant controllers (blue’Log XC data loggers or third-party PPCs) and you want to monitor each individually, each controller should be configured as a separate system, not as a subsystem. Otherwise, the performance ratio will not be calculated.
Example: A site has PV production across three rooftops, each with its own PPC. In this case, configure each rooftop in VCOM as a separate system.
To view the overall PR for the entire site, you can combine these individual systems into a virtual system in VCOM.
If you require further assistance, contact Support.
Recommendation: Prepare data
Before setting up a new system, we recommend collecting all the following information from designs, diagrams, manufacturer data sheets, and other relevant sources specific to your site and its components:
-
Exact address of your system
-
Responsible parties/contacts: names and email addresses of the owner, installer, operator, electrician, and invoice recipient (if relevant)
-
Date of installation of the entire system, of any subsystems, and of your measurement system (data logger or equivalent data source, such as PLC or API)
-
Total power output
-
Inverters and MPPTs: manufacturer, type, number of inverters, number of strings, modules per string, tilt and orientation in degrees
-
PV modules: manufacturer, type
-
Data logger: manufacturer, type, hardware serial number
-
Battery: rated capacity, inverter type and the number of busbars
-
You belong to the user group administrator or operations.
-
You have in-depth knowledge about the specific components of your system.
1) Start the setup
To start setting up a new system you have three options:
-
Either select
New system in your Systems list. -
Or at Portfolio level , go to
Administration > Portfolio > New system. -
Or at Portfolio level , go to
Administration > Portfolio > Overview and select New system.
You arrive at the Site data page.
2) Enter site data
-
Define the type of system you want to create and enter general site data. See Site data for more information on your options here.
-
Select Continue
The basic framework of the system is now created, and a system key is assigned. You arrive at the System configuration page for the system you just created.
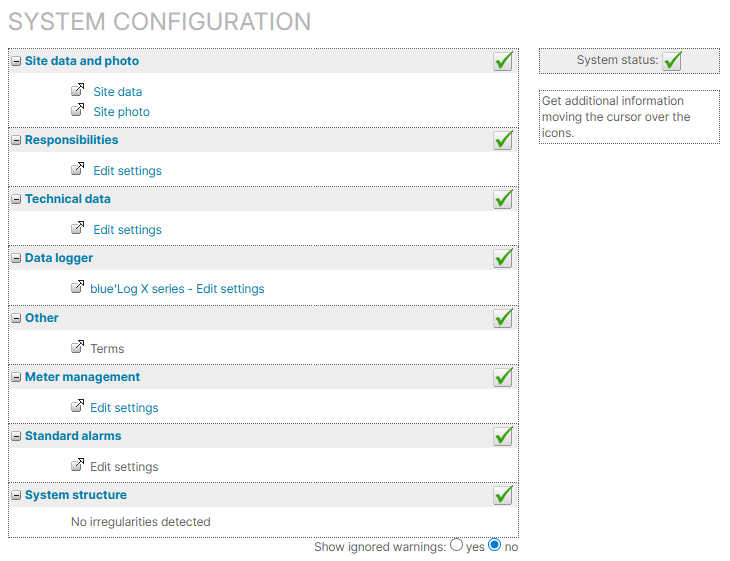
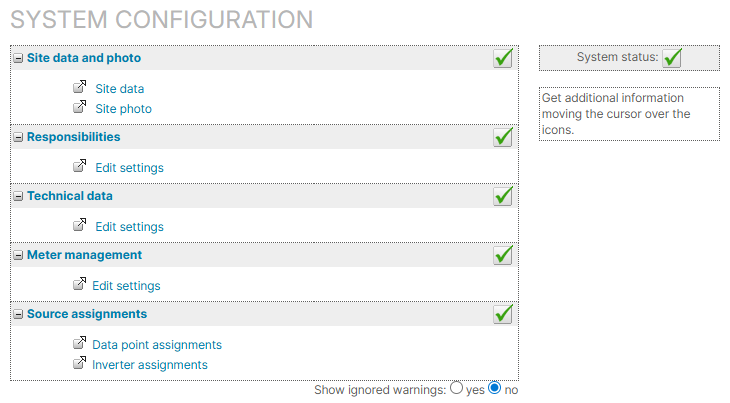
3) Complete the system configuration
The list on the system configuration page serves as a structured work plan to complete the system setup. We recommend following the steps from top to bottom. For each step, you will be redirected to the corresponding configuration page in the general
Icons and warning messages indicate whether there is a problem or everything is
3.1) Site data and photo
Site data
If you just set up a new system, you already entered the site data, and you do not have to do anything else here. See also Site data.
Site photo
If a
3.2) Responsibilities
Assign responsibilities for certain system topics. See Responsibilities.
3.3) Technical data
If there is
Set up subsystems, to specify the system’s technical components, such as inverters, modules, or batteries, and to define a default system plan. See Subsystems.
Note on navigation
Only setting up subsystems via the updated Technical data Beta page is described in this Help Center. But the link in the list does not yet redirect to this new page. Therefore, go directly to Technical data beta in the side bar. There you also find the Subsystems area.
3.4) Data logger
If
Add a data logger or a data source by following the steps under Data sources / data logger. For adding a blue’Log XM/XC, go directly to blue'Log XM/XC data logger.
Once you have added the data logger, close the configuration window and reopen it. The data logger and all connected devices should appear under
3.5) Other (Terms)
With terms, you define formulas to calculate your system’s basic or user-defined data points. The terms E_Z_EVU (PV yield counter) and G_M0 (Plane of array irradiance/POAI) are required for your system setup. Without them, many calculations and charts will not be displayed.
See Terms to check and configure them.
3.6) Meter management
If
-
For a blue’Log: Once you have finished setting up your blue’Log in VCOM, the data from your yield meter is automatically imported. We recommend double-checking the following under System >
System configuration > Meter management > Edit meter:
-
Measured value assigned: In general, you should select the term
E_Z_EVU. -
Installation date: Date when the data logger was commissioned.
-
-
For a different data logger: The data may not be automatically imported if your data logger does not deliver data (check the manufacturer’s data sheet for information). In this case, you can manually add a meter.
3.7) Standard alarms
Before setting up your alarms, ensure no issues appear under System structure. Then set up your alarms and alarm notifications as described under Smart alarms.
3.8) System structure
If there are any issues with your configuration, they will be displayed here.
Examples of system structure issues
-
You need to check the assignment of inverters to subsystems.
-
You need to check that the proper scale factor is set for inverters.
If there are no system configuration issues anymore green check marks
Further actions
Current sensors
-
To ensure the alarms work properly, assign the correct scale factor in kW to each subsystem via the
Magnifying glass.
Other devices
See Other devices
Digital signals/inputs
You can configure error states (0 or 1), e.g. fault messages, under Digital signals. If you have not manually set the error state, it will be displayed as 0.
String inverters and stringboxes
It is also possible to configure string inverters and stringboxes (string combiner boxes) if these are included in your imported data.
Set up charts
-
Set up the power flow chart. See Power control tab
-
Set up self-consumption. See Self-consumption terms and Self-consumption chart.
FAQs