
Last modified:
Overview
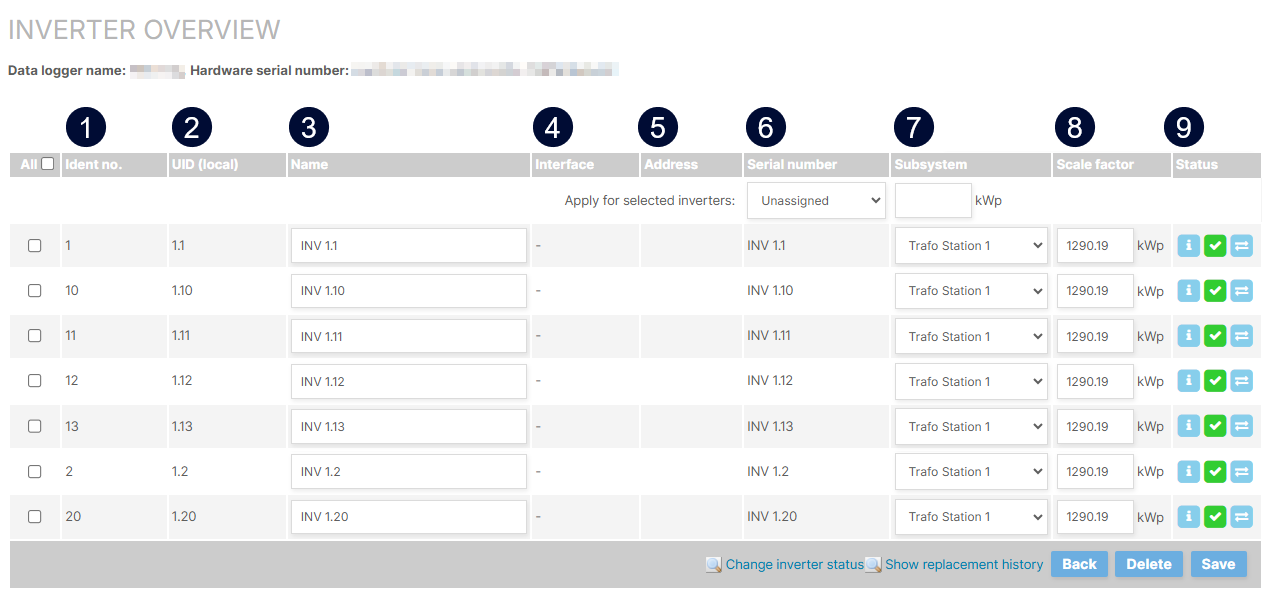
View and edit the inverters of your system at the system level under 
|
Name |
Details |
|
|---|---|---|
|
1 |
Ident no. |
Automatically assigned by VCOM. Read-only |
|
2 |
UID (local) |
External identification of the inverter, typically the same as the serial number. If there is no serial number available, it is a text string created from the interface and/or the address. Read-only |
|
3 |
Name |
Automatically assigned based on the information from the data logger. You can edit the inverter name here. BLUELOG ONLY If using a bluelog Neo or blue’Log XM/XC, you can only edit the name via the bluelog web interface. |
|
4 |
Interface |
Interface to which the inverter is attached. For the blue’Log, this might be a built-in RS-485 ports or an add-on module. For inverters connected via Ethernet, this will contain the network interface of the blue’Log. Read-only |
|
5 |
Address |
Address of the inverter on the RS-485 bus or the Ethernet IP address of the inverter. Read-only |
|
6 |
Serial number |
Serial number is read from the inverter. If you are not using a blue’Log, you may need to edit this field. |
|
7 |
Subsystem |
You can assign the inverter to a subsystem here. |
|
8 |
Scale factor |
Normalizing factor in kWp. This field is typically auto-filled when you select the subsystem. Otherwise, you can enter the data manually. This value is used for inverter monitoring and all normalized inverter charts. |
|
9 |
Status |
|
Replace inverters
When your system has faulty inverters, you may have to replace them.
Note
Carry out the replacement on-site first before saving the configuration page. Otherwise, the status of the new inverter is set from new to active and the replace option is no longer available.
Prerequisites
-
You have already replaced the inverter on-site.
-
The new inverter has been found on your data logger via a scan.
-
You have deleted the old inverter from your data logger.
Steps
-
At system level , go to


-
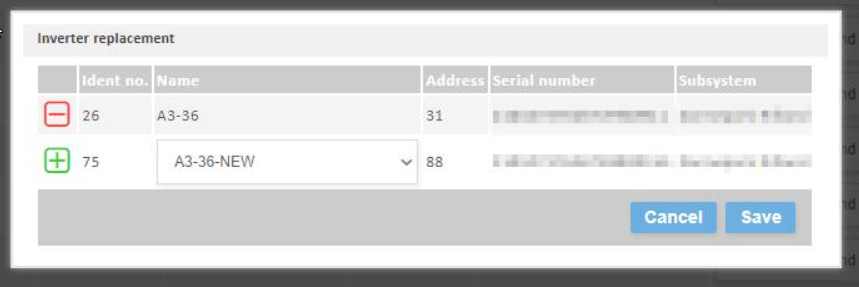
In the appearing window, the replacement inverter is displayed.
-
Select

The new inverter appears in the inverter overview.
Caution
-
Consider whether replacing the inverter will also change technical data of your subsystems. Make changes accordingly. See Subsystems and technical data.
-
If the system is also used in a virtual system, changes to subsystems must be made in the source system as well as in the virtual system. See Technical data for virtual systems.