Last modified:
Manage documents related to a specific asset.
As an asset manager, you may store all kinds of documents in a folder structure, document management system, or even on paper. In mc Assetpilot, you can store documents digitally and all in one place, sorted by asset.
Views of the documents domain
Enter the documents domain in platform view, by selecting the dedicated domain tab for ![]()
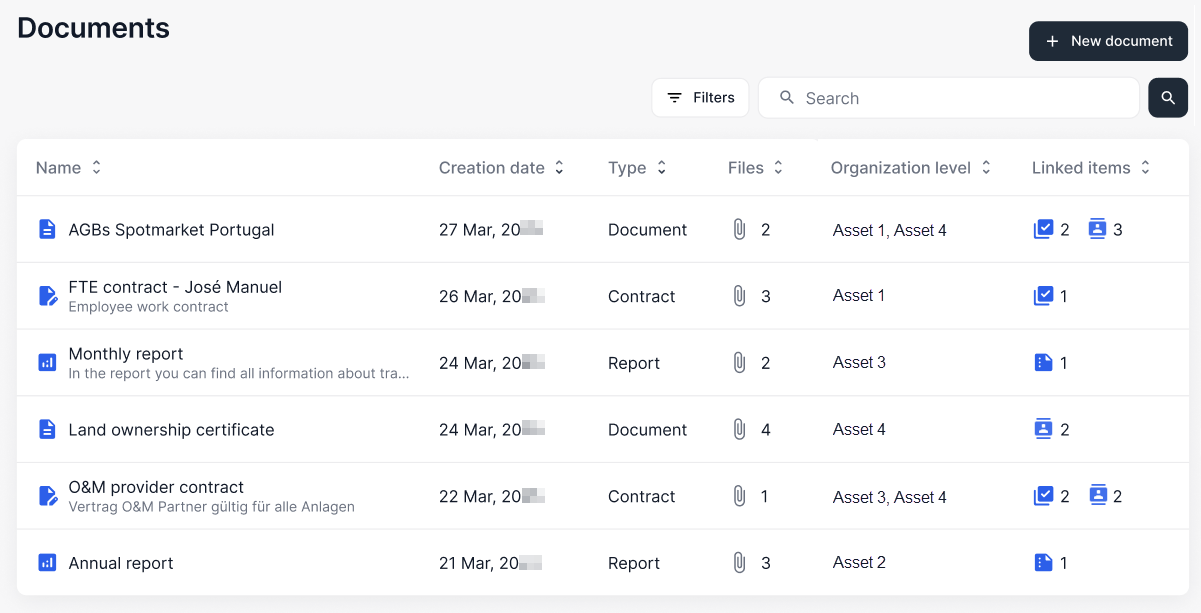
Overview
In the overview, you see a list of all ![]()
![]()
![]()
Note
Documents from sub-assets are consolidated to higher asset levels. You can see the respective sub-asset in the column Organizational level.
Quick view
Select a document in the overview to display a quick view of its details in a side panel.
|
Name |
Details |
|
|---|---|---|
|
1 |
General info |
View the document details. |
|
2 |
Obligations |
Contracts only View obligations for contracts. See also Obligations. |
|
3 |
Linked items |
Link other items of the portal to the document. See also Link other items with a document. |
|
4 |
Detailed view |
Go to detailed view. |
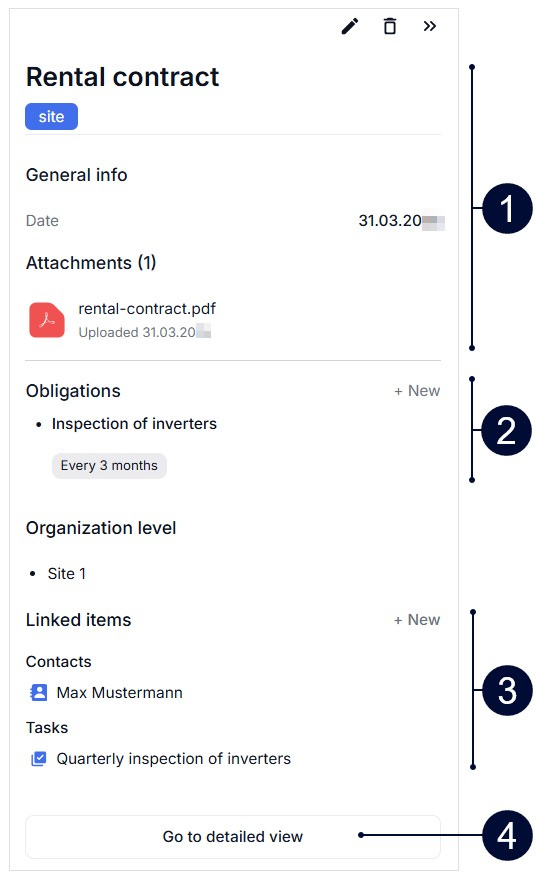
Detailed view
Select Go to detailed view in the quick view to open the document’s details on a separate page.
Document types
-
You can view three types of documents in the documents domain: reports, contracts, and other documents.
-
You can actively manage two types of them within the domain: Contracts and other documents. To effectively do so, you must "process" files for these document types upon upload, which involves labeling them with important information. This enables you to leverage your data for multiple functions and display it in various widgets. The different types require different processing inputs.

Reports
-
Reports are automatically saved to the documents domain when created in the Reports domain.
Examples
-
Annual reports
-
Monthly reports

Contracts
-
When processing contracts, you should enter the start and end dates, and the notice period. The Contract notice periods widget can then notify you of notice periods.
-
Optionally extract Obligations and their Regularity from your contracts, so you do not have to review them every time to know what you committed to.
Examples
Contracts
-
Power purchase agreements (PPA)
-
Land lease contracts
-
Supplier contracts
-
Employment contracts
Obligations
-
Pay rent every month
-
Contact a specific person once in case of damage
-
Regular compliance checks every 6 months

Other documents
-
When processing other documents, you only need to enter basic data and attach the file.
Example
-
Acceptance certificate from an energy supplier
-
Data sheets
Upload contracts or other documents
Recommendation
When you are just getting started with mc Assetpilot, or if you are uploading a large number of documents, we recommend first sorting them by the respective asset.
Note
For production assets in conceptual stage, you can only upload a maximum of 10 documents. See Conceptual stage for production assets.
Prerequisites
-
You belong to any other user group than viewer.
-
An organizational structure with assets already exists.
-
Documents are available in the supported file types: PDF, Word, PNG, JPEG.
Steps
-
Navigate to the Asset level at which you want to upload the document.
-
Select the domain

-
Select +New Document.
-
Enter a document Name and add a Description if desired.
-
Select the specific document Type and the input fields will adjust accordingly:
-
-
-
-
Optionally add Tags, which is highly recommended. See also Tags for optimized search.
-
Upload or drag and drop your file(s) into the area Upload file.
Note
You can upload a maximum of 3 files simultaneously.
-
Add obligations depending on your document type.
-
-
-
-
Select Create to finish processing.
The new document appears in the overview.
Manage existing contracts or other documents
Edit or delete a contract or document
Edit or delete existing documents in any view by selecting
Add an obligation to an existing contract
Note
You can only add obligations to documents with the type ![]()
-
Select a document with the type
-
In the area Obligations, select +New. A pop-up window appears.
-
Name and describe the obligation and determine its Regularity.
-
Select Create.
The obligation appears in the area Obligations of the contract document.
Create a task from a contract’s obligation
Note
Obligations only exist for documents with the type ![]()
-
Select a document with the type
-
In the area Obligations, hover over an obligation and select


-
Enter the specifications of the task. See Create a single task.
-
Select Create.
The task appears:
-
In the area Linked items of the document.
-
In the Tasks domain where it is linked automatically with the document that belongs to the obligation.
Link other items with a contract or an other document
Recommendation
Create tasks for the obligations of your contracts and link them with the contract. See Create a task from an obligation.
Note
Linking items is always bidirectional. See also Linking items.
Prerequisites
-
The items you want to link already exist.
-
You have access and writing rights to the domain with which you want to link an item. See also User groups and permissions.
Steps
-
Select a contract or an other document from the overview to open its Quick view or go further to the Detailed view.
-
In the area Linked items, select +New. A pop-up window appears.
-
Choose the Domain and the specific Item with which you want to link the document:
-
Task: Select the task you want to link from the dropdown.
-
Contact: Select the contact you want to link from the dropdown.
-
-
Select Link to link the document with the chosen item.
The item appears in the area Linked items of the document. Navigate to the linked item by selecting it. You will see the document as linked item there as well.
Monitor documents on the dashboard
To help you work efficiently, documents are evaluated in the following widgets on the dashboard: