Last modified:
Manage tasks for the users of a specific asset.
Tasks are any job that needs to be carried out for asset management.
Examples for tasks
-
Finalizing budgets with stakeholders
-
Evaluating O&M suppliers
-
Optimizing maintenance schedules
-
Preparing tax documents
Views of the tasks domain
Enter the tasks domain in platform view, by selecting the dedicated domain tab ![]()
Overview
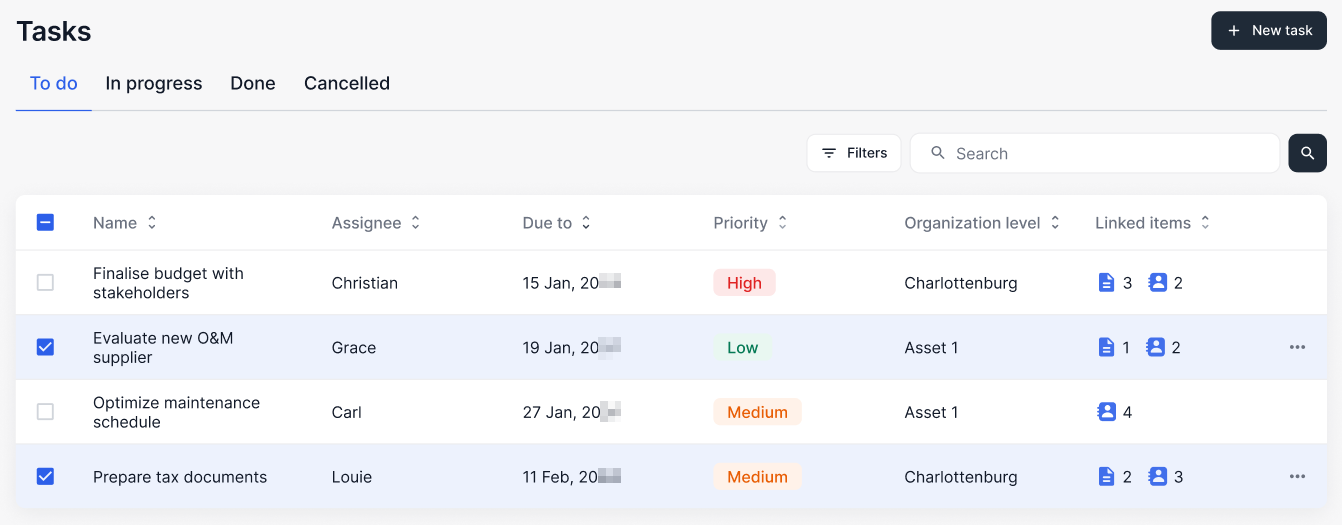
In the overview, you see a list of all tasks grouped by their status into different tabs: To do, In progress, Done, Cancelled. Select a tab to see only the tasks with the respective status.
Note
Tasks from sub-assets are consolidated to higher asset levels. You can see the respective sub-asset in the column Organizational level.
Quick view
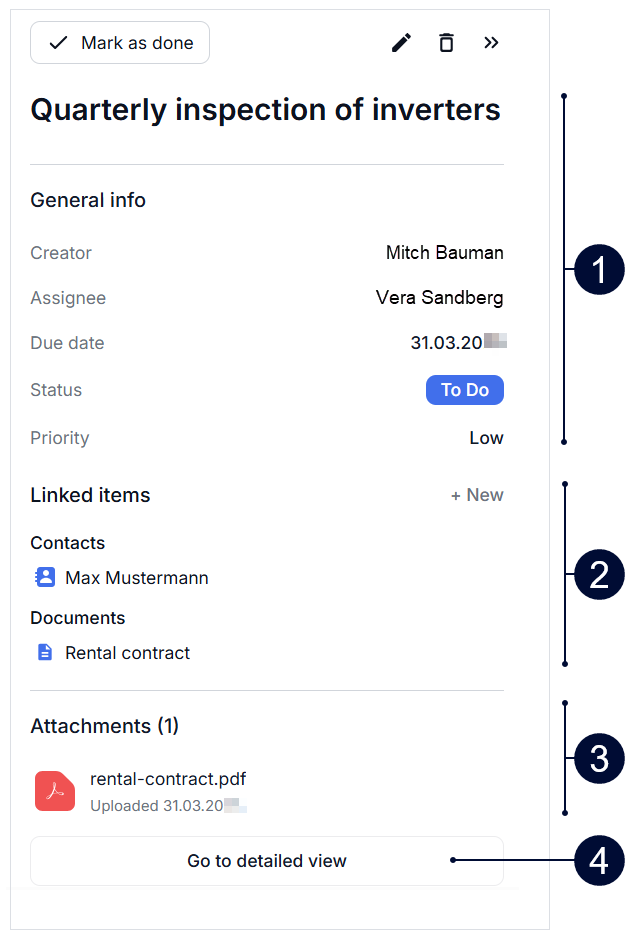
Select a task in the overview to display a quick view of its details in a side panel.
|
Name |
Details |
|
|---|---|---|
|
1 |
General info |
View the task details you enter on creation. |
|
2 |
Linked items |
Link other items of the portal to the task. See also Link other items with a task. |
|
3 |
Attachments |
View attachments for the task. |
|
4 |
Detailed view |
Go to detailed view. |
Detailed view
Select Go to detailed view in the quick view to open the task’s details on a separate page.
Create tasks
Either create single tasks or import a task list via CSV import.
Note
-
Tasks can only be created for assets, not for your whole organization.
-
For production assets in conceptual stage, you can only create a maximum of 10 tasks. See Conceptual stage for production assets.
Create a single task
You can assign work and set deadlines for yourself and other users. You can classify tasks by status and priority, and add tags and attachments.
Prerequisites
-
You belong to any other user group than viewer.
-
An organizational structure with assets already exists.
Steps
-
Select an asset level from the side bar and select the domain tab

-
Select +New task.
-
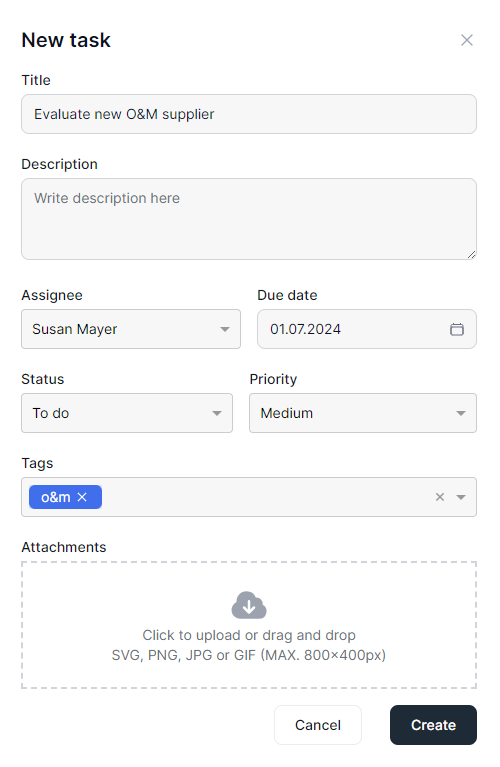
Enter a descriptive task Title and add a Description if desired.
-
Select an Assignee (a user in your organization who should carry out the task), a Due date, Status, and Priority. Add Attachments if desired. Tags are also optional but highly recommended. See also Tags for optimized search.
-
Select Create.
The assignee will receive a notification email, and the task will appear in the ![]()
Import several tasks via CSV file
Prerequisites
-
You belong to any other user group than viewer.
-
An organizational structure with assets already exists.
Steps
-
Select an asset level from the side bar and select the domain tab
-
Select

-
Select the column of your CSV file to match the missing system column. Then select Next.
-
On the next page, a table with all the matching data is displayed. Select Finish when you reviewed the table.
-
All imported tasks appear in the tasks list with the corresponding assignees:
-
The system matches the assignees in your CSV file with the corresponding users of your organization (via matching mail addresses). The tasks will be assigned to these users automatically.
-
If your file does not contain information about assignees, then you as the file importer will be assigned to all tasks. You can then assign users manually by selecting


Manage existing tasks
Edit or delete a task
Task creator or assignee only As task creator or assignee, edit or delete existing tasks in any view by selecting
Note
You can no longer edit tasks with the status done or cancelled.
Change the status of multiple tasks at once
Prerequisites
-
You belong to any other user group than viewer.
Steps
-
Navigate to the task Overview.
-
Change the status of multiple tasks at once by ticking the respective

-
Select

-
Select the new Status from the dropdown.
-
Select Change.
The selected tasks now have the new status and appear in the respective tab.
Link other items with a task
Note
Linking items is always bidirectional. See also Linking items.
Prerequisites
-
The items you want to link already exist.
-
You have access and writing rights to the domain with which you want to link an item. See also User groups and permissions.
Steps
-
Select a task from the overview to open its Quick view or go further to the Detailed view.
-
In the area Linked items, select +New. A pop-up window appears.
-
Choose the domain with which you want to link the task:
-
Contact: Select the contact you want to link from the dropdown.
-
Document: Select the document you want to link from the dropdown.
-
-
Select Link to link the task with the chosen item.
The item appears in the area Linked item of the task. Navigate to the linked item by selecting it. You will see the task as linked item there as well.
Monitor tasks on the dashboard
To help you work efficiently, tasks are evaluated in the following widgets on the dashboard: