Last modified:
Import bank transactions for an asset and map them to a cashflow category.
Maintaining liquidity is crucial for the success, growth, and survival of your business. To make informed decisions about how to use liquidity you need accurate, up-to-date information about cashflow, the money moving in and out of your business. Import your cashflow transactions to mc Assetpilot and map a cashflow category to each of them for accurate evaluation.
Note
This domain is not accessible for production assets in conceptual stage. See Conceptual stage for production assets.
Overview of the cashflow domain
Enter the cashflow domain in platform view, by selecting the dedicated domain tab for ![]()
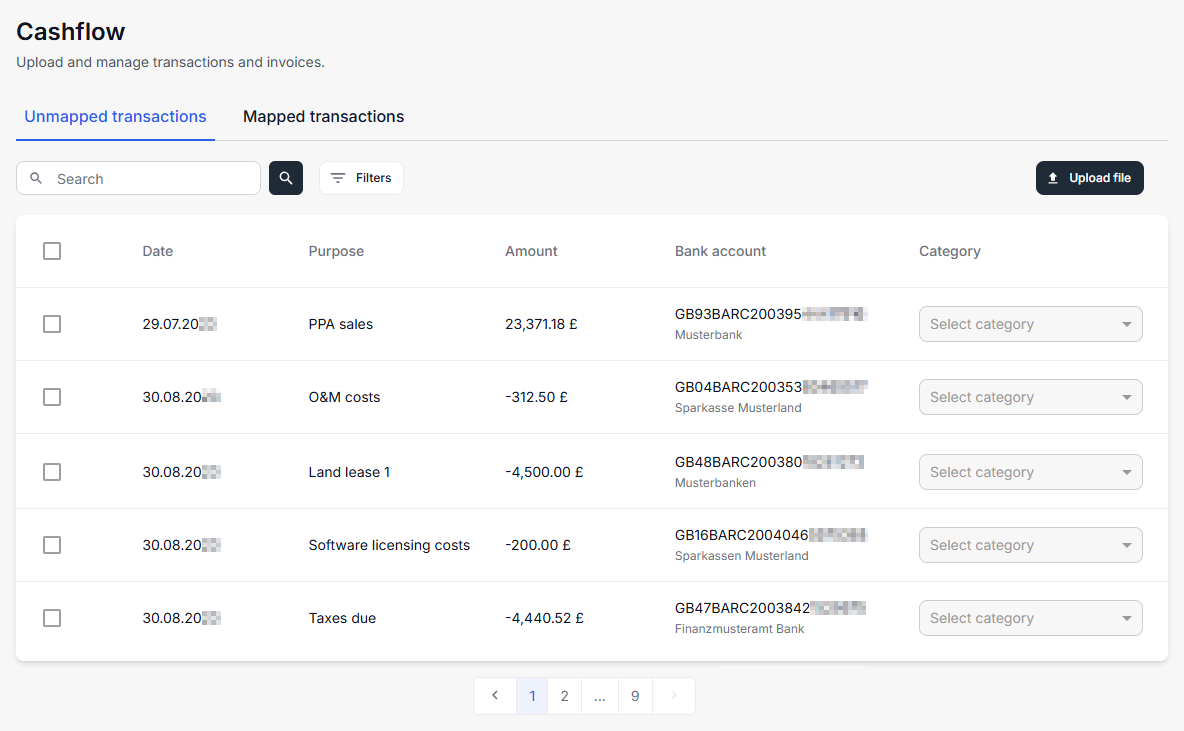
In the overview, you see a list of all cashflow transactions grouped by their status into different tabs: Unmapped transactions, Mapped transactions. Select a tab to see only the transactions with the respective status. Unmapped transactions do not have a mapped category yet.
Note
Transactions are not consolidated on higher asset levels. You must navigate to a specific asset to view manage its transactions.
Track your cashflow
To track your cashflow in mc Assetpilot, do the following:
-
First, you can optionally define your own cashflow subcategories in the Administration .
-
Then you must import your cashflow transactions…
-
…manually via CSV at Asset level .
-
…or automatically via bank sync in the Administration .
-
-
Then you must map these transactions to the cashflow categories at Asset level .
Note
After initially defining your categories and if you decide to import your transactions via bank sync, you only must carry out step 3 on a regular basis.
1) Optionally define cashflow subcategories
Every cashflow transaction must be mapped to a category for structured evaluation. These categories are defined in the Administration domains. By default there already are several main categories. If the main categories do not fit your needs, you can also optionally create subcategories there. See Categories.
2) Import cashflow transactions…
To use and evaluate cashflows in mc Assetpilot, you have to import these transactions to the platform. You can do that manually by uploading CSV files regularly, or you sync your bank accounts with the corresponding assets, and all transactions will be imported automatically.
All cashflow transactions must have the following attributes:
-
Date,
-
Purpose,
-
Amount (including currency),
-
Bank account (including bank name),
-
and after mapping, they also have a category. See Map cashflow transactions to categories.
…manually via CSV file upload
You can manually import cashflow transactions via CSV file upload at Asset level . Therefore, the file must be in a certain format so that the columns can be matched to the system columns with the transaction attributes. The system also checks for duplicates before importing any data.
Caution
If you decide to manually import bank transactions, make sure to do it periodically to ensure the accuracy of your financial forecasts.
Prerequisites
-
You are the organization owner, an admin, or a member of all domains or the finance domains. See User groups and permissions.
-
The records in your CSV file correspond to the following requirements:
-
Comma-separated values
-
Currency code is listed in ISO 4217
-
Example
09/26/2023,SolarBank,DE98123456780001122334,Einspeisevergütung,2000,EUR
Sample file
MockbankImportDEMO.csv
Steps
-
Navigate to the Asset level at which you want to import transactions and select the domain tab

-
Select

-
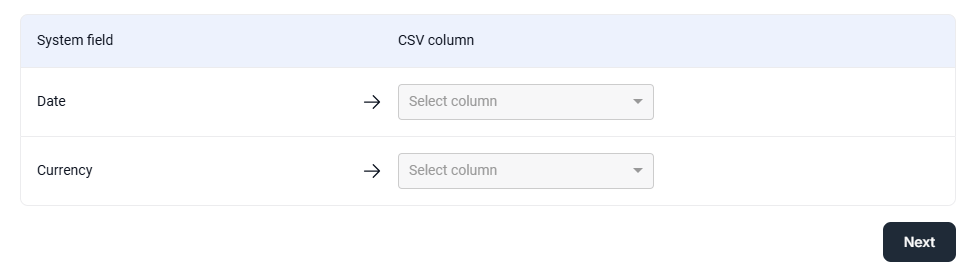
Match columns: The system matches your data to the transaction’s attributes automatically. If some of your data could not be matched to an attribute, you will have to match this column manually to the respective System field (= transaction attribute). To do, select the column of your CSV file to match the missing system field. Then select Next.
-
Match formats: For the Date and Amount, select the respective format that is used in your file. Then select Next.
-
Review table: On the last page, a table with all the matching data is displayed.
-
Duplicate check: The system checks your file for duplicate transactions. A transaction is considered a duplicate if there is already a transaction with exactly the same attributes somewhere in your organization. Duplicates will be grayed out in the import preview list. In the column Organizational level, you can see at which asset level the original to your duplicate was found. If no duplicates were found in your import file, this column is empty.
-
Select Finish when you have reviewed the table.
-
Caution
Duplicate transactions will not be imported.
The transactions are now imported and displayed under Unmapped transactions.
…automatically via Bank syncs
You must sync a bank account in the Administration domains to automatically import cashflow transactions. See Bank syncs.
3) Map cashflow transactions to categories
All transactions, whether from an imported CSV file or a bank sync, first appear under Unmapped transactions in the ![]()
Caution
Unmapped transactions can not be taken into account in financial models, as the underlying calculations in the financial model rely on categories. Therefore, every cashflow transaction has to be mapped to a category to be evaluated in a structured way.
You can map single transactions one-by-one or several at once. They will then appear under Mapped transactions in the ![]()
Map a single transaction
Prerequisites
-
You are the organization owner, an admin, or a member of all domains or the finance domains. See User groups and permissions.
Steps
-
Navigate to the Asset level at which you want to map a transaction and select the domain tab
-
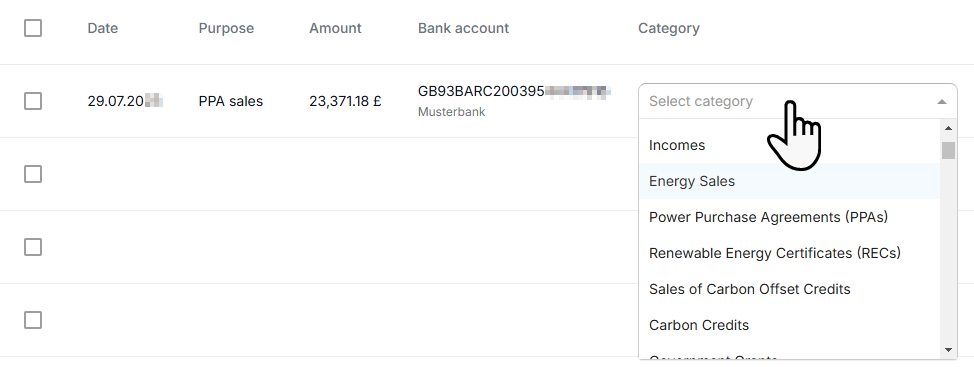
Assign a category from the dropdown to the desired transaction.
-
Switch to the tab Mapped transactions to see your mapped transaction. Then it will also disappear from the list of unmapped transactions.
Further actions
-
Map more transactions in the same manner if needed.
-
Change a category afterwards under the tab Mapped transactions.
Map multiple transactions at once
Prerequisites
-
You are the organization owner, an admin, or a member of all domains or the finance domains. See User groups and permissions.
Steps
-
Navigate to the Asset level at which you want to map transactions and select the domain tab
-
Select multiple transactions at once. You have the following options for that:
-
Tick several

-
Tick the
-
Use the


-
-
A floating button will appear. Select

-
Select the cashflow category you want to assign to all selected transactions, then select Confirm.
The transactions will automatically be transferred to the tab Mapped transactions and will disappear from the tab Unmapped transactions.
Further actions
-
Map more transactions in the same manner if needed.
-
Change categories afterwards at once under the tab Mapped transactions.
Monitor your cashflow on the dashboard
To monitor your cashflow, display cashflow related information on your dashboard with various widgets: