Automation
Last modified:
About automation
A key performance indicator (KPI) in O&M work is the efficiency with which a single O&M manager can monitor systems and/or installed capacity. Digitalization offers a significant advantage by enabling task automation, which can increase the number of systems monitored and boost revenue.
The automation module allows you to automatically create tickets for all your systems simultaneously. For example, you can schedule maintenance tasks for checking device connections, mowing the lawn, and other routine maintenance. If you have a portfolio of several dozen installations, you can free up a lot of time for yourself and your team to concentrate on what O&M operators do best: finding faults.
Note
CMMS ONLY Instead of the Regular events portlet, you can also use the Automation module.
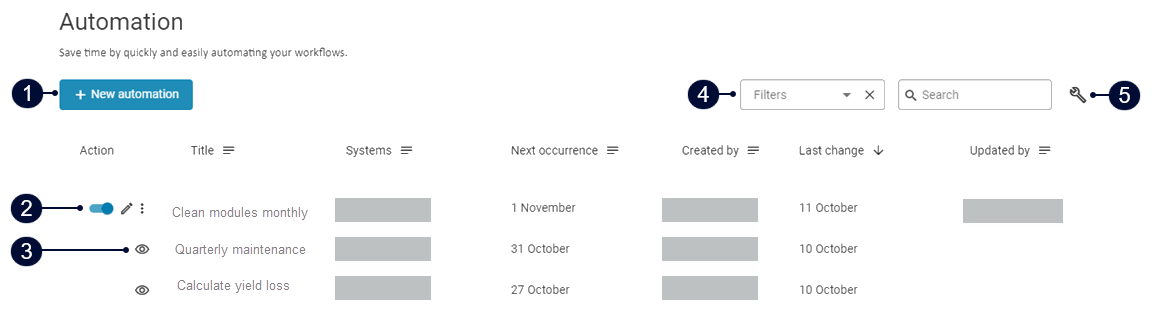
Automation overview
Name | Description | |
|---|---|---|
| 1 |
| Create new automation. |
| 2 | Further actions |
|
| 3 |
| Automation is read-only if the user is not the creator. |
| 4 | Filters | Sort the list of automation by location, device, etc. |
| 5 |
| Choose which columns are displayed in the automation overview. |
Prerequisites and permissions
The automation module is included in the package for premium partners and is available as an additional paid module to partners.
Only the admin and operations roles can access the automation overview and create automations.
Automations can only be edited by their creator. Exception: Partner admins have full access and can view and edit all automations within their partner account
Other admins and operations users can view, but not edit, an automation if it affects at least one system in their portfolio. In the automation overview, they will only see systems that belong to their own portfolio.
Automation types
You can set automation for:
Further actions
Once you have created an automation, you can make changes in the automation overview. Prerequisite: You are the creator of the automation. If the automation was created by someone else, it will be read-only.
Activate/deactivate an automation
To pause an automation, deactivate the toggle next to the name of the automation in the overview. Reactivate the toggle to restart the automation.
Edit an automation
Select ![]() Edit to customize an existing automation to work even more efficiently. In the window that appears, select the desired entry in the overview to make changes. For example, select Ticket to edit the ticket settings.
Edit to customize an existing automation to work even more efficiently. In the window that appears, select the desired entry in the overview to make changes. For example, select Ticket to edit the ticket settings.
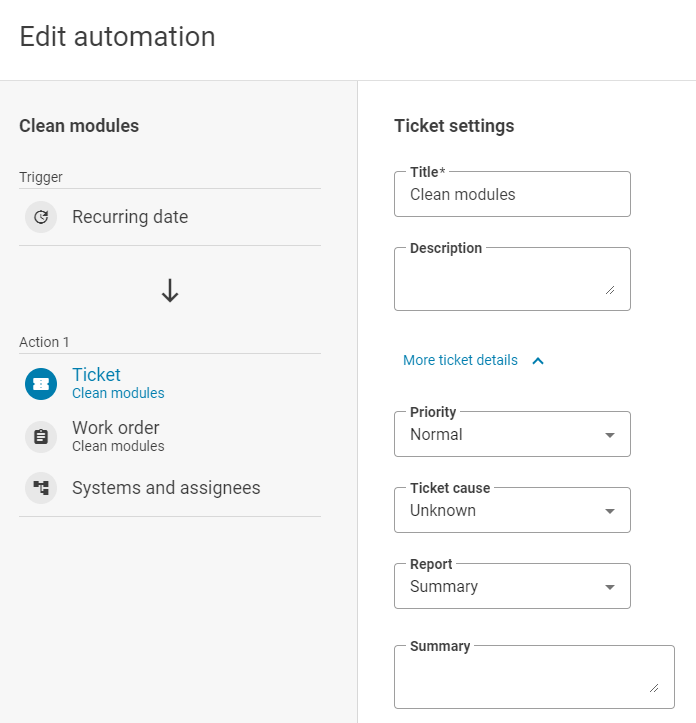
Edit an automation
Delete an automation
Select ![]() Further actions >
Further actions > ![]() Delete to delete an automation.
Delete to delete an automation.
Rename an automation
Select ![]() Further actions > Rename. Edit the title of the automation and select
Further actions > Rename. Edit the title of the automation and select ![]() Save.
Save.
Use automation with CMMS and the O&M app
See CMMS (Computerized Maintenance Management System).