Ticket system
About tickets
Tickets are central to O&M processes in VCOM:
They contain all relevant information for an event, such as device downtime
A ticket may contain several alarms with the same root cause
The ticket cause (e.g. A for alarms, T for ticket) helps you to decide whether you need to consider the ticket in reporting and yield loss calculation
If you have a CMMS license, work orders can be assigned to a ticket. Work orders are specific tasks for service personnel, e.g. exchanging or repairing an inverter, cleaning PV modules, etc. See CMMS
Tickets are created based on alarms, and an alarm will automatically create a ticket. Alarms are triggered in the following ways:
In the event of a fault, inverters automatically trigger alarms which are sent to the data logger. The data logger then sends the alarms to VCOM
VCOM provides you with a wide range of sophisticated alarm settings that can be tailored to your system. See smart alarms.
Tip
If you want to view the alarms for an individual system, you can click on a system from the list of systems on the sidebar. The Alarms portlet then only displays the alarms of that system.
Portlets for ticket information
Tickets portlet: At the portfolio level, the portlets display all tickets in your entire portfolio. To view tickets that only apply to a specific system, select the Arrow icon next to the system name to access the cockpit for that system.
Ticket details portlet: Details of the ticket you are currently editing
Alarm information portlet: Additional information and graphs for the selected ticket
Work orders portlet: Overview of work orders, which are linked to tickets (CMMS only)
Tip
We recommend creating a tab at the portfolio level specifically for the portlets relevant to tickets. For more on portlet configuration, see Portal concept and structure.
Tickets portlet
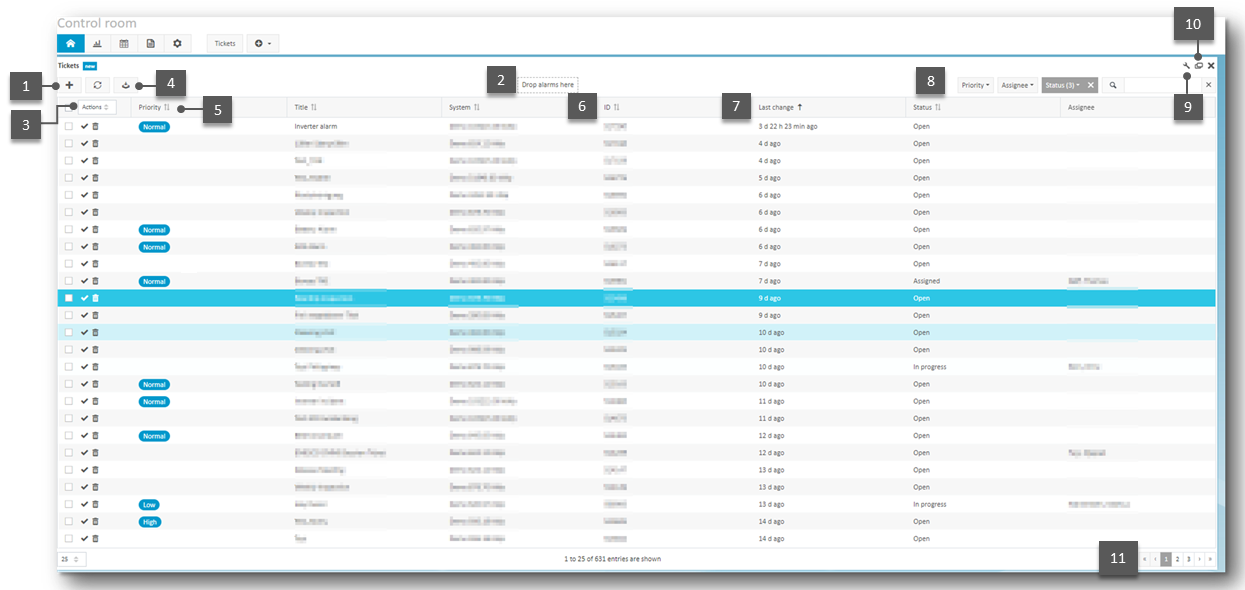
Here is an overview of the Tickets portlet:
Tickets portlet
Item | Name | Details |
|---|---|---|
1 | Plus icon | Create a new ticket |
2 | Drop alarms here | Create tickets directly by dragging & dropping alarms from the Alarms portlet |
3 | Actions | Delete or close multiple tickets at once |
4 | Download icon | Download the list as a CSV |
5 | Priority | Set ticket priority |
6 | ID | System ID |
7 | Last change | Time since last ticket update |
8 | Search bar and filters | Active search filters are displayed in a dark color |
9 | Wrench icon | Choose which columns to display |
10 | Screen icon | Expand portlet to full-screen |
11 | Page display | Browse through multiple pages |
Ticket details portlet
To view the details of any specific ticket:
Right-click on any ticket in the Tickets portlet and select Edit
If you have added the Ticket details portlet, select any ticket in the Tickets portlet and the details will appear in the Ticket details portlet
The following tabs and fields are available. However, the Work orders and System access control tabs are only visible if you have purchased the CMMS add-on.
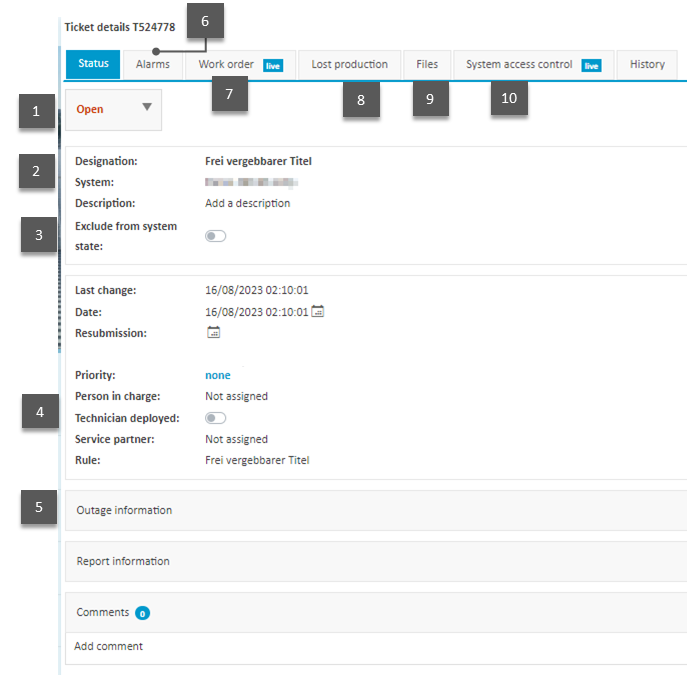
Ticket details portlet
Item | Name | Details |
|---|---|---|
1 | Status tab | Ticket status: open, assigned, in progress, closed |
2 | Designation/System/Description | Basic ticket details |
3 | Exclude from system state toggle | Exclude this ticket from the overall system status |
4 | Ticket assignment |
|
5 | Outage information | Details about the incident: dates, components, etc. |
6 | Alarms tab | Has the ticket been assigned to a specific alarm? |
7 | Work order tab | Manage work orders (CMMS) |
8 | Yield loss | Calculate losses for this outage in kWh and revenue. See Yield loss calculation |
9 | Files | Upload photos or PDFs |
10 | System access control | Manage people currently at your site (CMMS) |
11 | History | Recent actions and relevant people |
Create a ticket from an alarm
A ticket can be created from an individual alarm, or multiple alarms can be grouped into a ticket. Grouping is helpful, for example, if all alarms have the same cause.
Prerequisites
You have set up at least one alarm
Step
On the left-hand side of the Alarms portlet, tick the check box next to the alarms for which you want to create a ticket and select the Ticket icon next to the check box. Alternatively, you can drag and drop an alarm to the Tickets portlet.
In the window that appears, give the ticket a Title. A Description is optional.
The ticket has now been created and is displayed in the Tickets portlet.
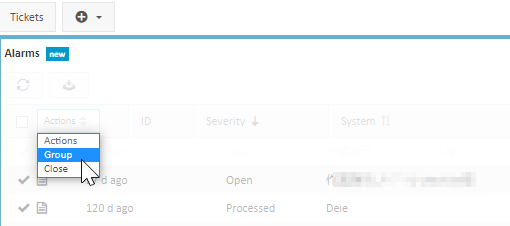
Group alarms into a single ticket
Group alarms into a single ticket to reduce the number of alarms you see.
Prerequisites
You have set up at least one alarm and have at least two active tickets
You have added the Alarms portlet.
Steps
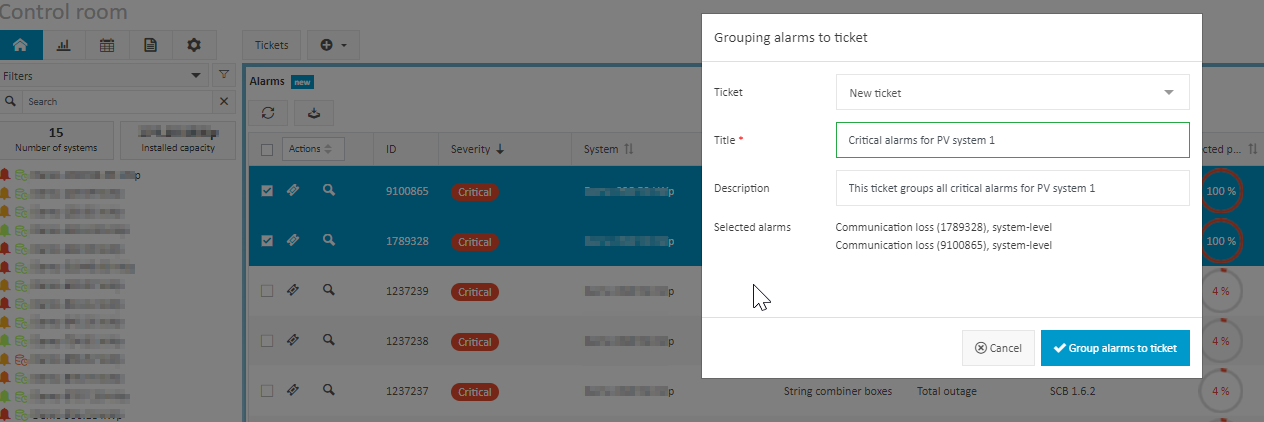
On the left-hand side of the Alarms portlet, tick the check boxes next to the alarms you want to group and select Group from the Actions dropdown. Alternatively, you can drag and drop multiple ticked alarms to the Tickets portlet.
In the window that appears, select the Ticket type and give the ticket a Title. A Description is optional.
Select Group alarms.
The ticket has now been created and is displayed in the Tickets portlet.
Group alarms into a single ticket
Group alarms into a single ticket