CMMS
Last modified:
CMMS product description
For companies with growing investments and portfolios, it is increasingly important to have fast access to information. VCOM CMMS (Computerized Maintenance Management System) is a VCOM license add-on for managing Operations & Maintenance (O&M) processes, such as system inspection, maintenance, and repair. VCOM CMMS is fully integrated into VCOM and is specially tailored to the needs of the photovoltaic industry.
Digital work orders shared with service technicians via the O&M app
Fully customizable templates for forms and reports
Master data management to keep your documents (e.g. forms, driving directions, safety instructions) organized
Streamlining of workflows and recurring events
How CMMS works
A ticket is created on the basis of an alarm, or a group of alarms. This will give you a new ticket. You can also create a new ticket by clicking on the Plus icon.
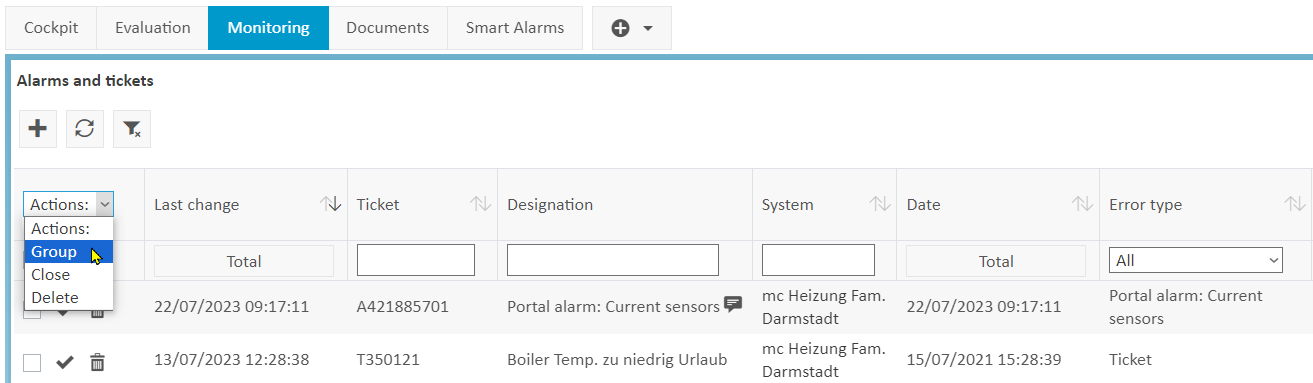
Alarms and tickets portlet
Work orders can later be created from tickets within CMMS. The graphic below shows the process from an alarm to a ticket to a work order and how it gets back to the O&M Manager. Reports can be created from this workflow later on. Reports reflect what is done in the work order, which is why technicians need to complete the relevant forms.
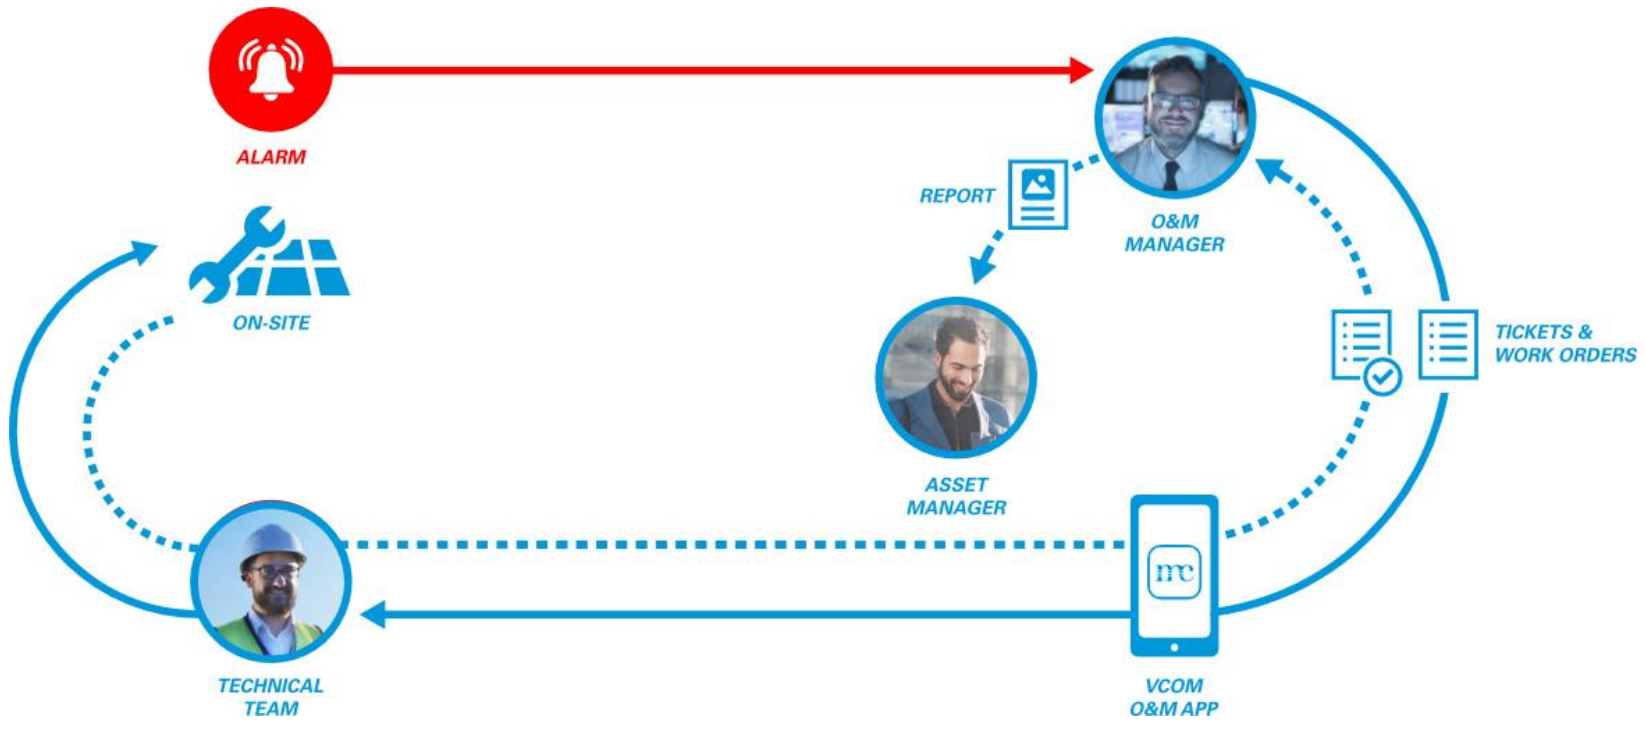
CMMS workflow example
The O&M manager can assign the work order as well as various forms to the technician via VCOM. The work order is sent to the technician using the push function of the O&M app. The app informs the technician that there is a new work order. During synchronization, the work order, along with the respective forms, is transferred from VCOM to a smartphone via the O&M app. Synchronization is also useful if a technician works in an area with poor reception and the data therefore need to be compared.
Several work orders can also be created from one ticket, e.g. when a system is being converted, and this requires several separate service assignments. In this case, the ticket should remain assigned to the O&M manager in VCOM and not the technician. The technician receives the work order and completes it, and the O&M manager is immediately informed in VCOM. When the forms and work order are completed, the data is synchronized between the O&M app and VCOM. Based on the finished work order, the O&M manager can create a CMMS report for customer invoicing and close the ticket when all tasks are complete.
You can think of the ticket as a folder for the related work orders and a summary of information. It is also possible to upload relevant images and PDFs (e.g. plans) to the ticket.
Activate CMMS
Partners and customers can activate CMMS independently. To do so, open the portfolio administration by clicking on the House icon and then the Gear icon.

Portfolio administration menu
In the window that appears, go to Administration in the top bar, then select CMMS from the sidebar.
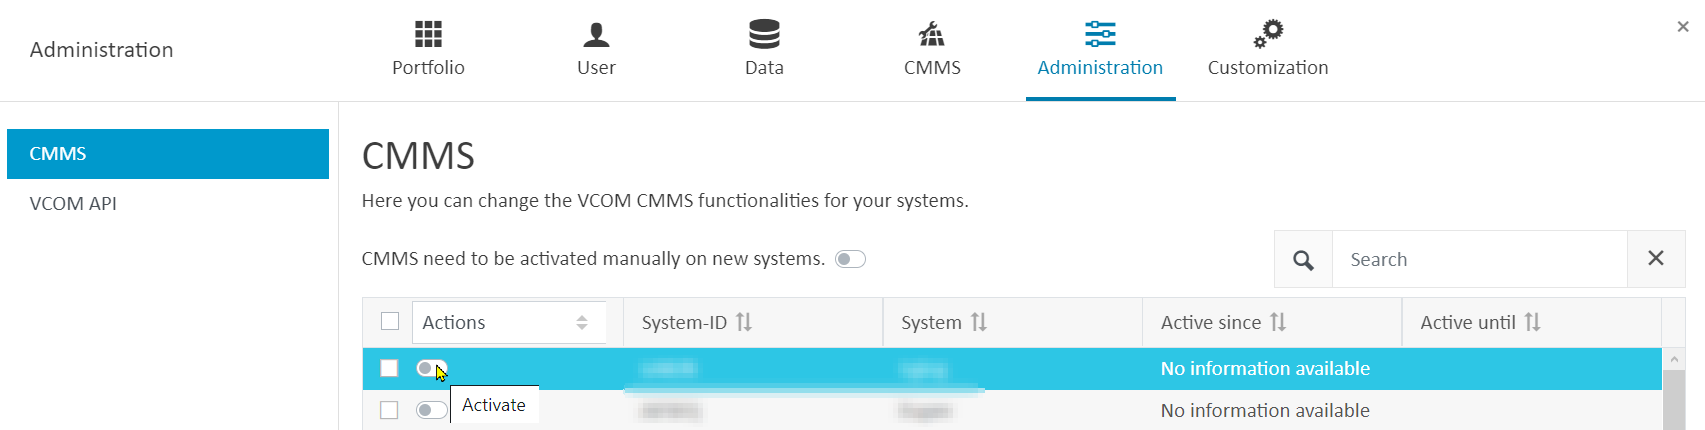
CMMS in Administration
CMMS is a paid feature. This information is displayed to partners as a button. The fee is payable along with the VCOM fees in your quarterly statement.

Activate paid CMMS features
Set up CMMS in VCOM
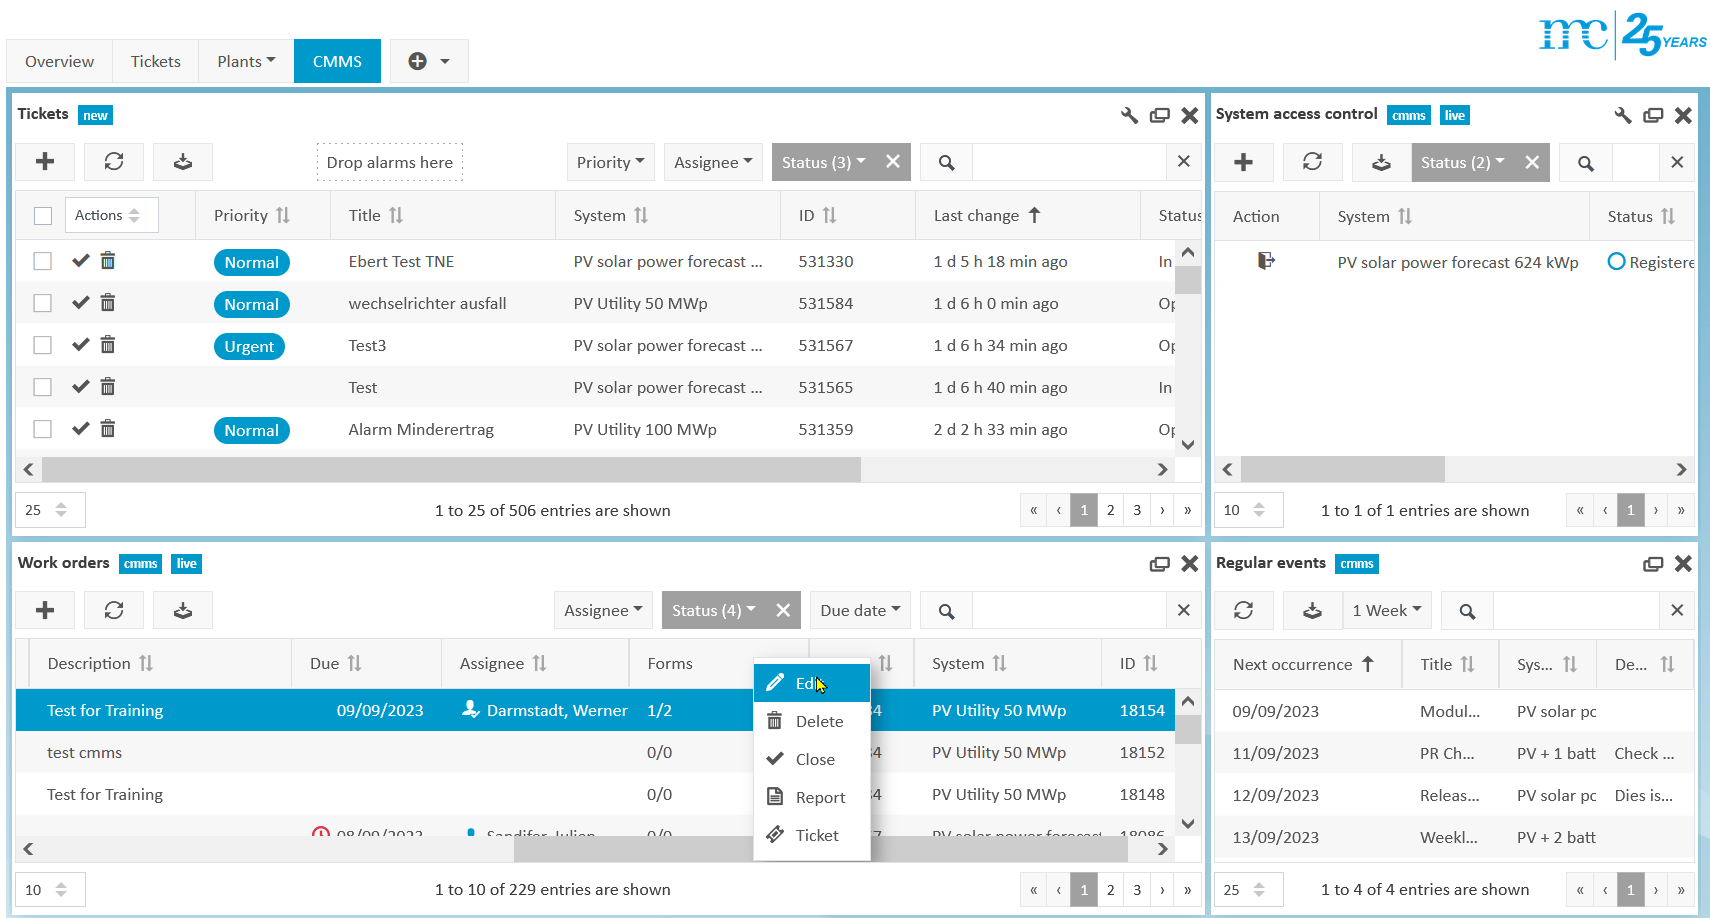
Portlets
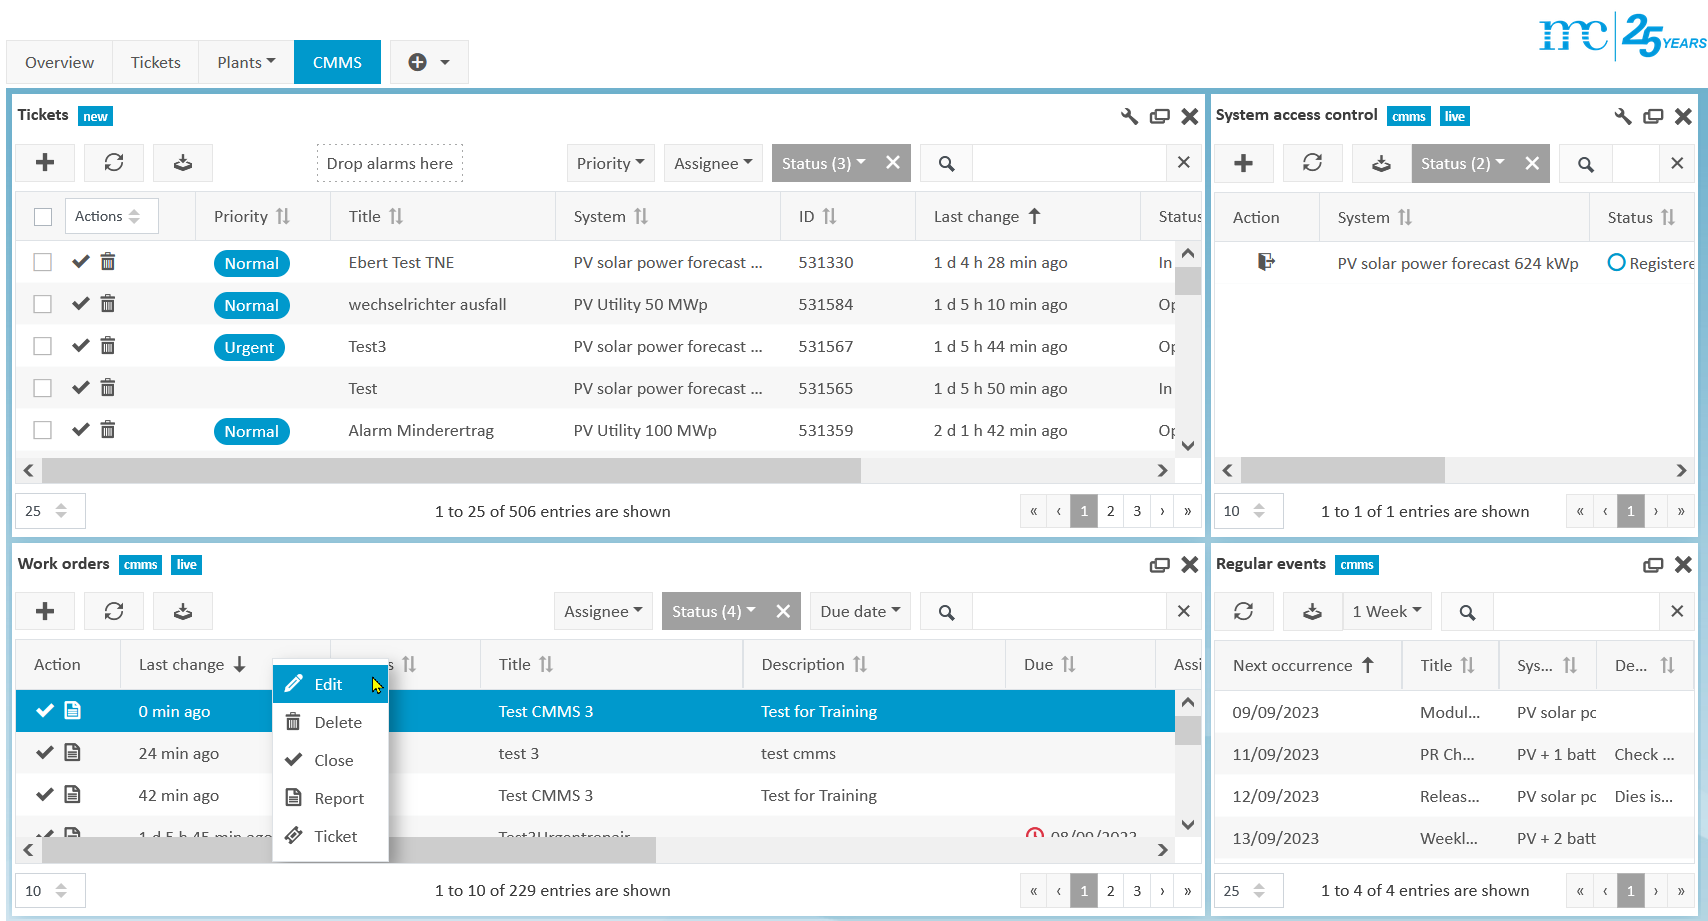
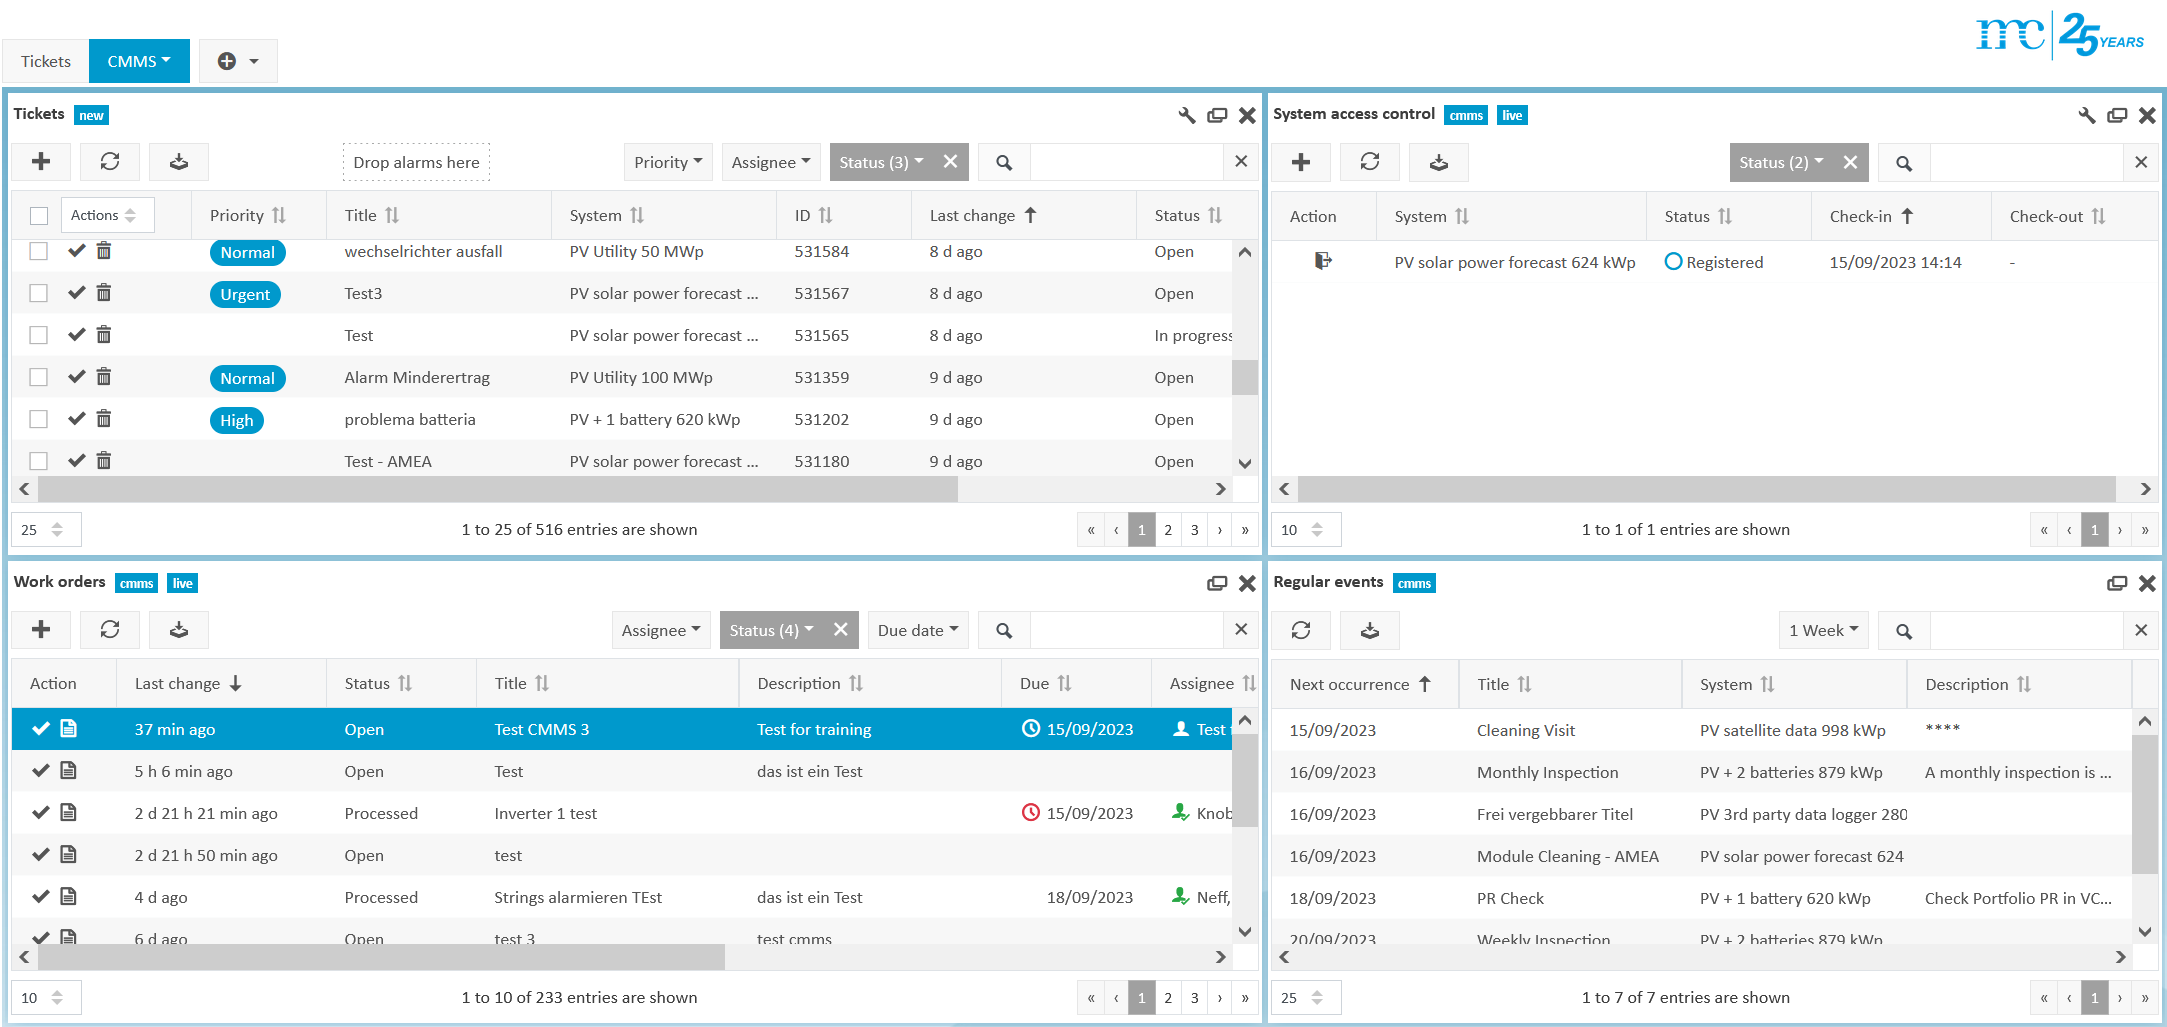
There are four portlets that you can use for CMMS: Tickets, Work orders, Regular events, and System access control.
We recommend creating a new tab in the control room, for example CMMS, as well as a submenu of this tab, for example CMMS work orders.
Organize CMMS information
You can then place the CMMS portlets in this new menu: Tickets, System access control, Work orders and Regular events. The size, placement, and individual configuration of the windows is entirely up to you. The screenshot is just an example.
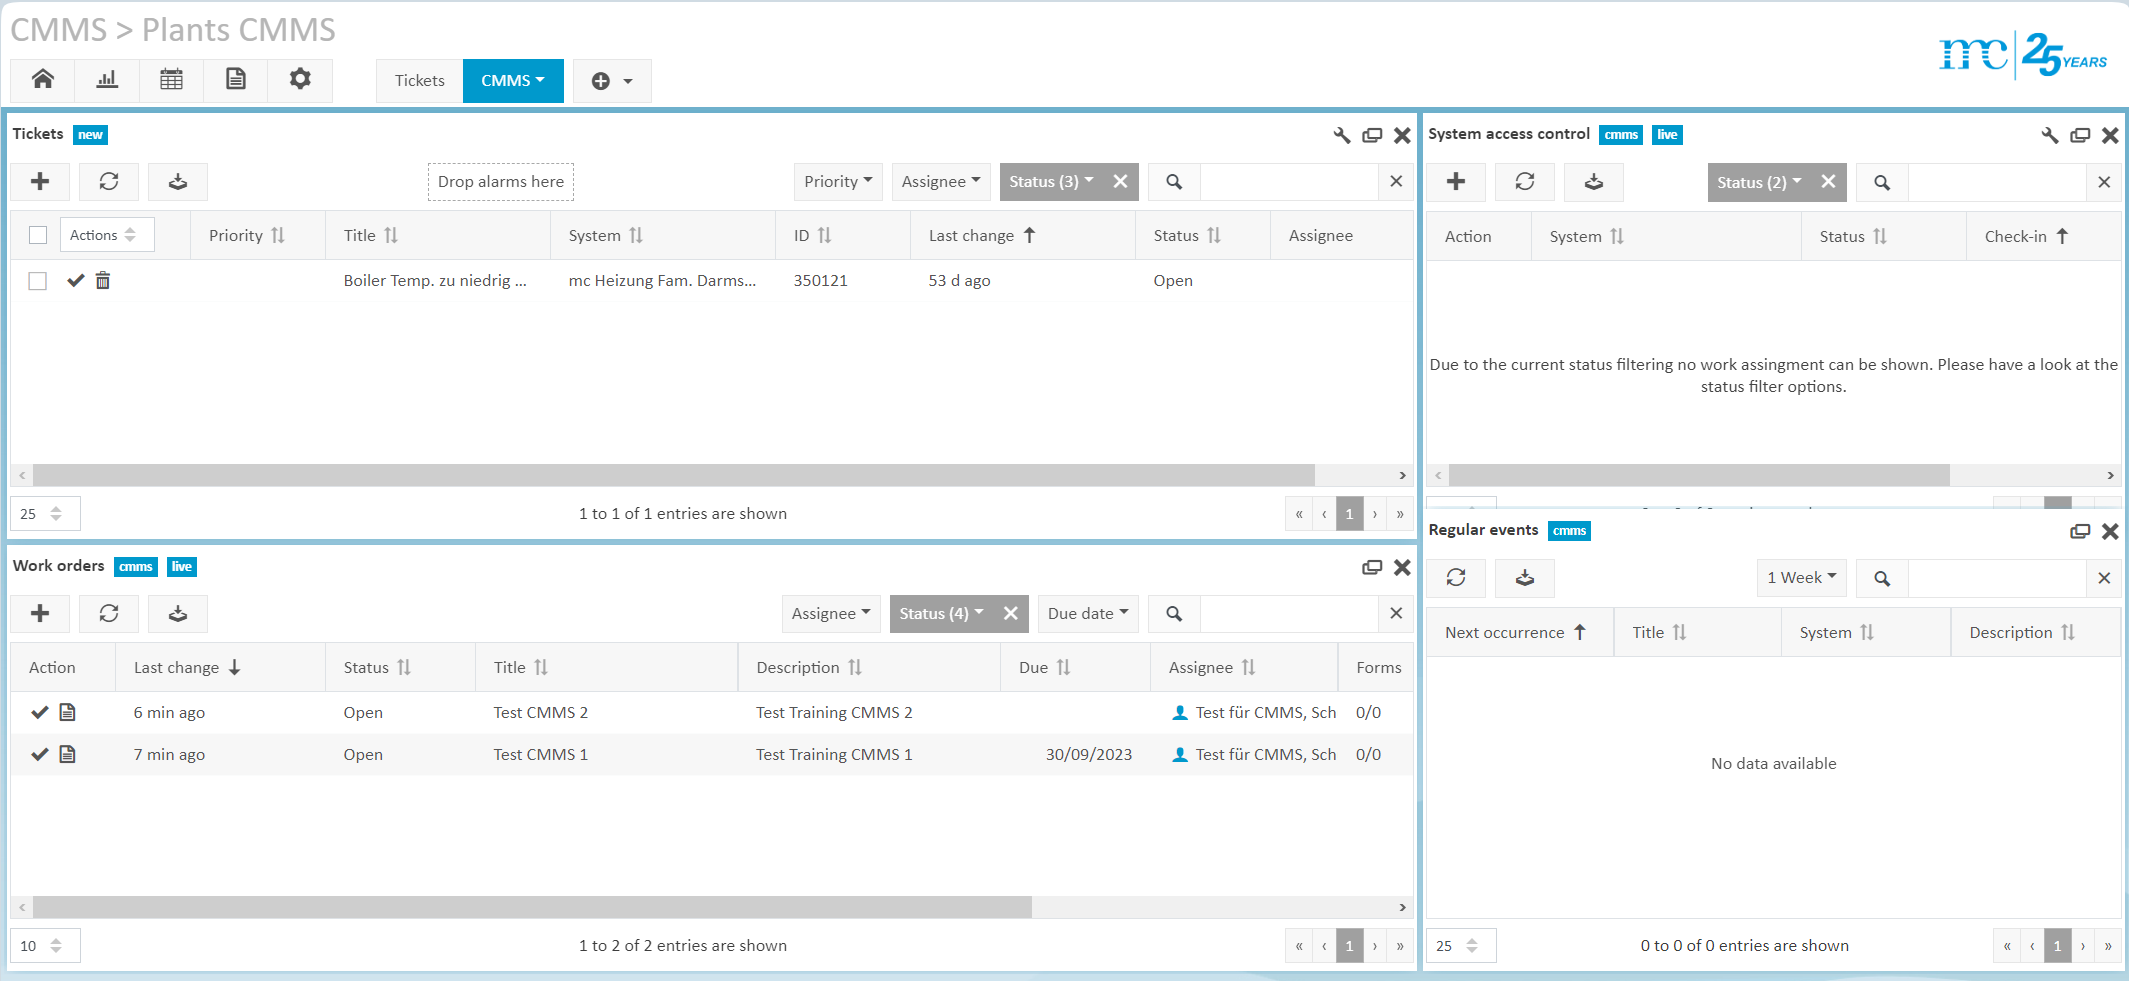
Example of how to configure portlets relevant to CMMS
Users
The next step is to set up the users for CMMS in the Portfolio administration > User > User list. At least two users are required for this:
One user uses CMMS in VCOM, for example, an O&M Manager uses CMMS within VCOM and assigns work orders.
One user uses CMMS in the VCOM O&M app, for example, a technician accesses the O&M app on a smartphone or tablet.
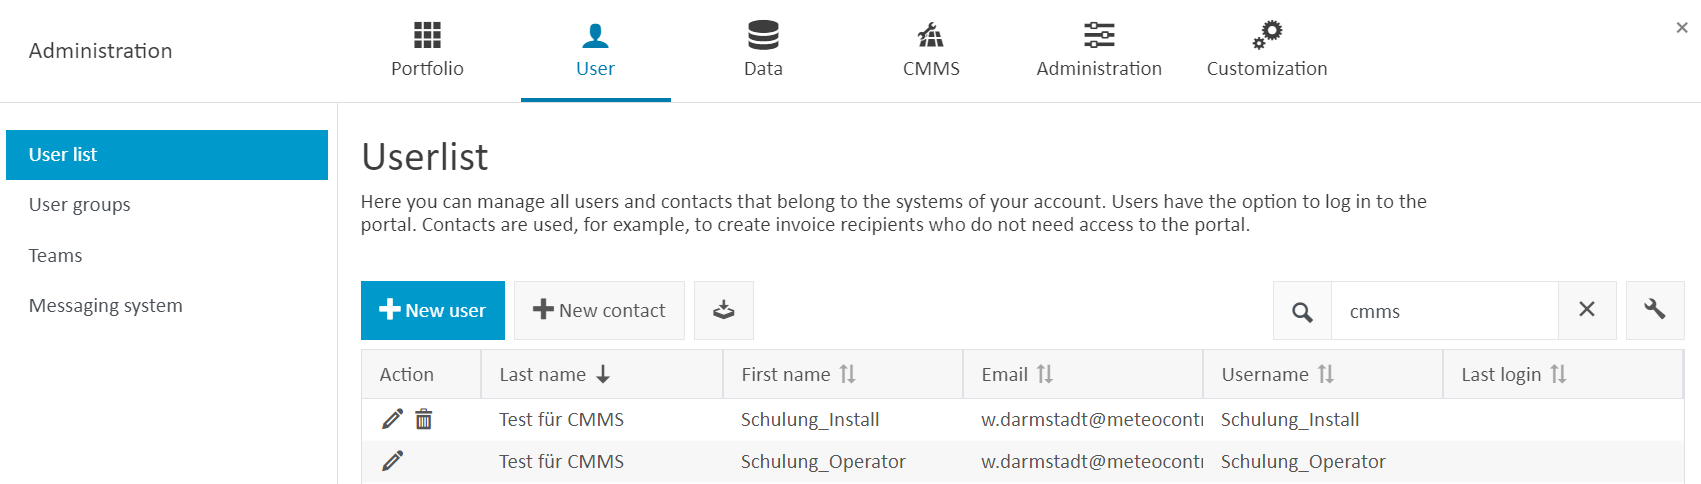
User list
To use an existing user, click on the Pencil icon next to the user's name. To add a new user, click on New user. Under Contact data, ensure that all details are correct. Under User data, ensure that both users have Operations permissions, otherwise, the work orders will not be displayed correctly within CMMS. Under Systems and teams, assign the users to the systems they will be working on.
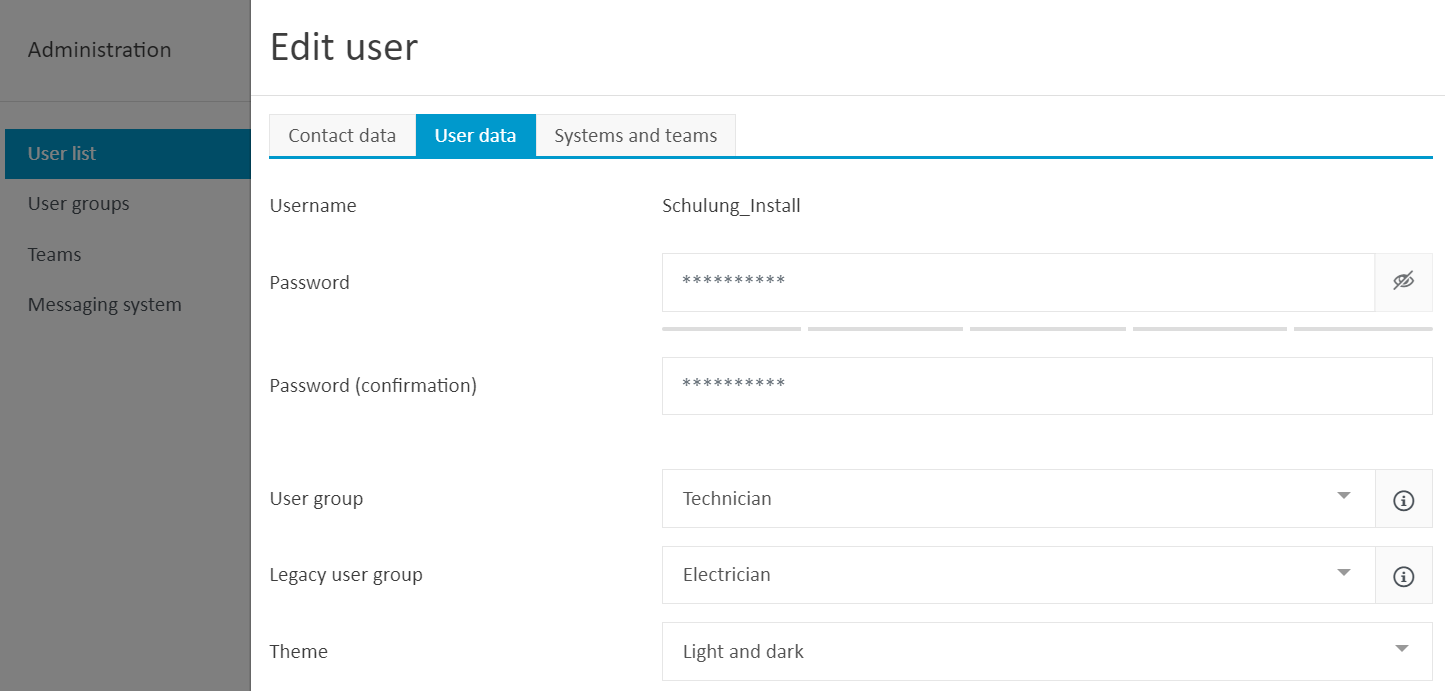
Edit users
App
The O&M app is available for Android (Google Play) and iOS (App Store):
Configure forms/templates
With CMMS, you use forms to manage your workflows. We have provided two default forms to help you get started: maintenance protocol and service report. You can edit these to suit your needs, or add your own templates. In the portfolio administration, click on the CMMS tab > Form templates. Click on the Pencil icon to the left of the form name to open the editor.
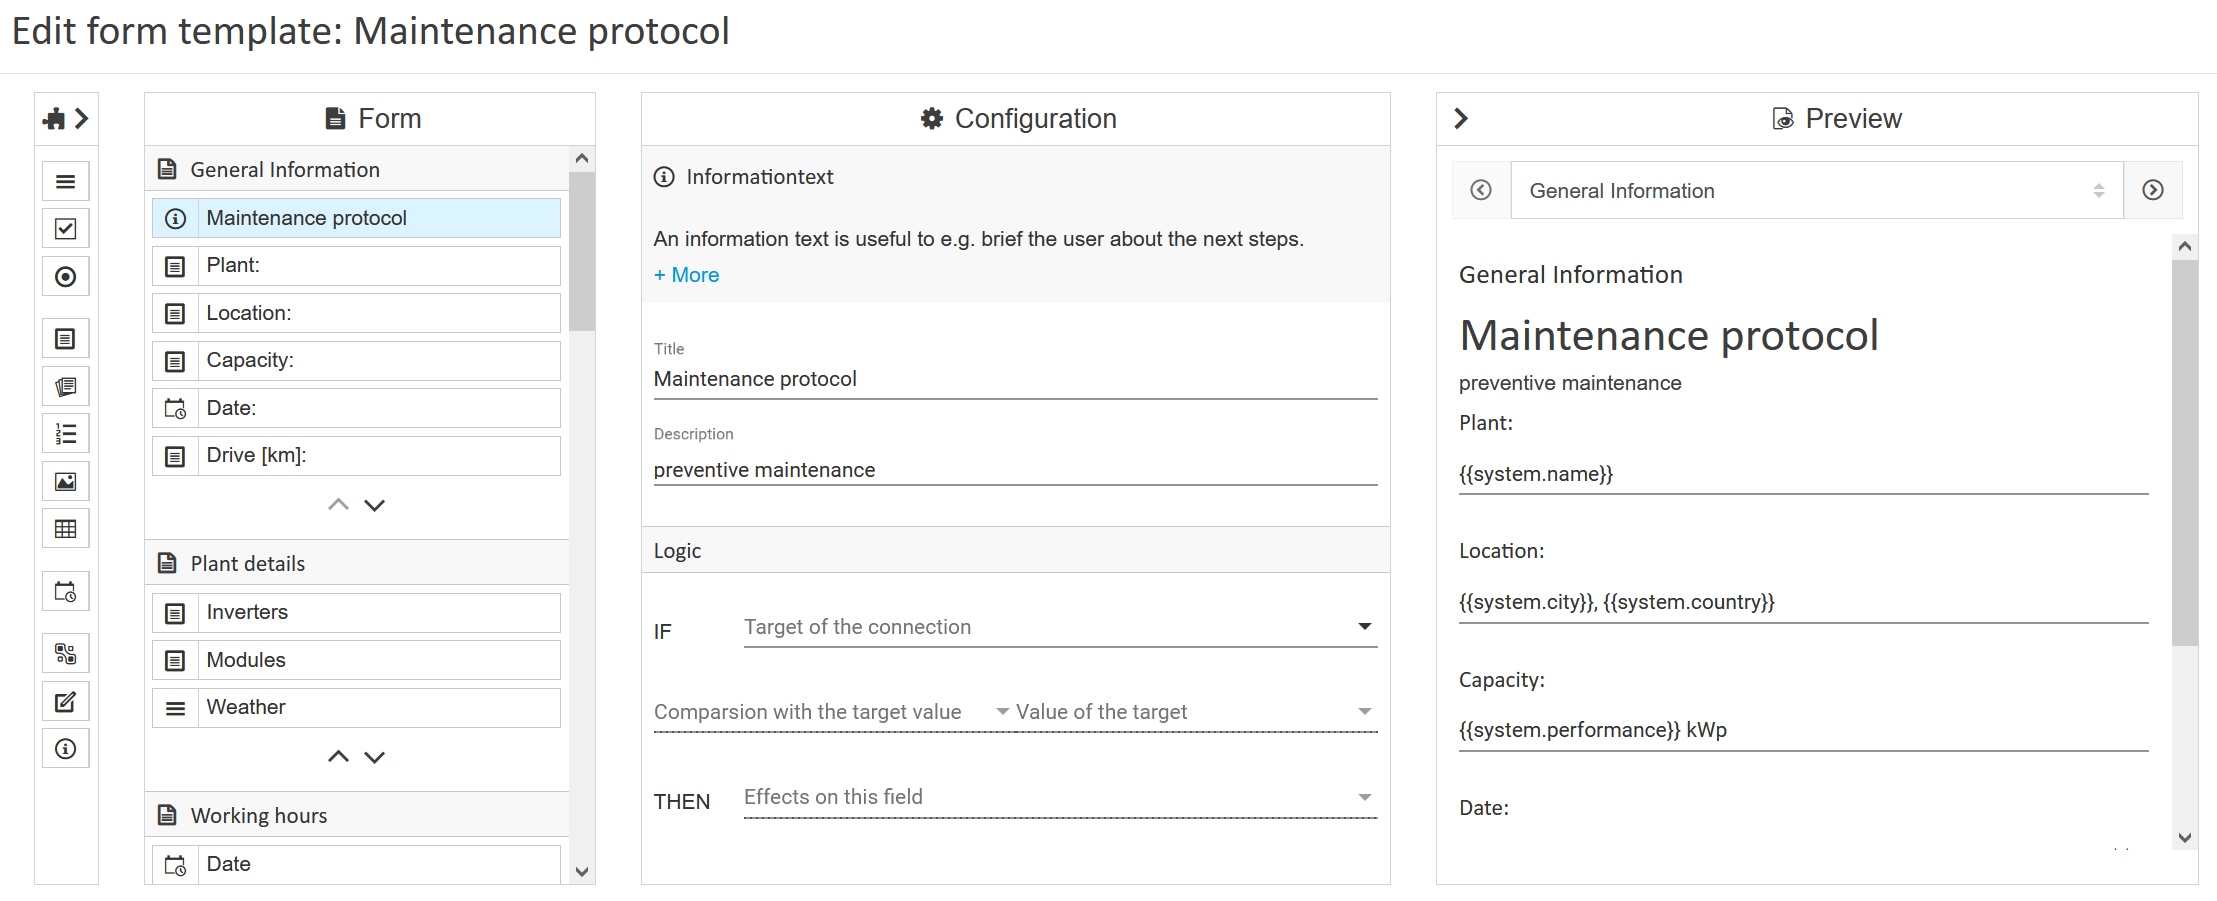
Form template editor: maintenance protocol
We recommend opening the Components area on the left first. For this, click on the arrow at the top left. This displays the elements that can be used in the template, e.g. image elements for photos, signature field, text area, selection fields, etc.
Here, we recommend testing the various elements to create a form that suits your needs:
You can build the form using drag and drop, and specify mandatory fields. These must be filled out later by the technician.
If desired, you can define a process using a checklist. This can be used e.g. to define a list of the components a technician needs to check, or tasks they need to perform.
The image elements for photos allow the technician to take photos on site, e.g. the type plate containing the serial number of the inverter being replaced. These images are then automatically assigned to the work order and transferred when completed.
You can create any number of templates to suit different scenarios.
When creating a new template, always click on Save as and give the template a new name.
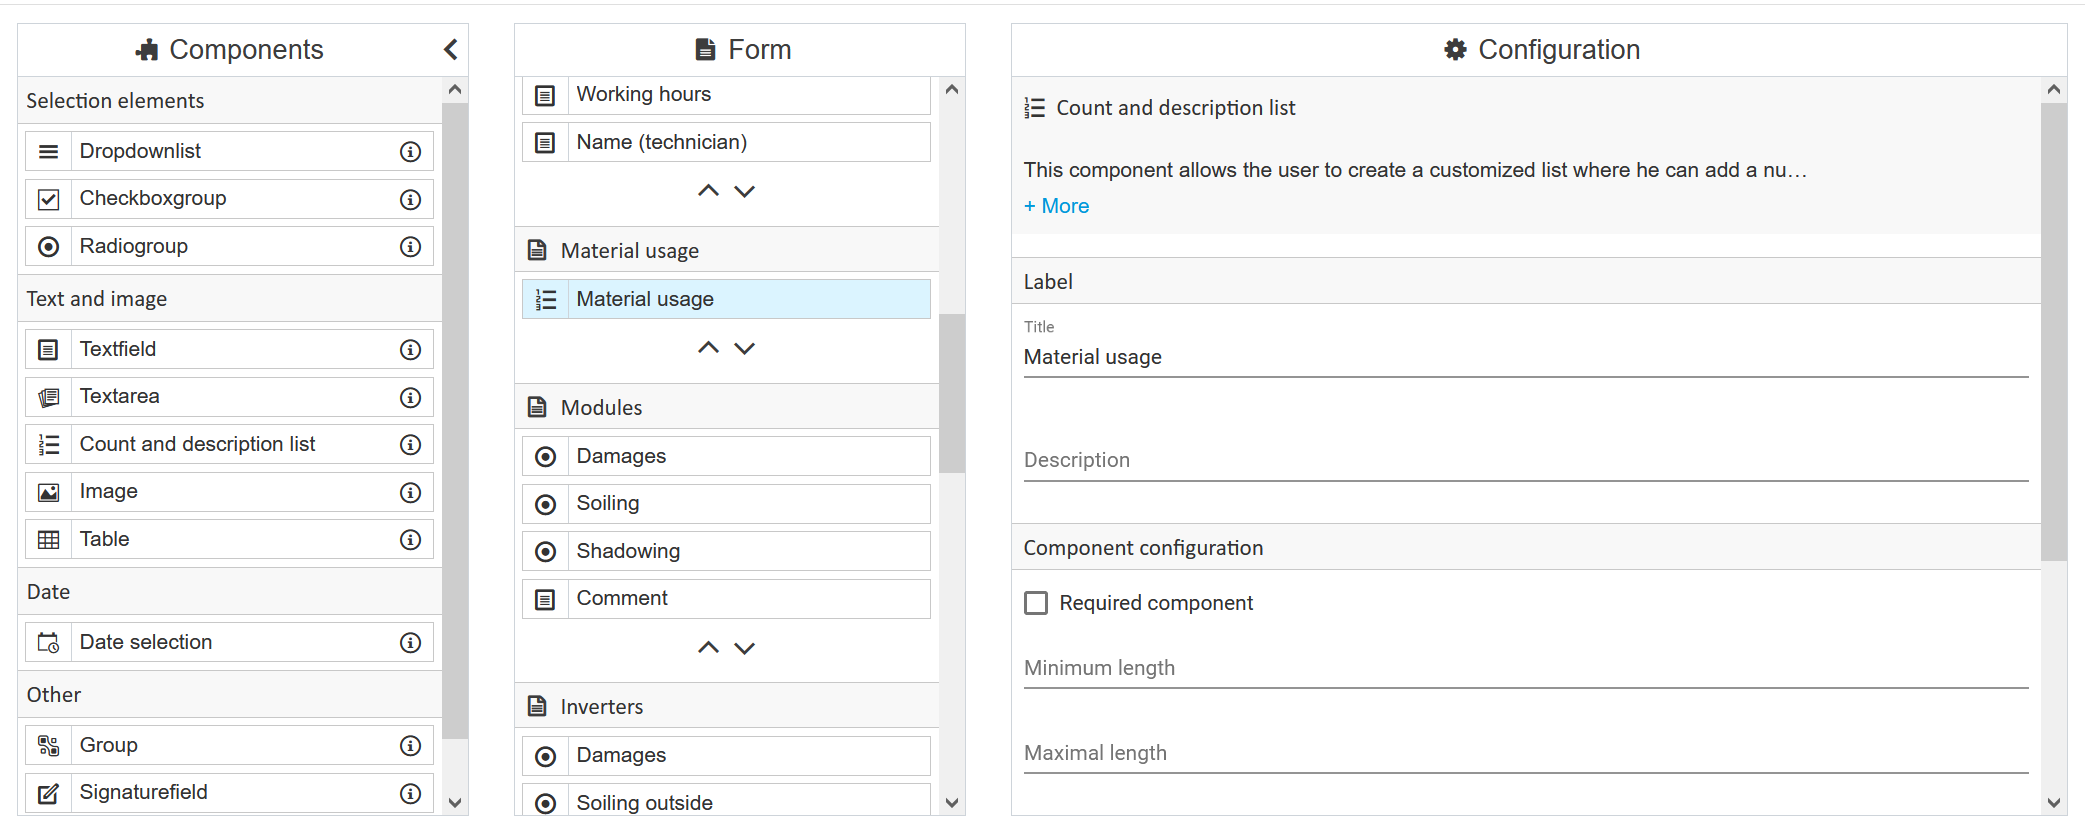
Form template editor: components
Create a work order from a ticket
There are several ways to create a work order.
Within the Tickets portlet, right-click on the ticket > Create new work order.
Within the Work orders portlet, click on the Plus icon.
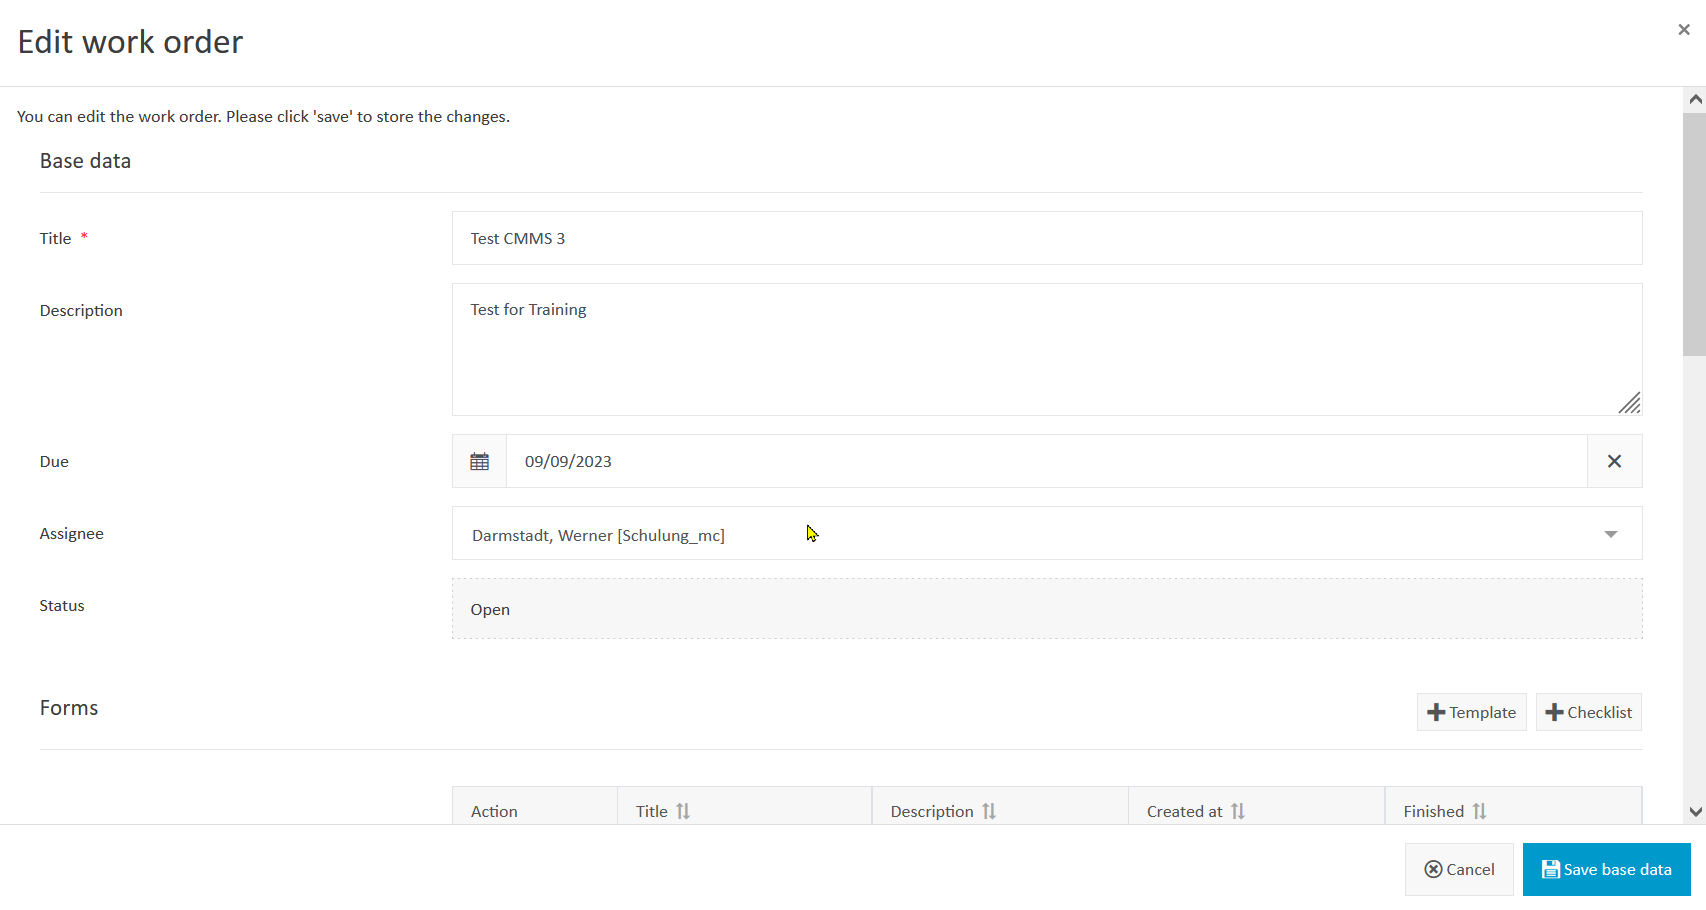
Give the new work order a title and assign the due date and assignee (e.g. O&M manager). The next step is to assign the forms for this work order. Select Template if you wish to include one of your standard forms. To edit a template, see Configure forms/templates. If you wish to add a one-time checklist just for this work order, select Checklist.
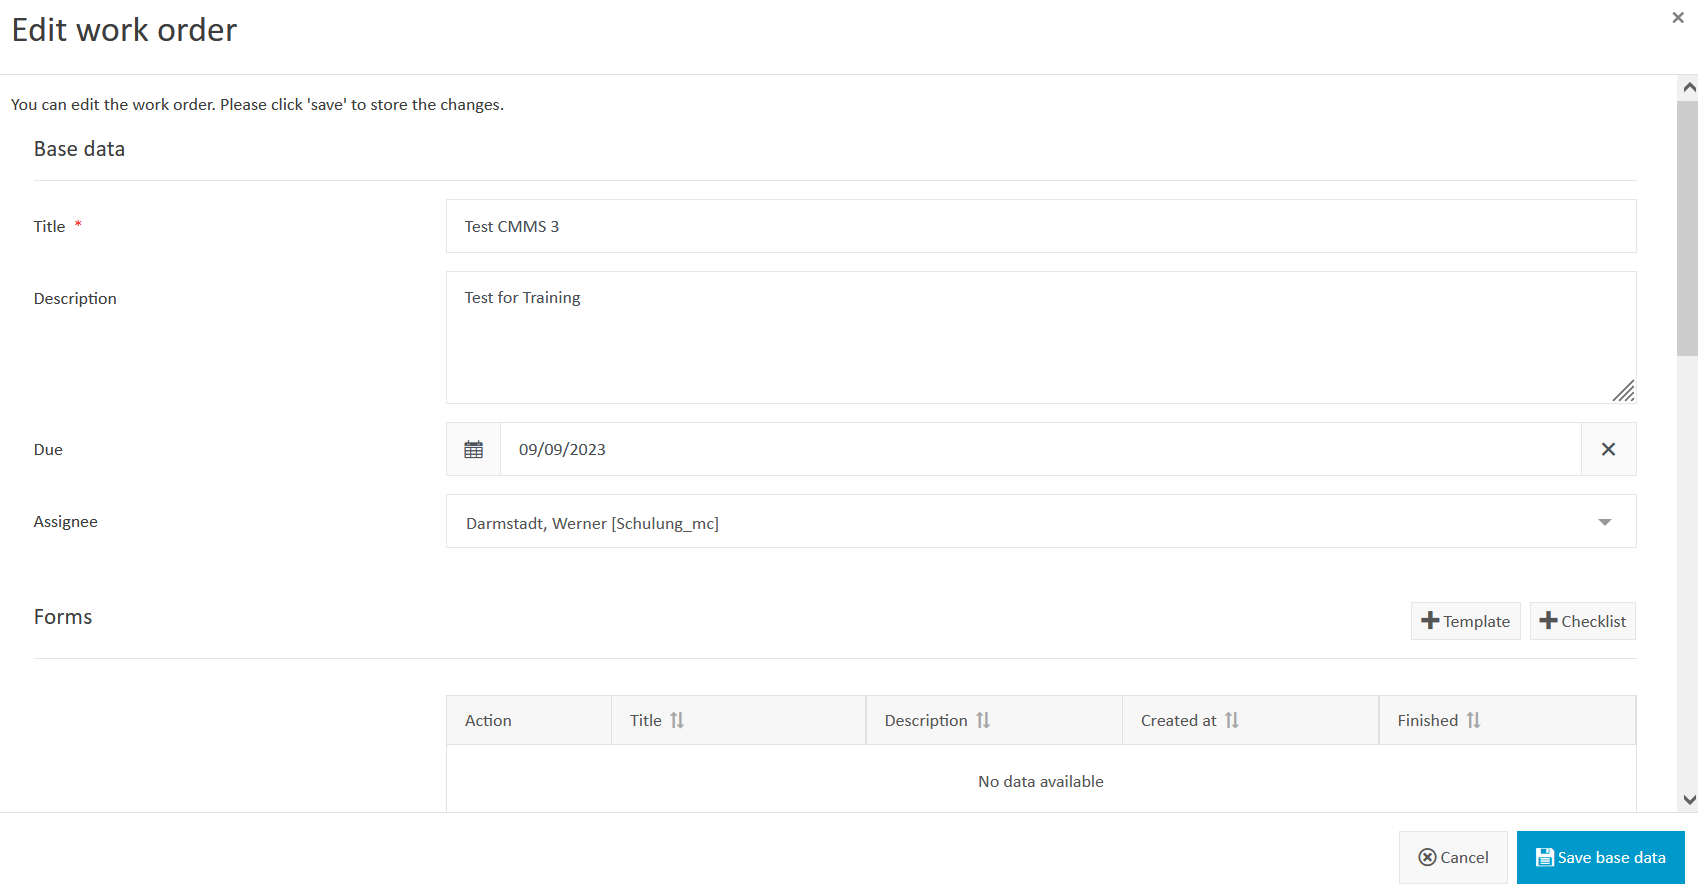
Edit work order
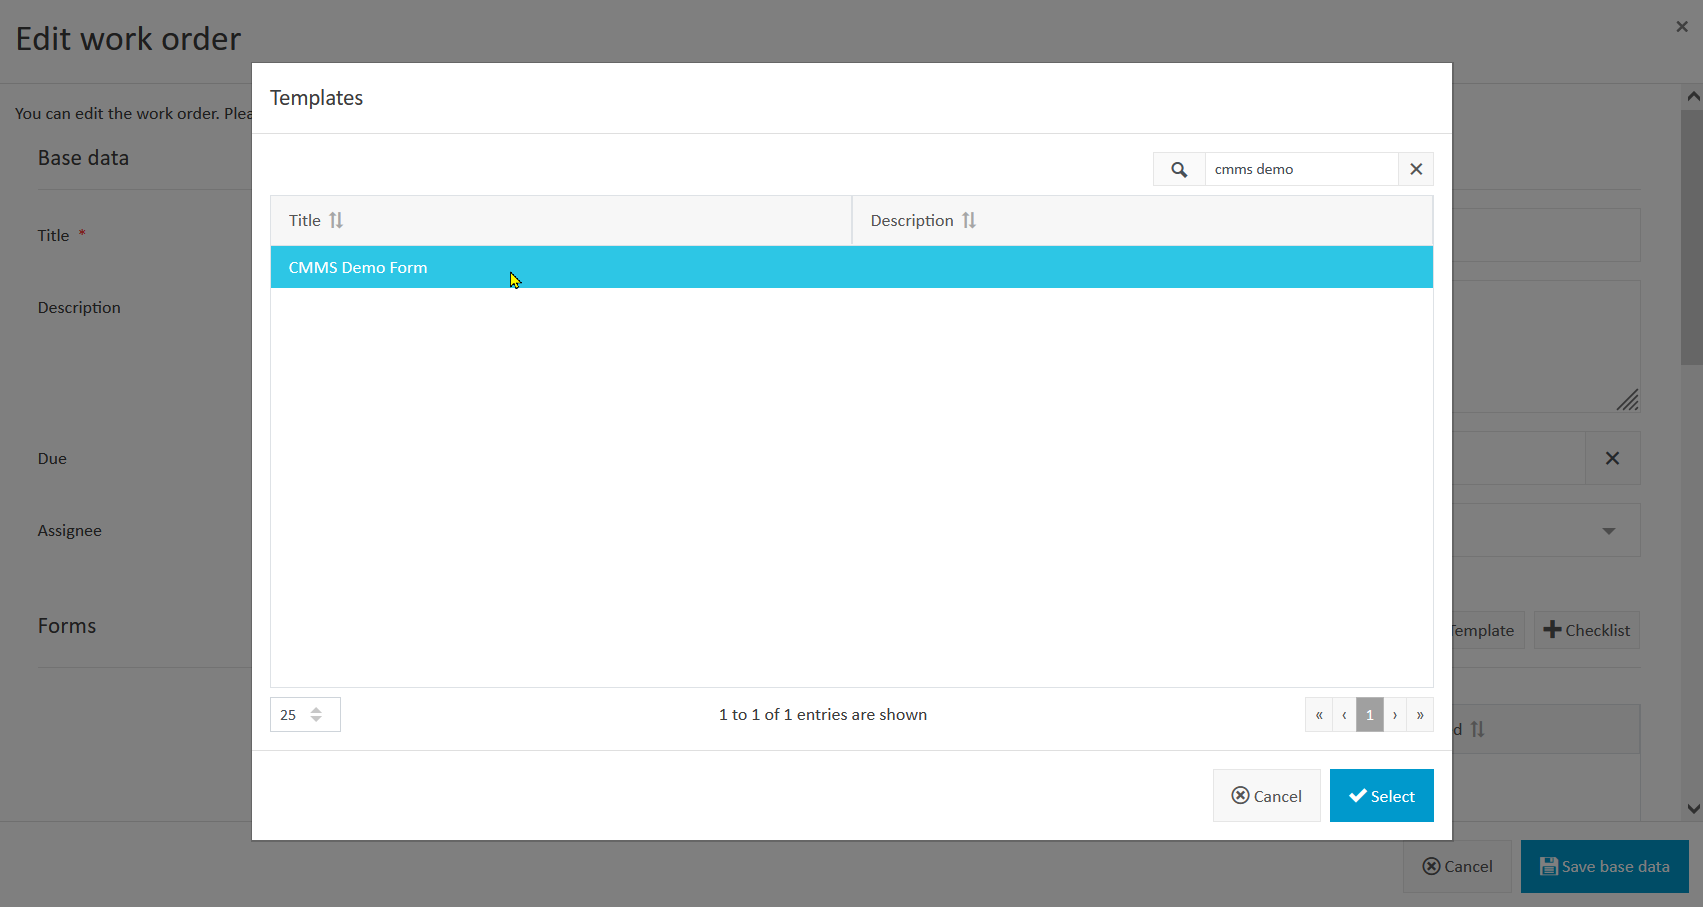
Select template
Here is an example of a checklist. If system maintenance is carried out by external companies, it is especially useful to have a checklist in addition to the maintenance protocol. This helps you to define important work processes and safety instructions to read before work begins. The technician can then go through and check off the individual items.
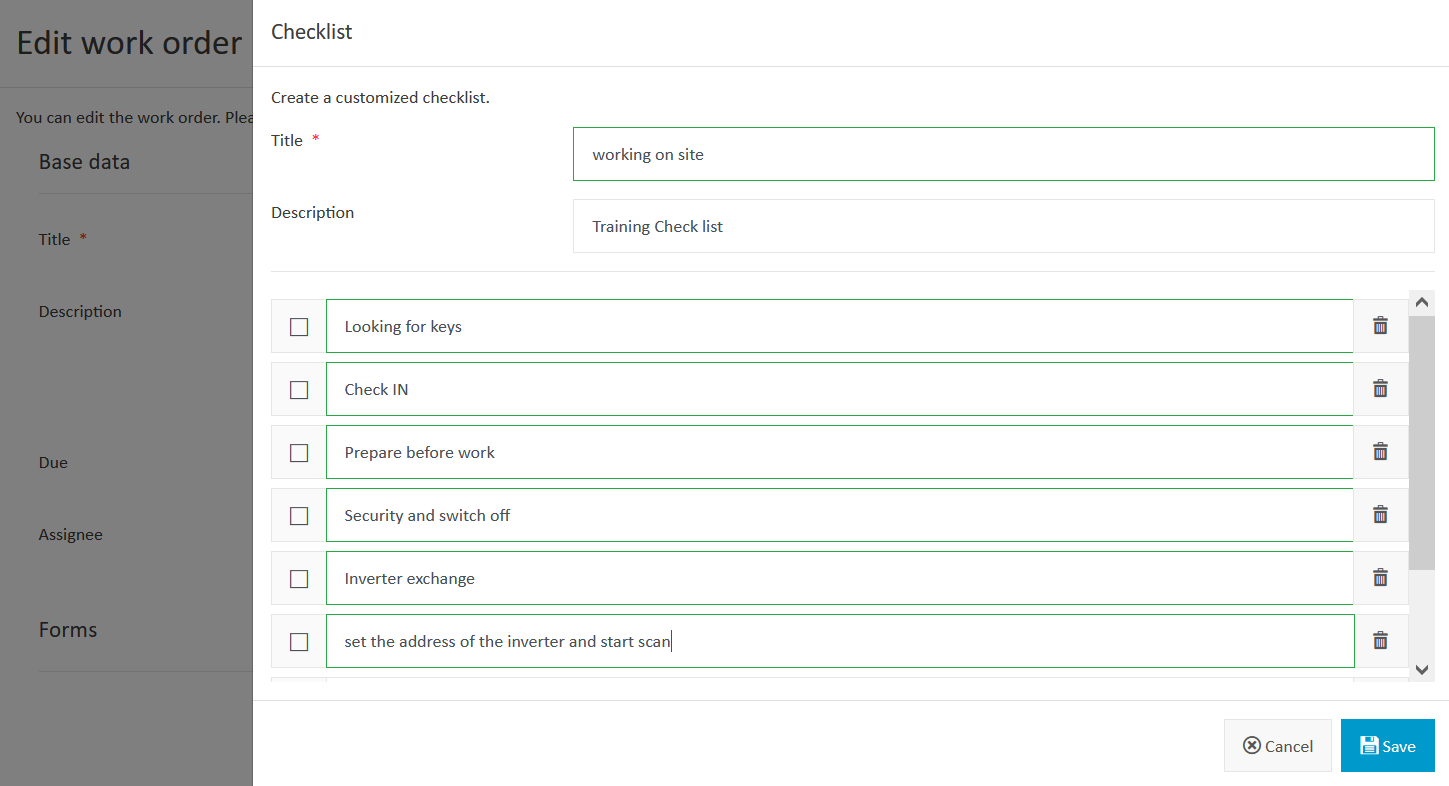
Checklist example
Assign a work order to a technician
When you are ready to assign a work order to a technician, go to the Work orders portlet, right-click on the work order, and select Edit.
Edit a work order to assign it
Enter the technician as the assignee. The due date should of course be in the future, so the technician can independently plan multiple orders. The work order is transferred to the smartphone or tablet of the technician via the push function of the O&M app.
Edit work order details
Technician carries out the work order
The data is transferred to the smartphone or tablet of the technician via the O&M app. You can also manually perform synchronization at any time. This is useful if the technician is working in an area with poor reception.
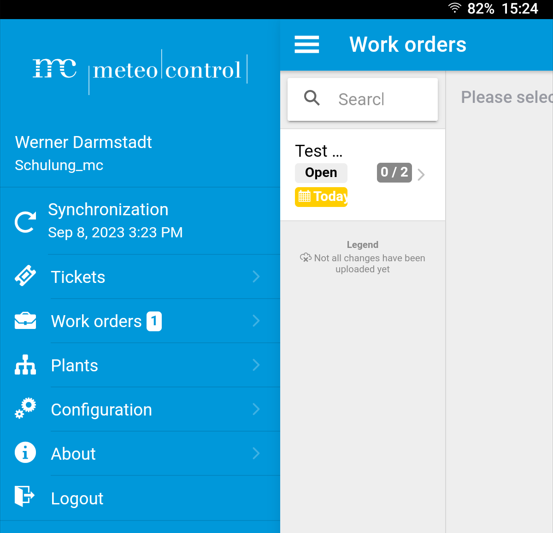
O&M app: Technician’s overview
“0/2” means there are two forms attached to the work order and neither has been completed yet. The technician accepts the work order by clicking on Accept. It is also possible to reject the work order. If a work order is rejected, a comment field pops up, and the technician must provide a reason. Once the technician clicks on Accept or Reject, the O&M manager is informed in VCOM. This ensures the flow of communication.
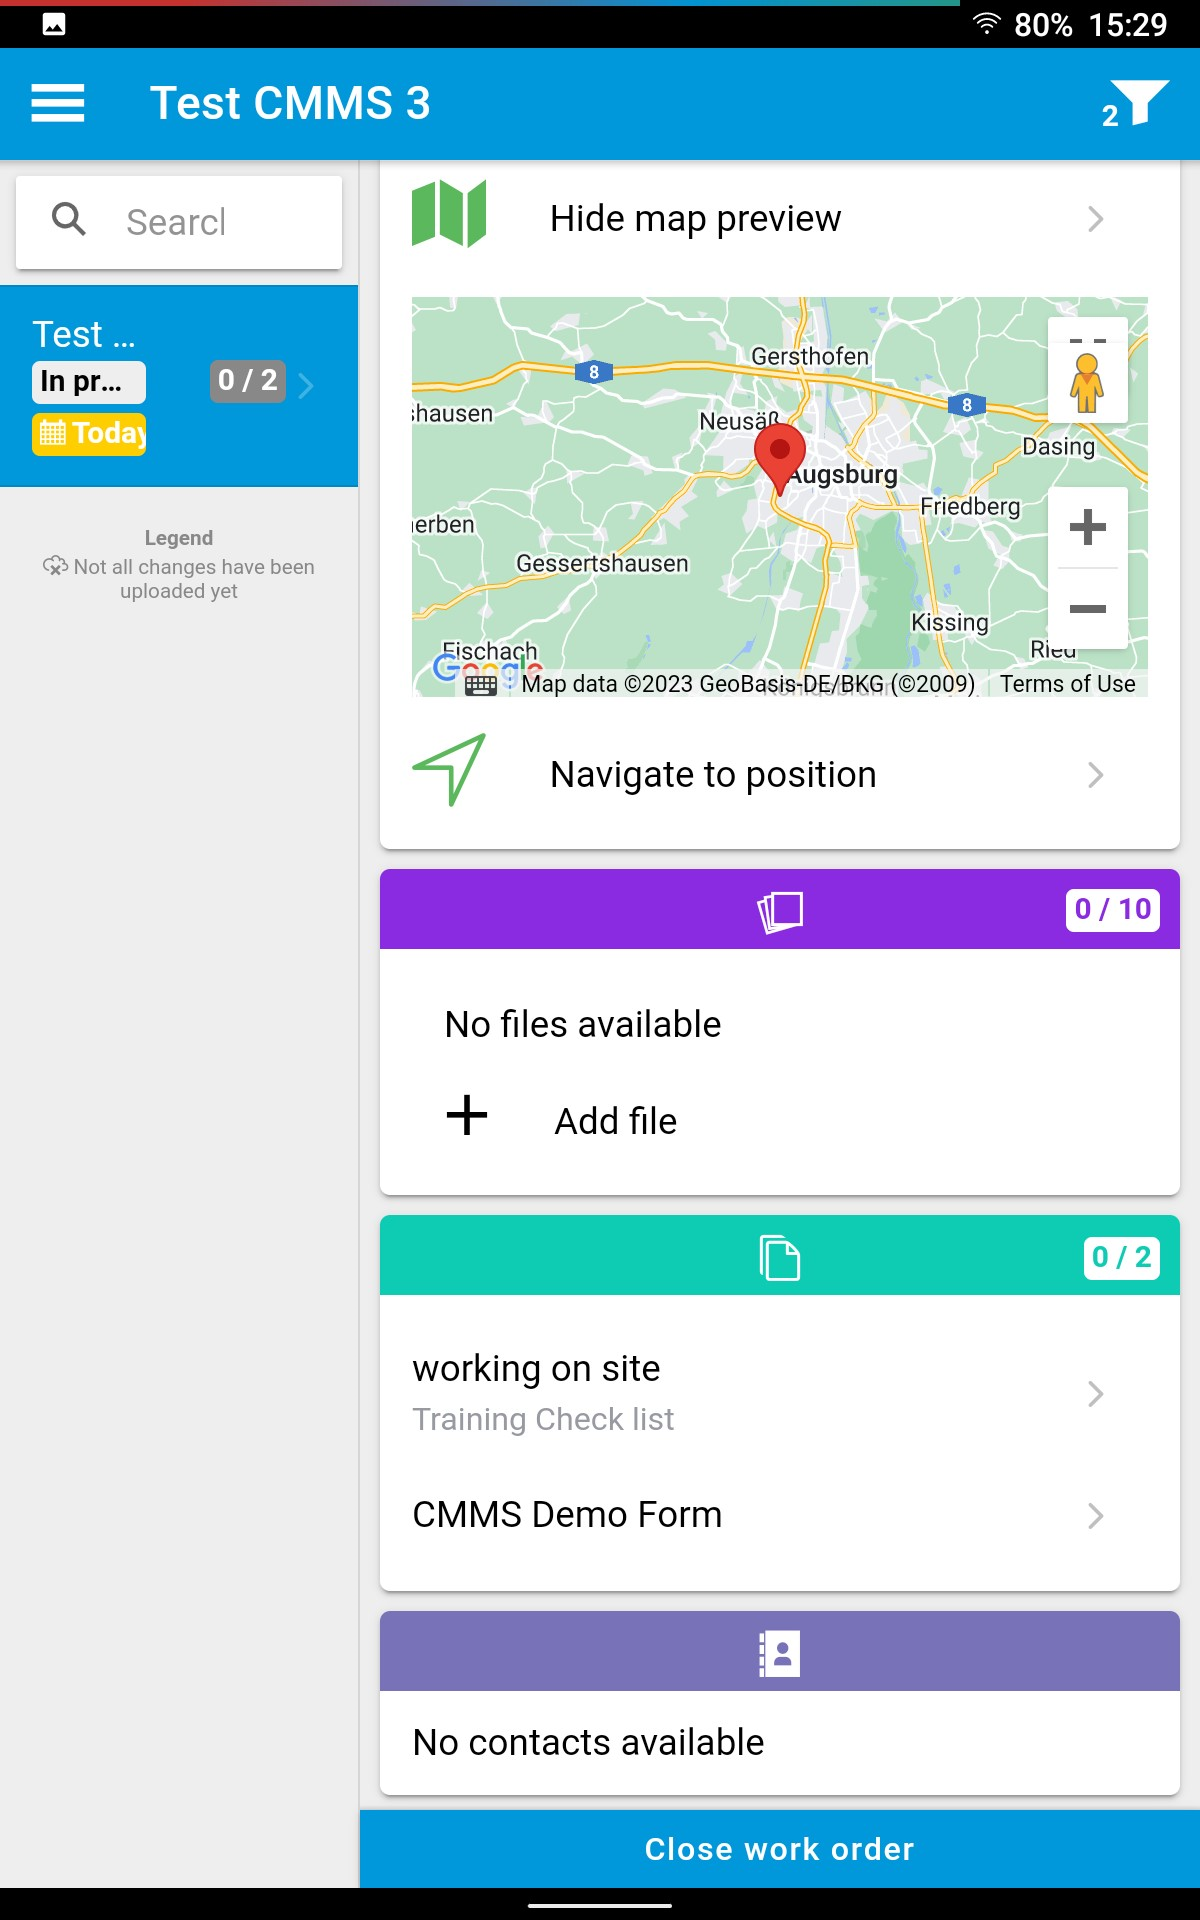
From within the app, the technician can display a Google Maps image or navigate to the destination address. In the green area, the technician will find the maintenance protocol as well as an activities checklist. This helps to keep track of everything on site.
O&M app: work order details
Technician edits the maintenance protocol
The maintenance protocol can now be filled out. It consists of several pages. Here are some examples:
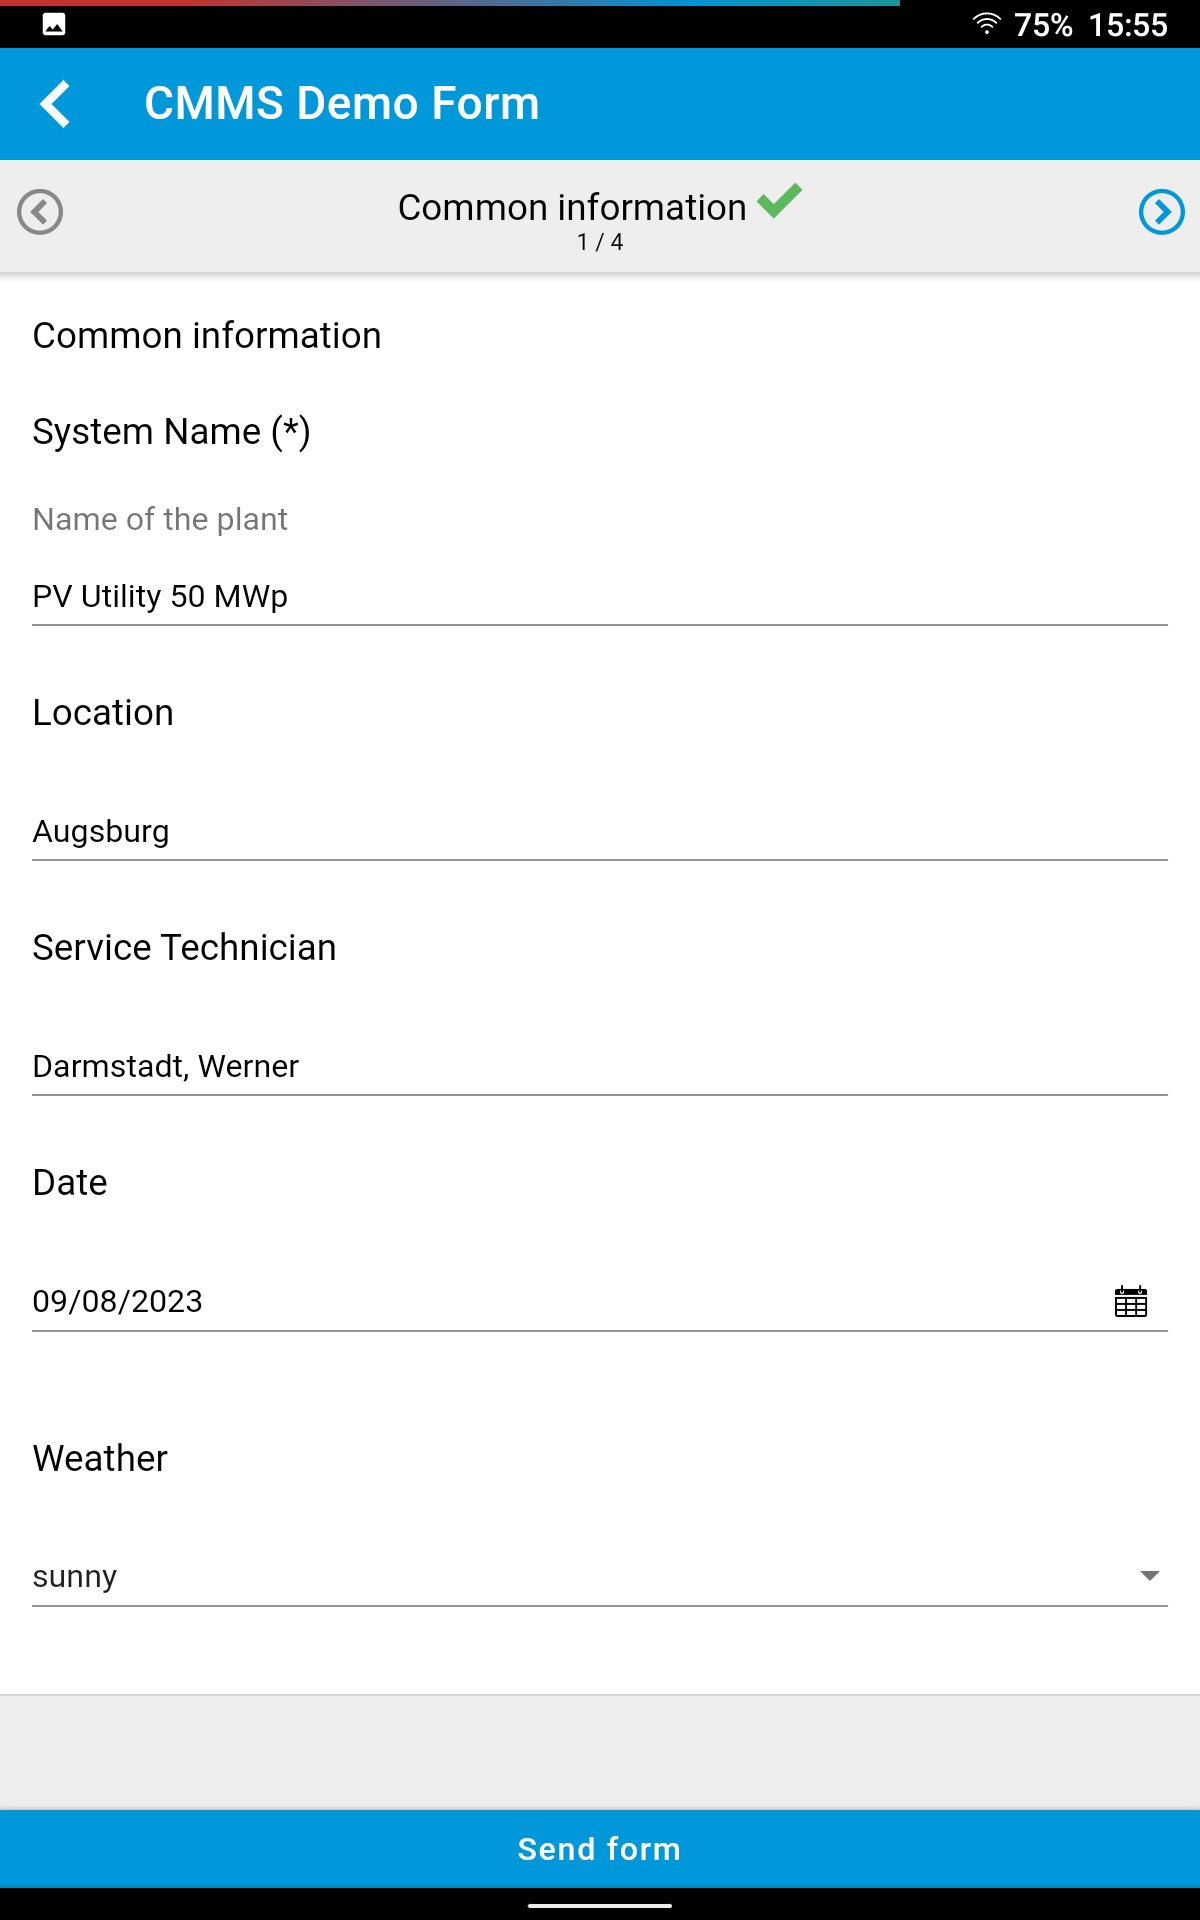
O&M app: form
On this page, the technician only has to select one of several options, which saves time.
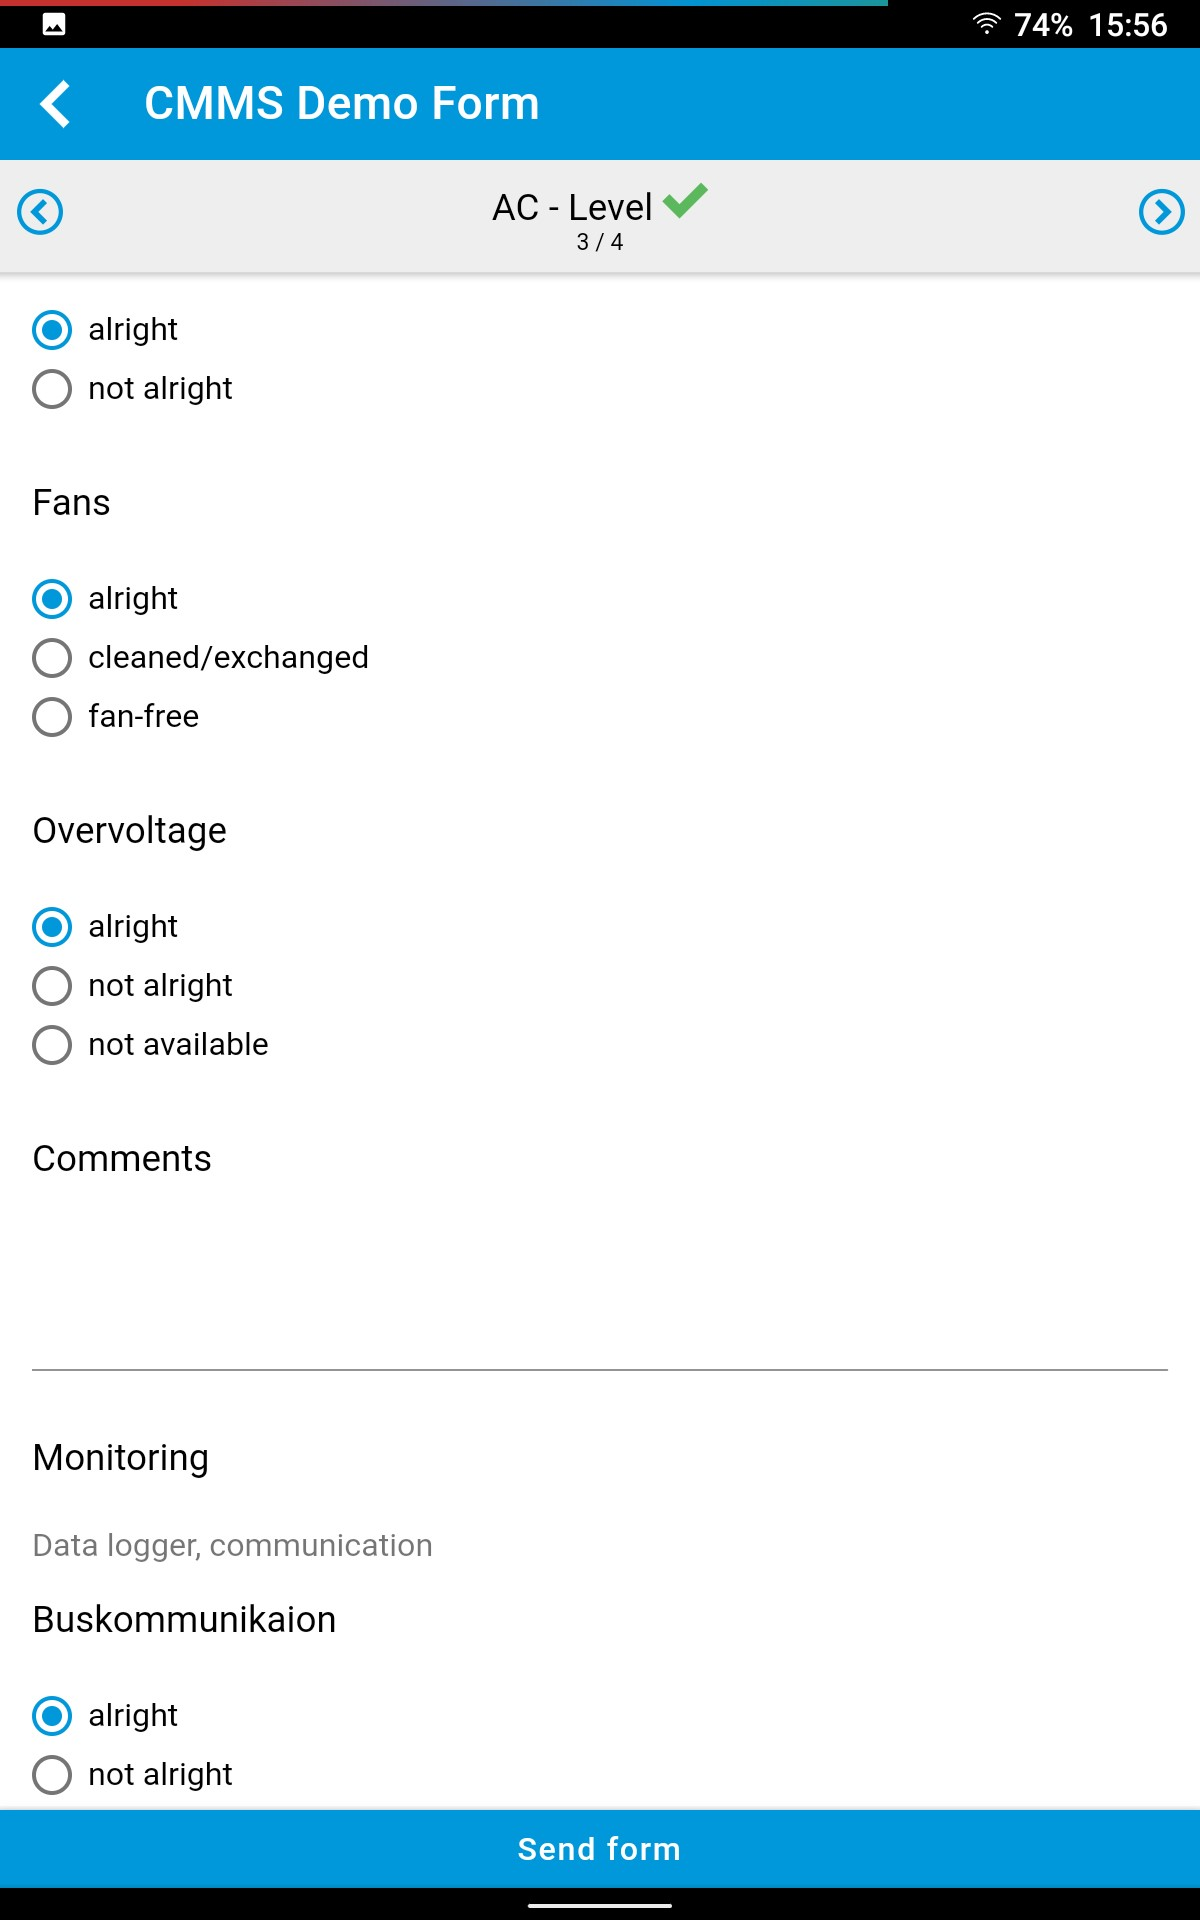
O&M app: form
The last page shows a signature field for the service technician, thus documenting the service assignment. The technician clicks on Send form to complete the maintenance protocol.
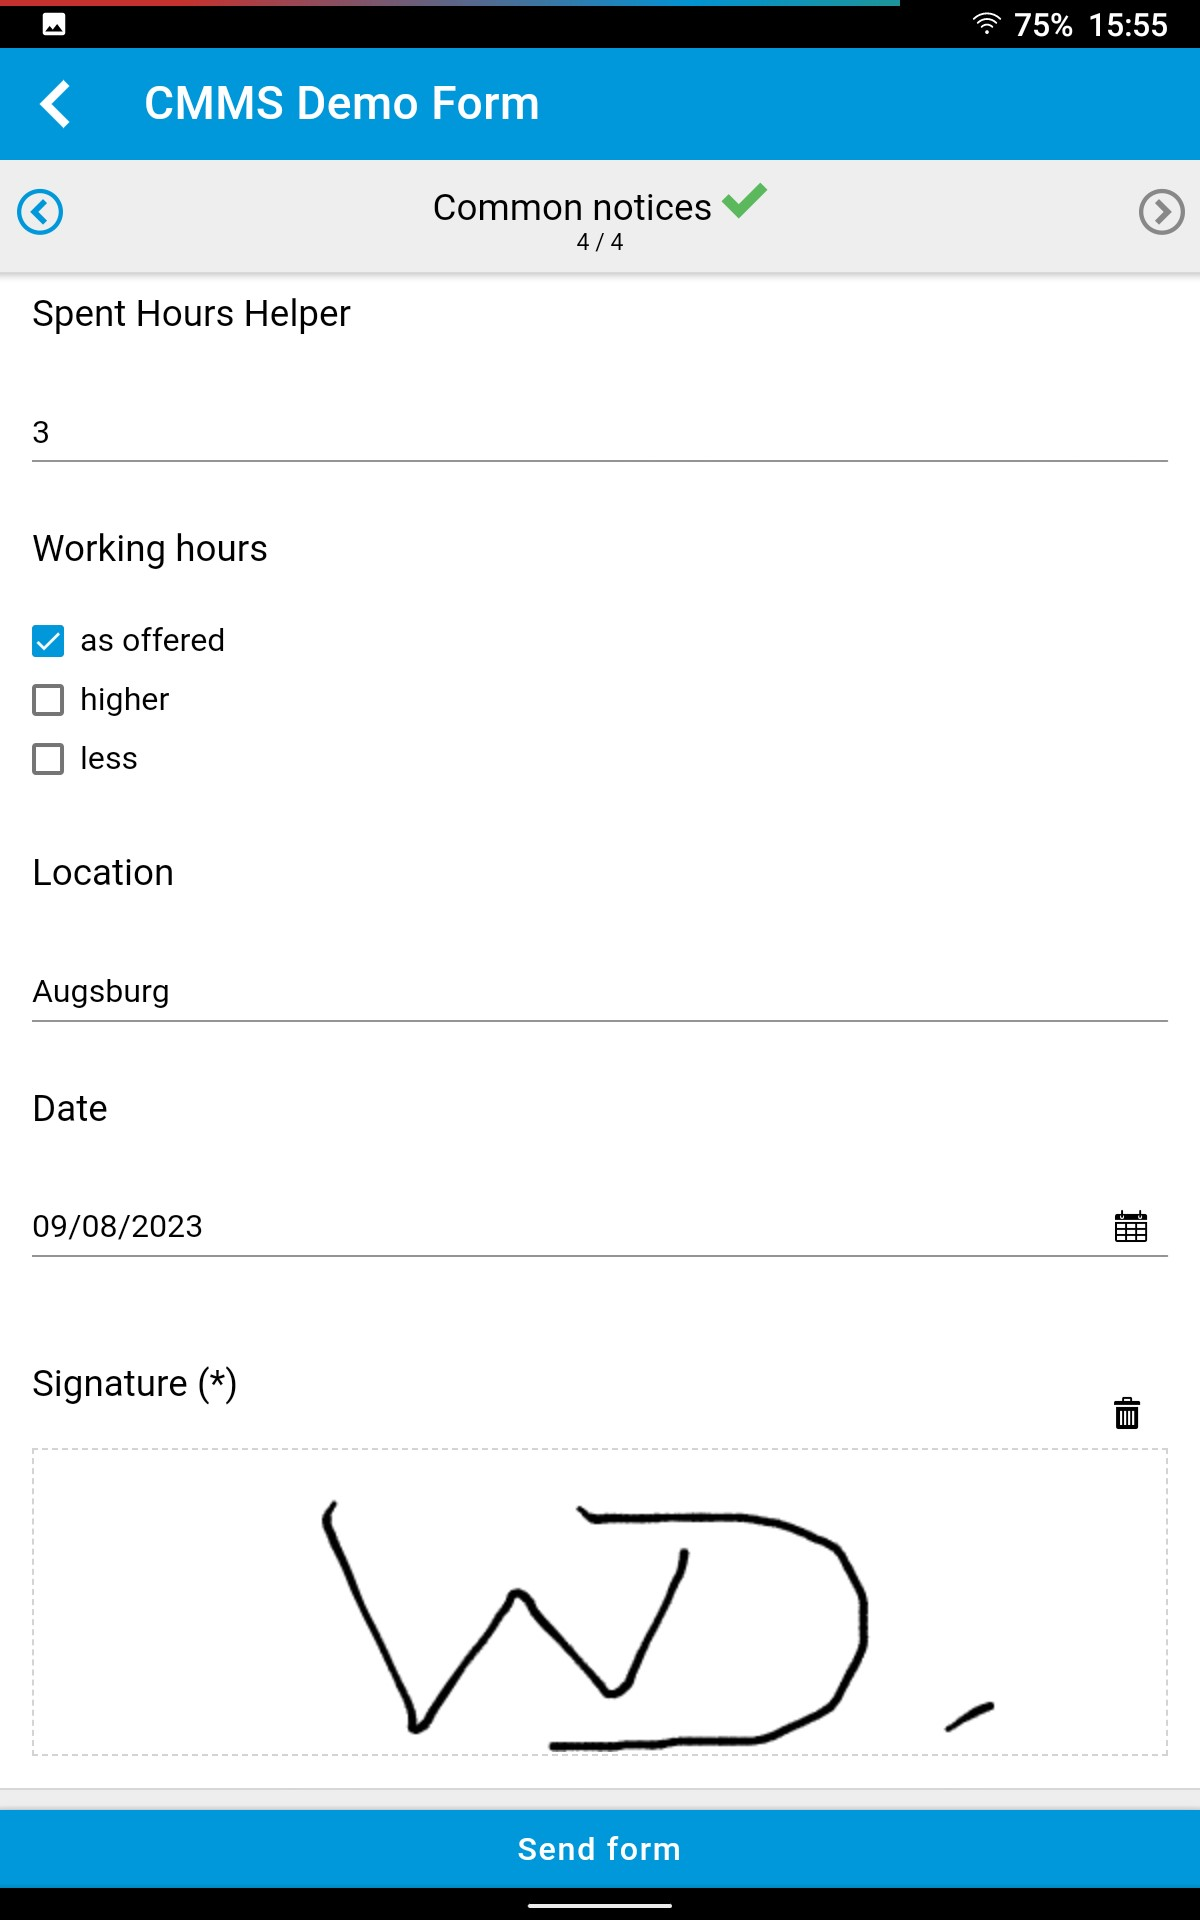
O&M app: form
In the O&M app, a green check mark appears next to the maintenance protocol. The maintenance protocol is simultaneously transferred to the Operations and maintenance personnel in VCOM and can be accessed from within VCOM.
VCOM: open the completed maintenance protocol
Here is a part of the completed maintenance protocol which the O&M manager can view in VCOM.
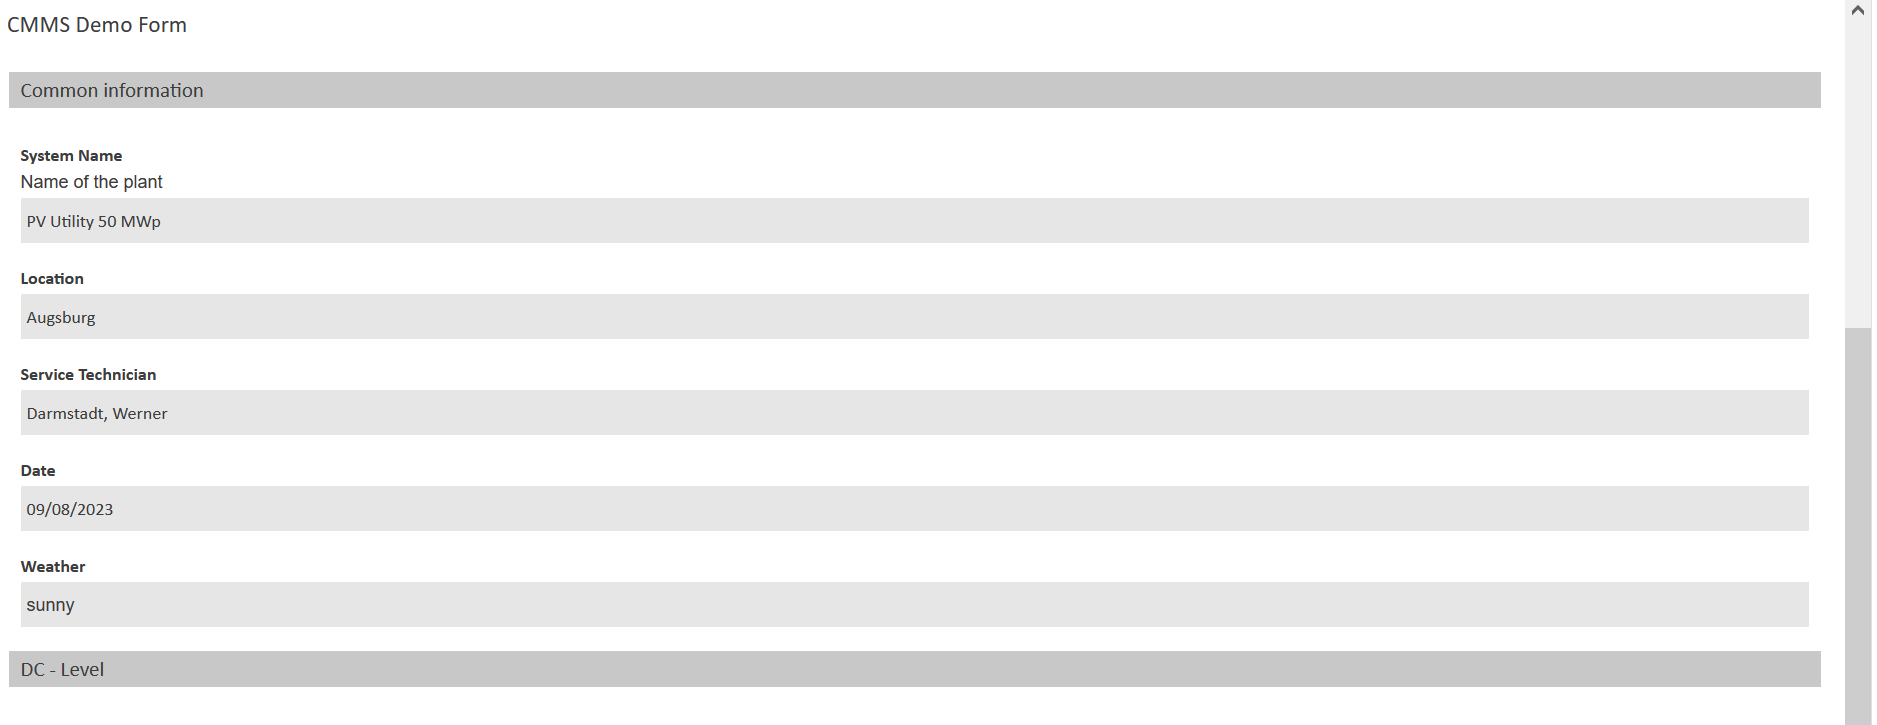
VCOM: completed maintenance protocol
Technician edits a checklist
To edit a checklist in the O&M app, the technician must check off the individual items, ensuring that no tasks are forgotten. The technician completes the form by clicking on Send form.
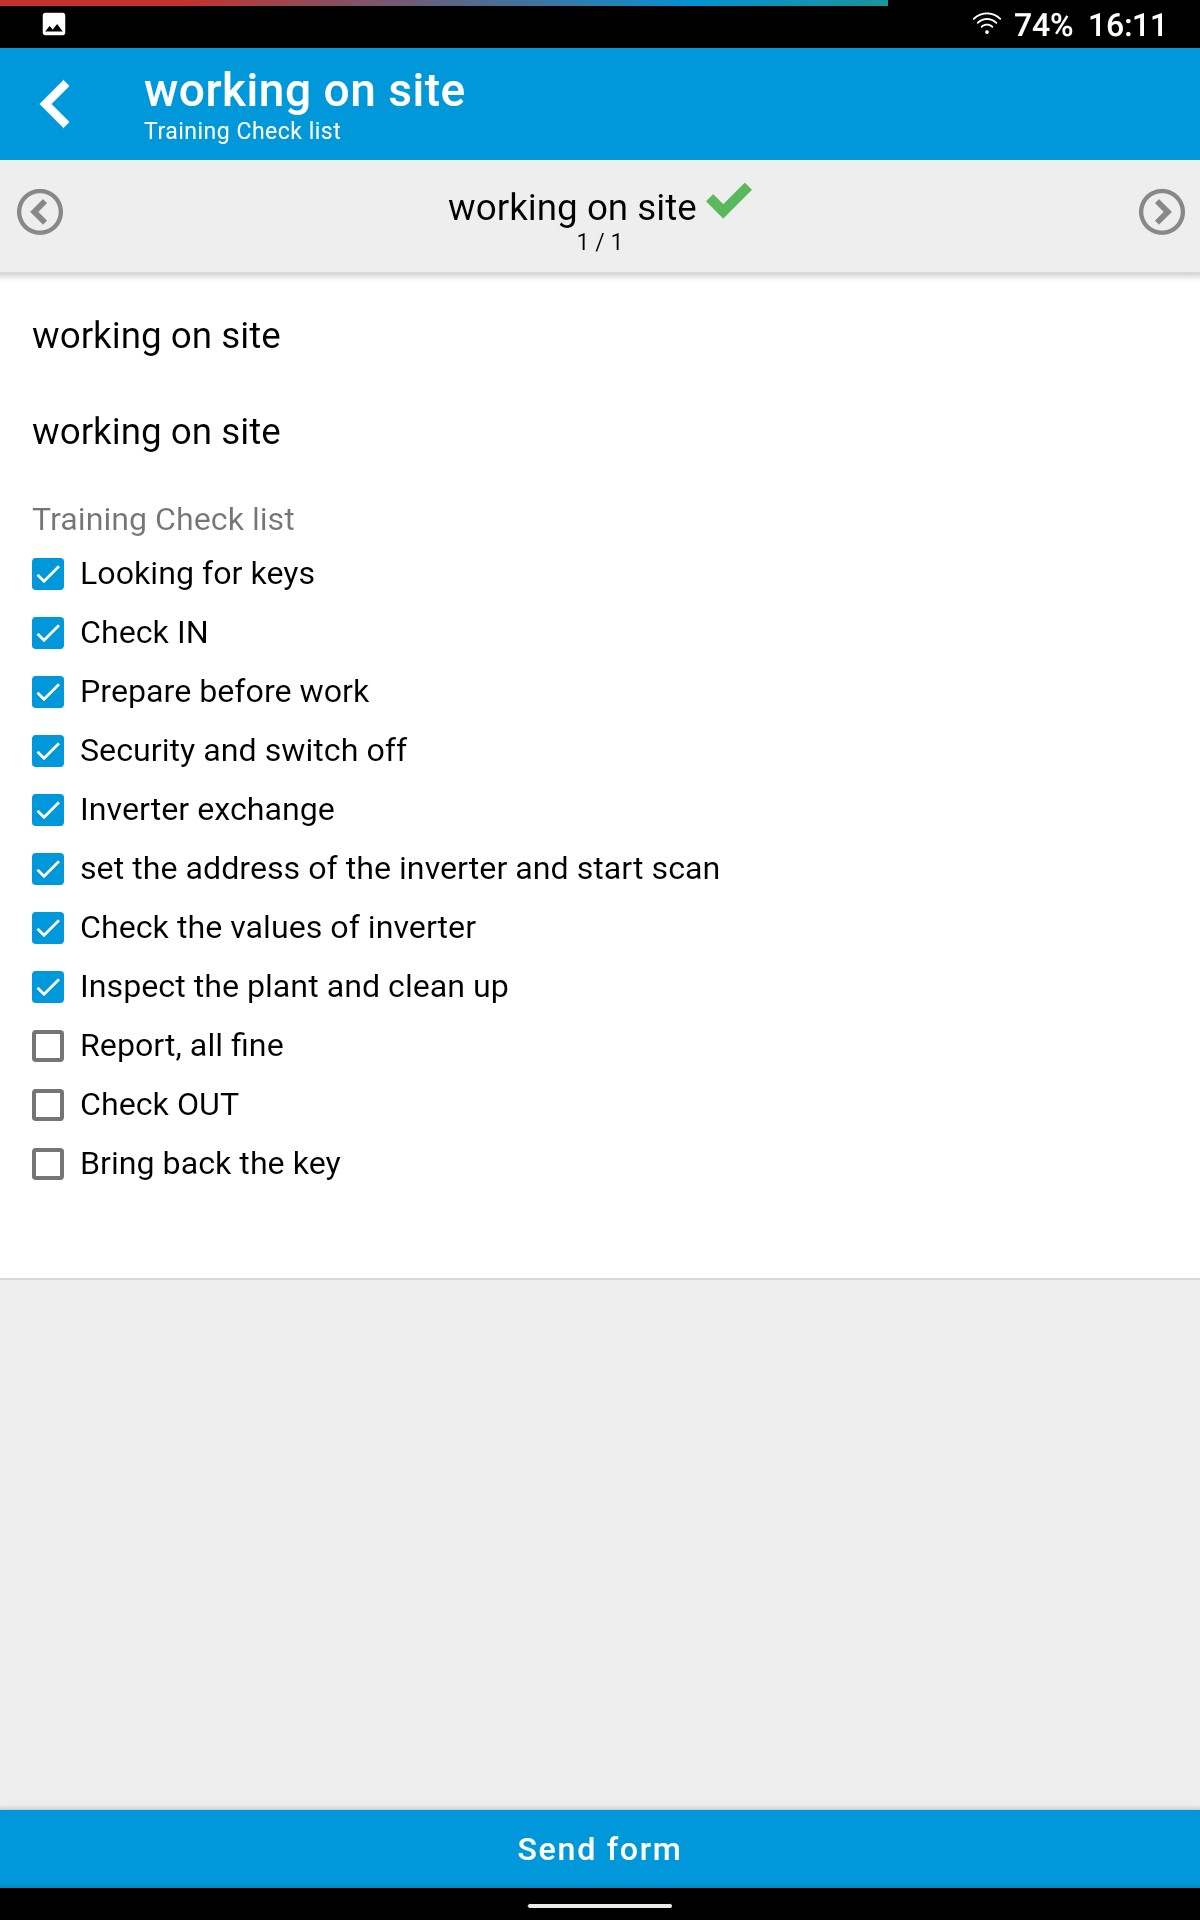
O&M app: checklist
Technician closes a work order
On the main page of the O&M app, both forms in this example display green check marks. The technician can now close the work order by clicking on Close work order. The technician is warned that the work order can no longer be changed.
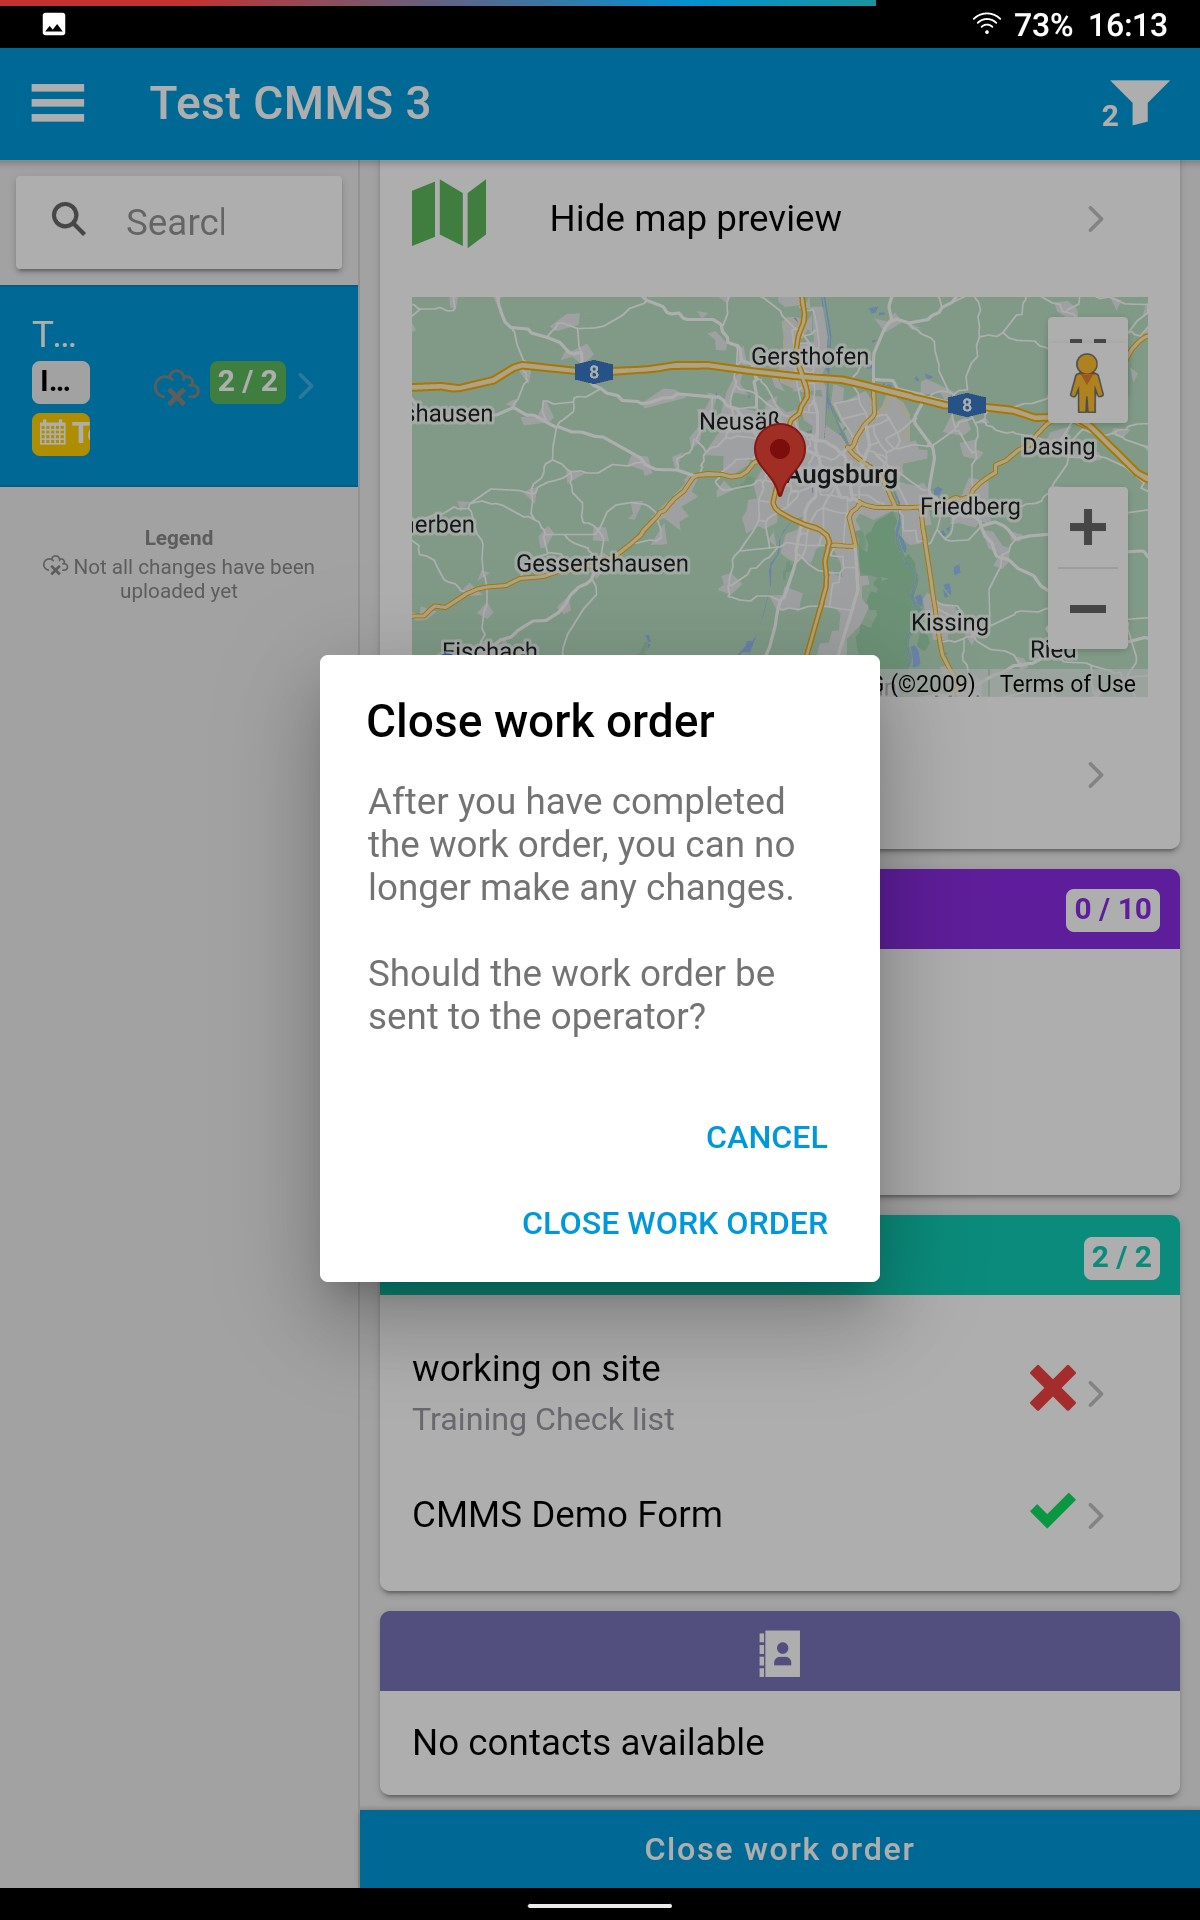
O&M app: close work order
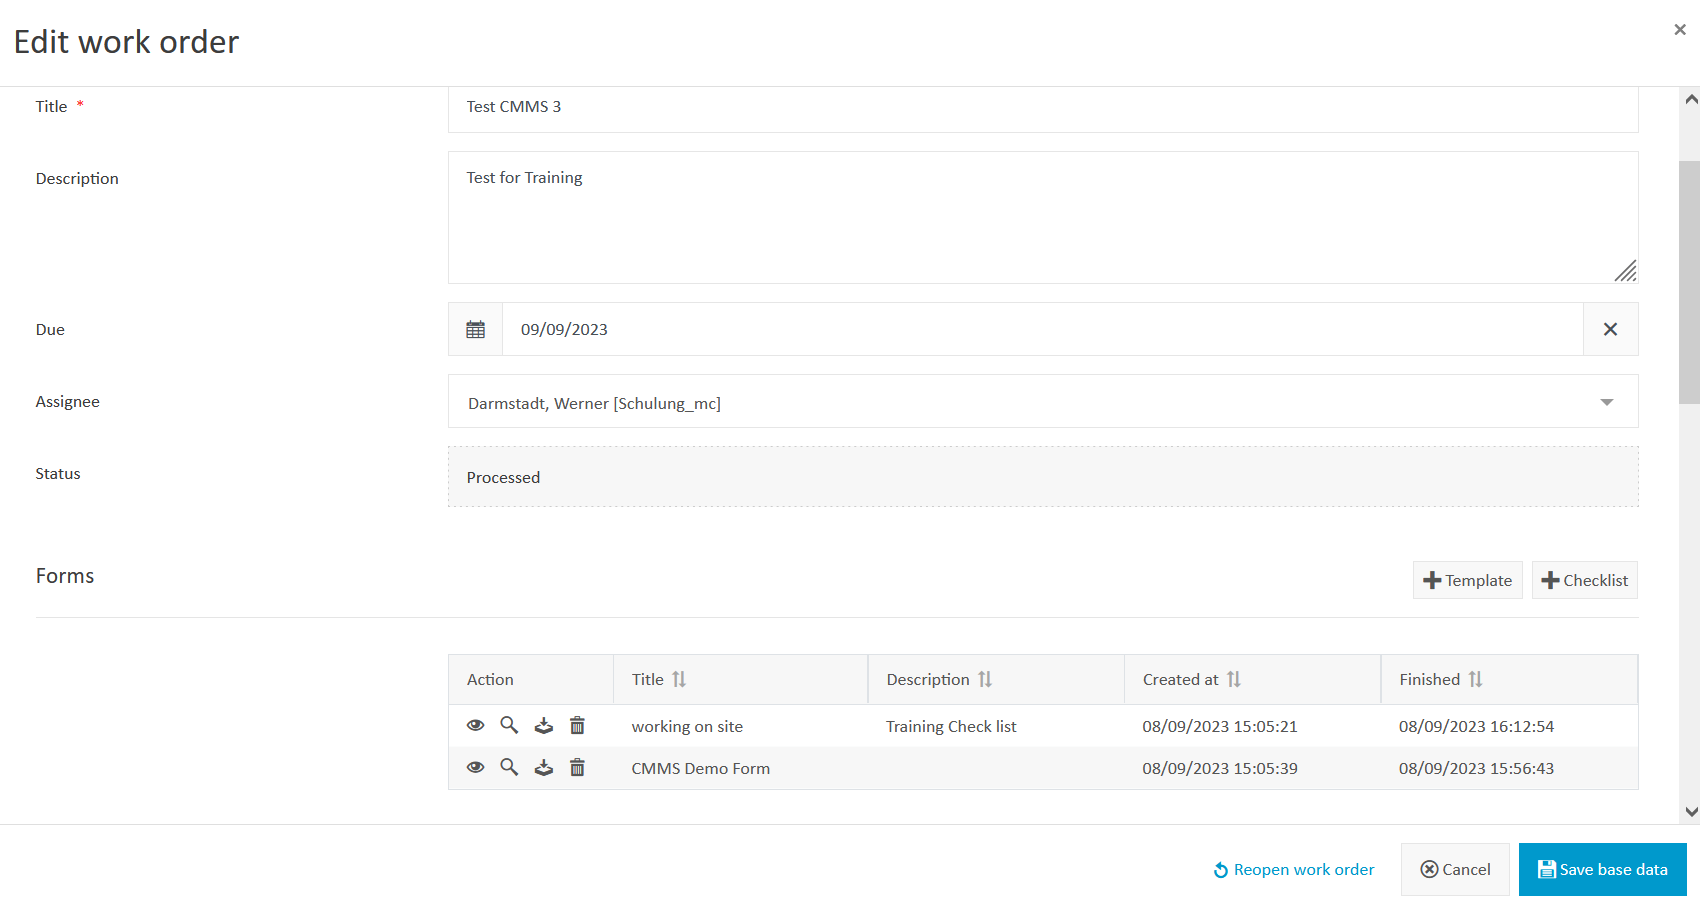
O&M manager closes a work order in VCOM
In order for the O&M manager to close a work order in VCOM, the work order must be completed in the O&M app by the technician. In the Work orders portlet, a green man icon will appear next to the assignee when the technician has completed the work order. The O&M manager can now view the individual completed forms by right-clicking on the work order and selecting Edit.
VCOM: close work order
Create a CMMS report from the work order
A CMMS report can be created from a completed work order. In the Work orders portlet, right-click on the work order and select Report. All the information in the individual completed forms are included in the report.
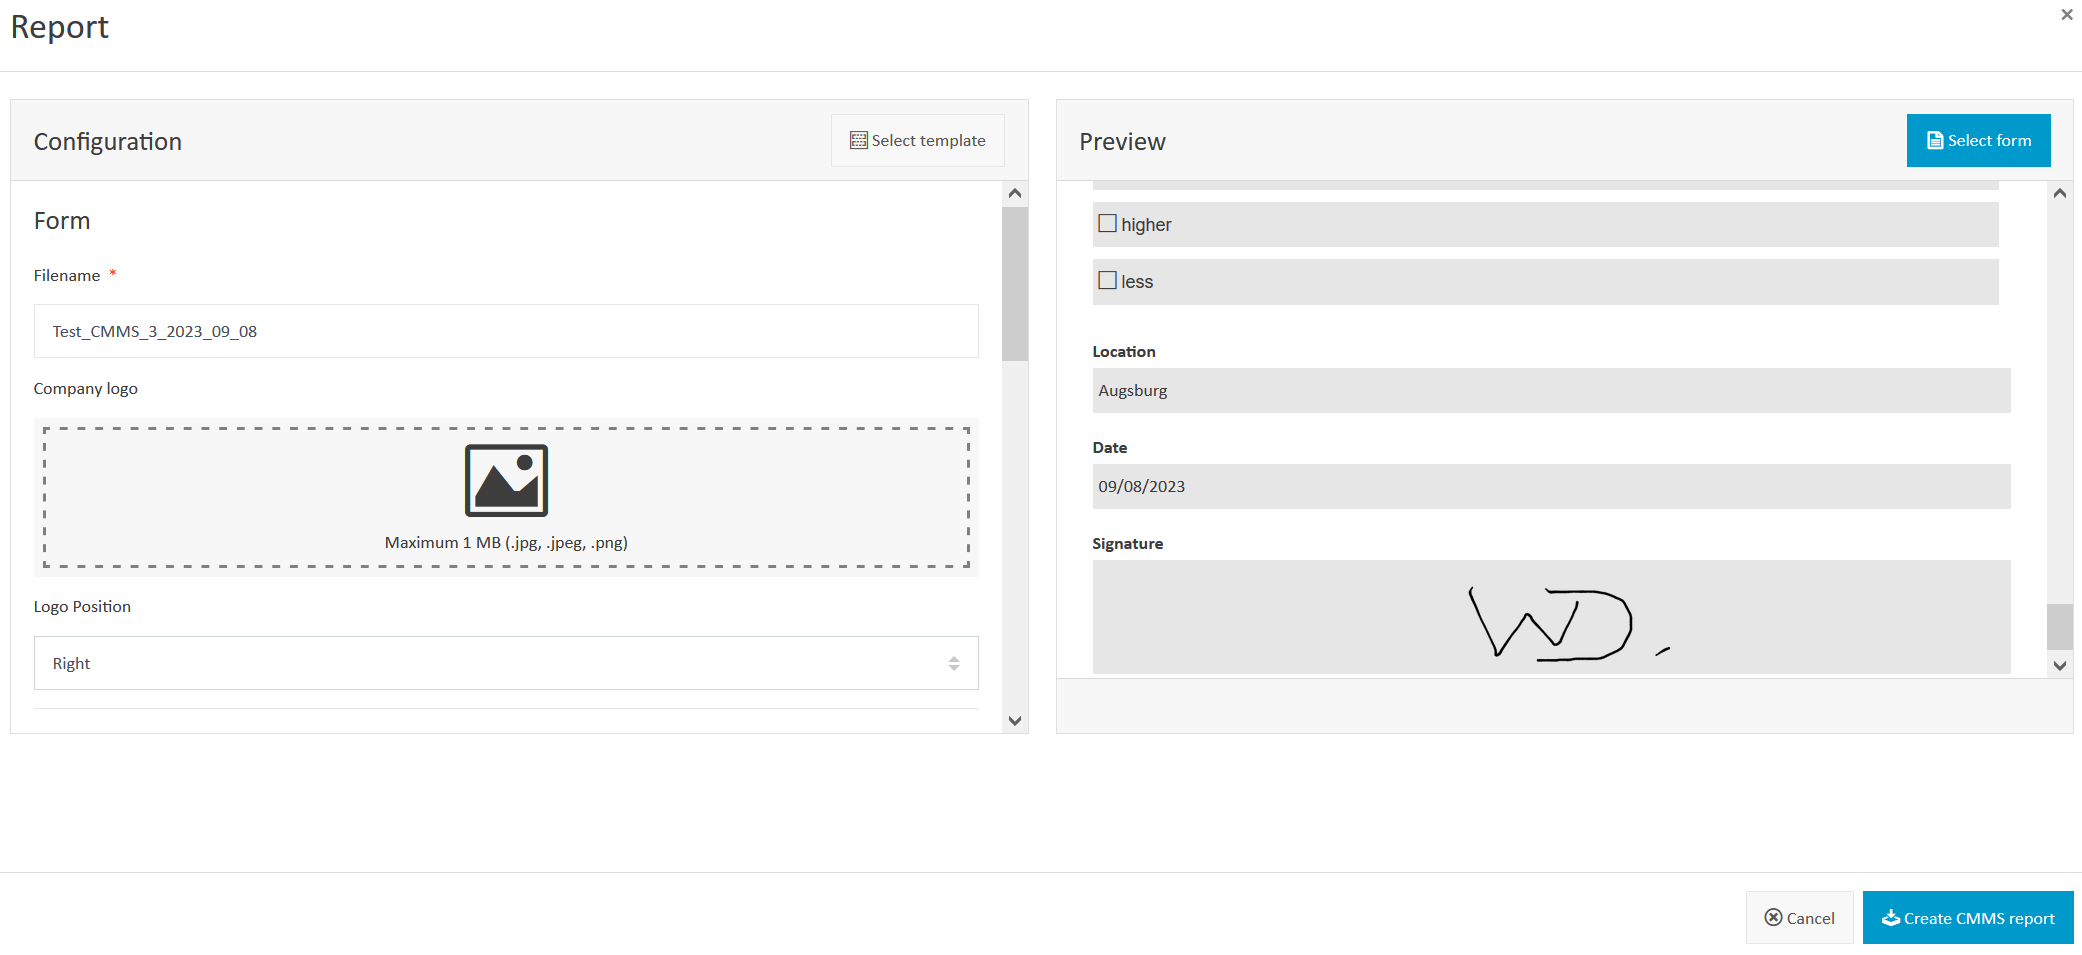
VCOM: Create CMMS report from a work order
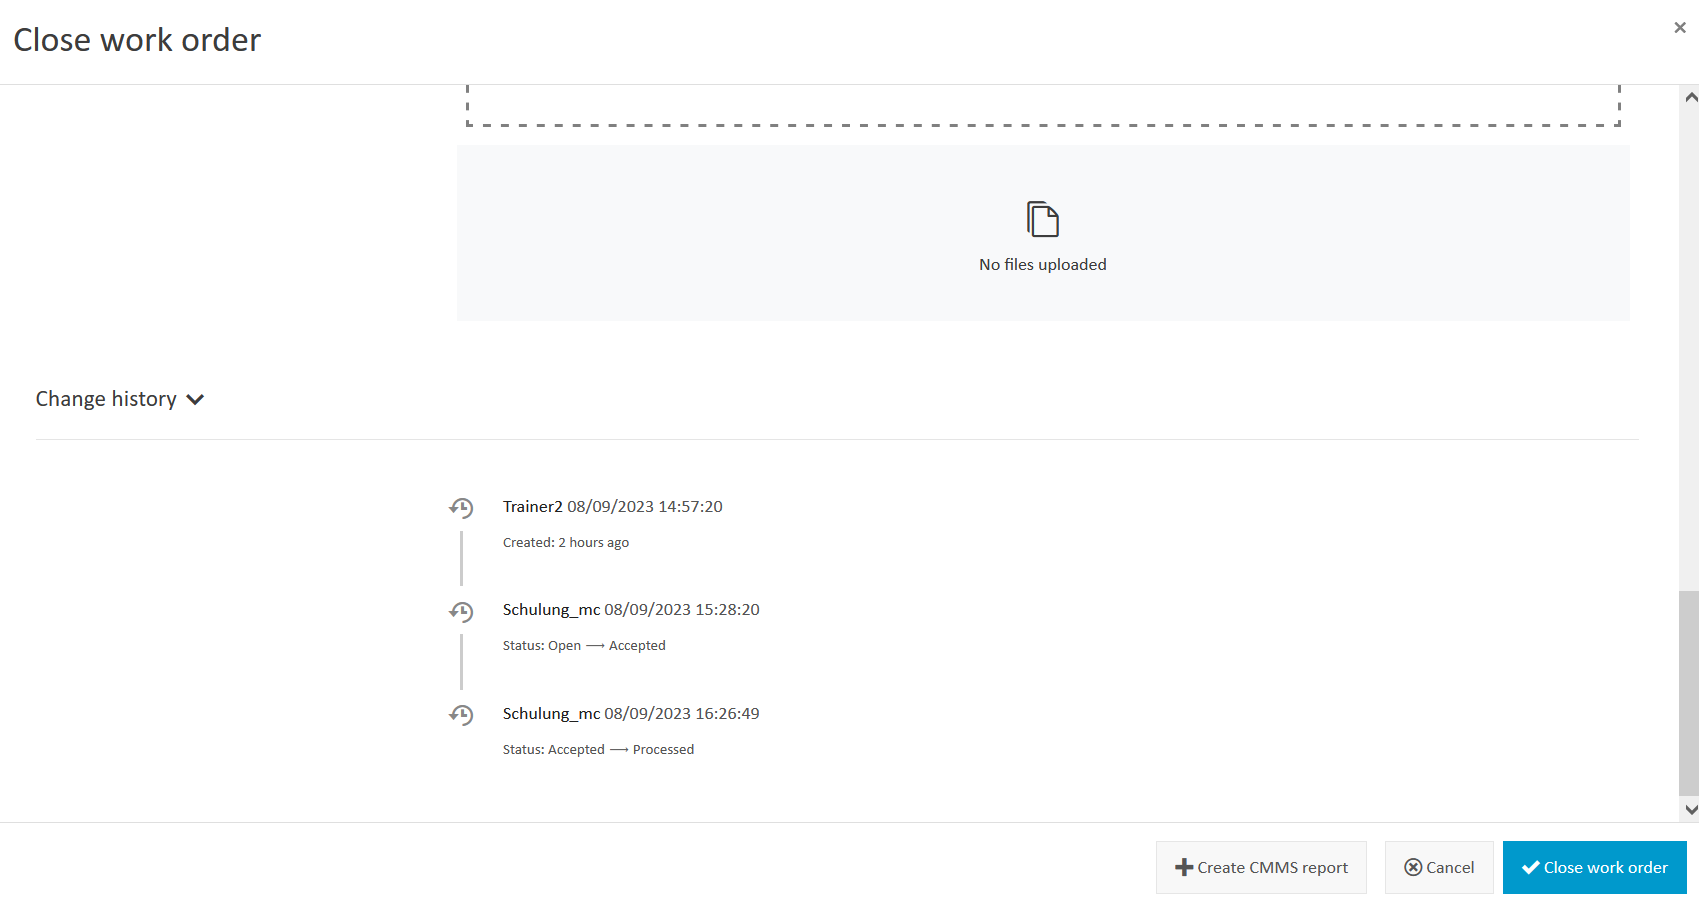
Close the work order
If you no longer wish to display a work order, you can close it by right-clicking on it in the Work orders portlet and selecting Close. An overview will appear so that you can review all the details. When you click on Close work order, the work order is closed and no longer visible in the overview. If you wish to display closed work orders again, click on the Status filter > Closed in the Work orders portlet.
VCOM: close work order
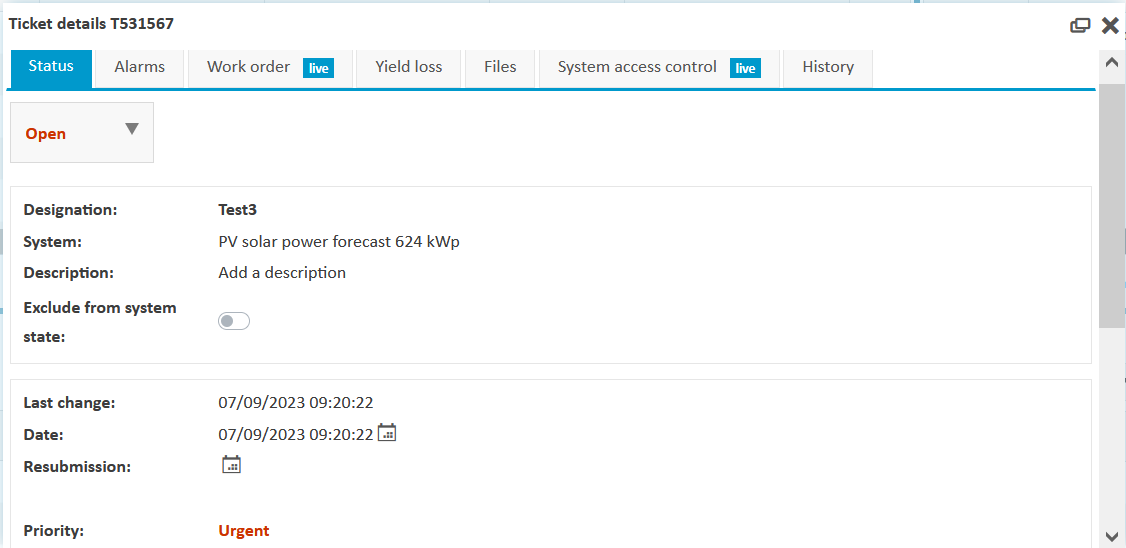
Close the ticket
It is a good idea to close the ticket as well when the work order has been completed. If the ticket involves major work on a system, then several work orders may also be associated with it. Do not close the ticket until the last work order in this group has been completed.
VCOM: close ticket
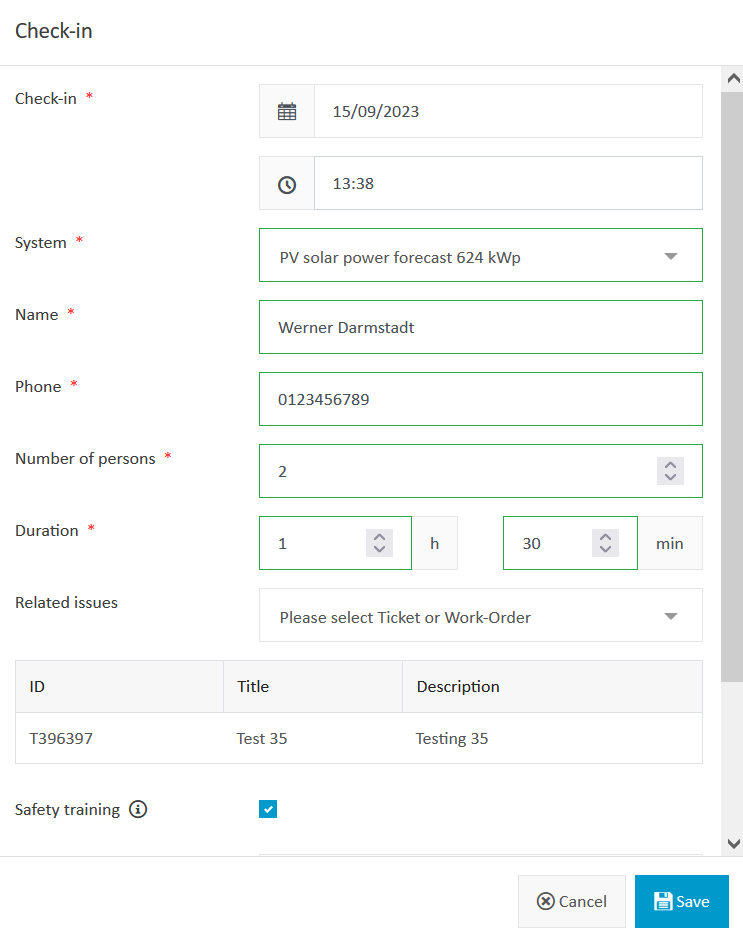
System access control: check-in
You can manage the people that are currently working on your system. This helps the O&M manager in VCOM to keep track of which people are on the move in which systems.
In the System access control portlet, click on the Plus icon to check someone in. When checking someone in, you must enter the date, time, system, and name of the technician. You can link a ticket or work order to a check-in and add a comment.
VCOM: check-in
In the System access control portlet, you can then see the status Registered. Right-click on the new entry to edit or delete system access control.
VCOM: registered
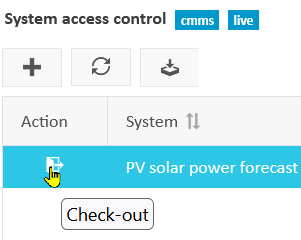
System access control: check out
To check someone out of the system, click on the Door icon in the Action column. You can adjust the date and time if needed.
VCOM: check out
The technician is now checked out of the system. This is shown in the status as Logged out.

VCOM: registered
Add regular events
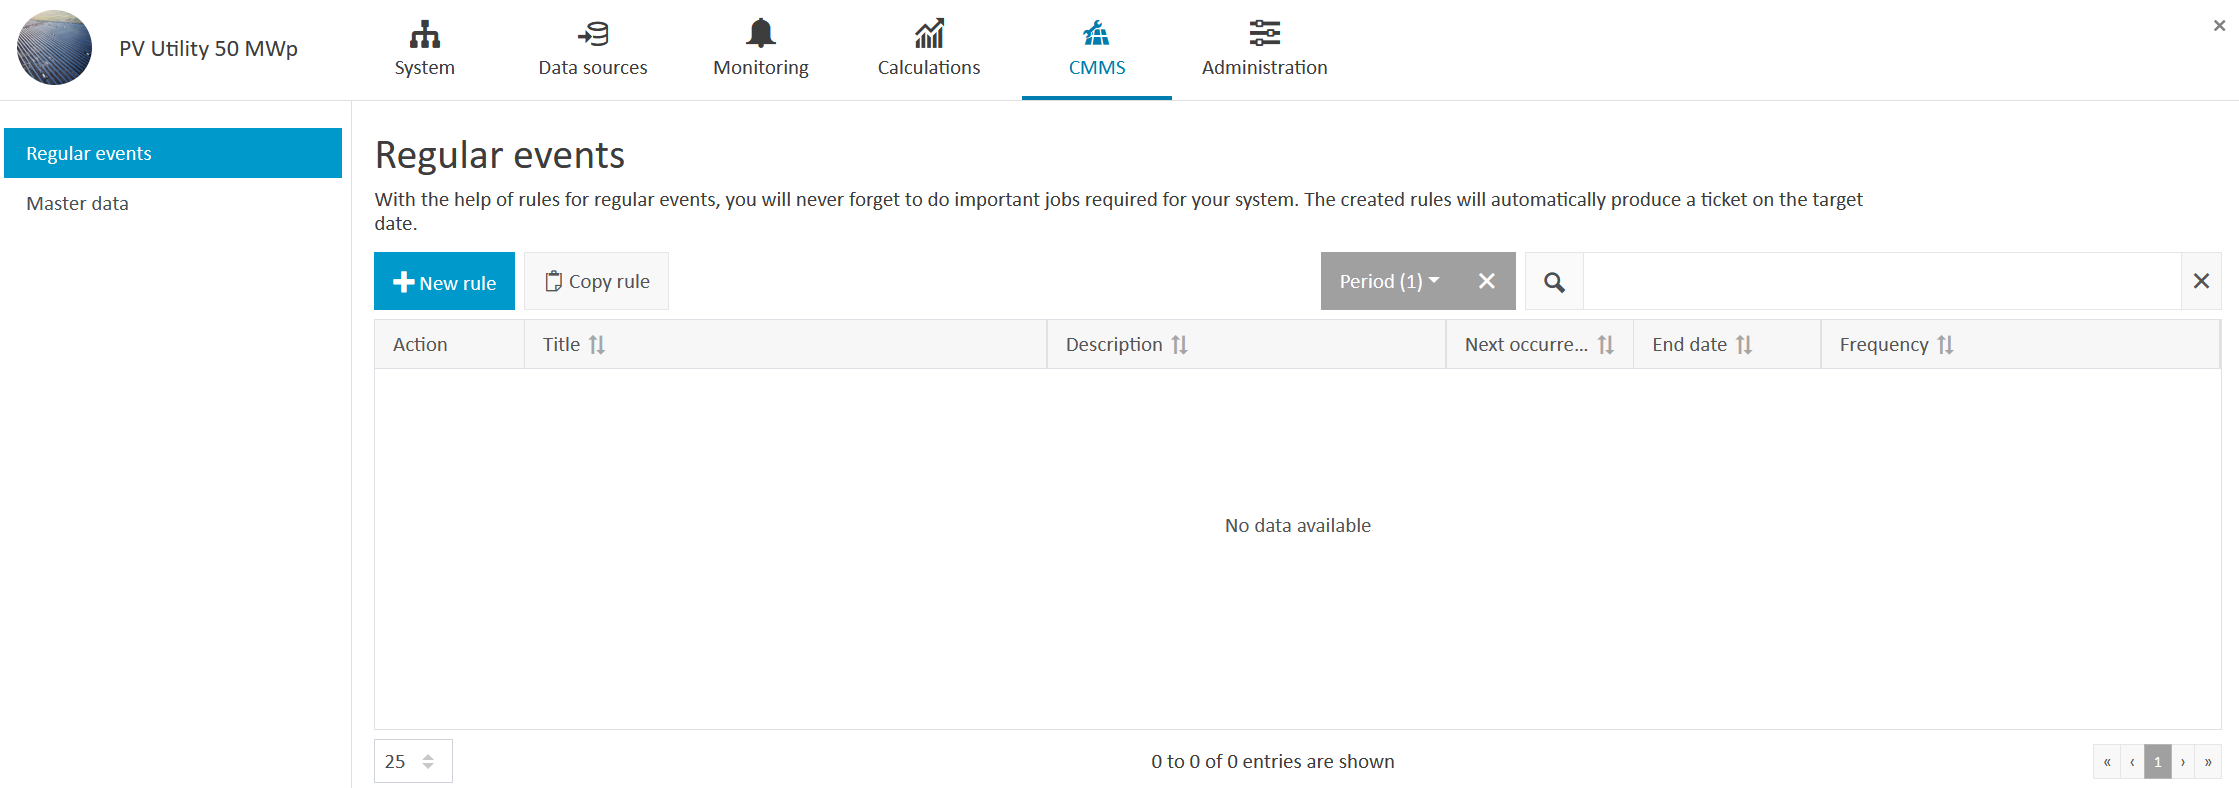
If you are responsible for maintaining a system, you may want to schedule recurring events, such as inspections, mowing the grass, etc. You set this up in the configuration of each system and can view the events in the Regular events portlet.
To add a regular event, go to System configuration > CMMS > Regular events. Select New rule.
VCOM: regular events
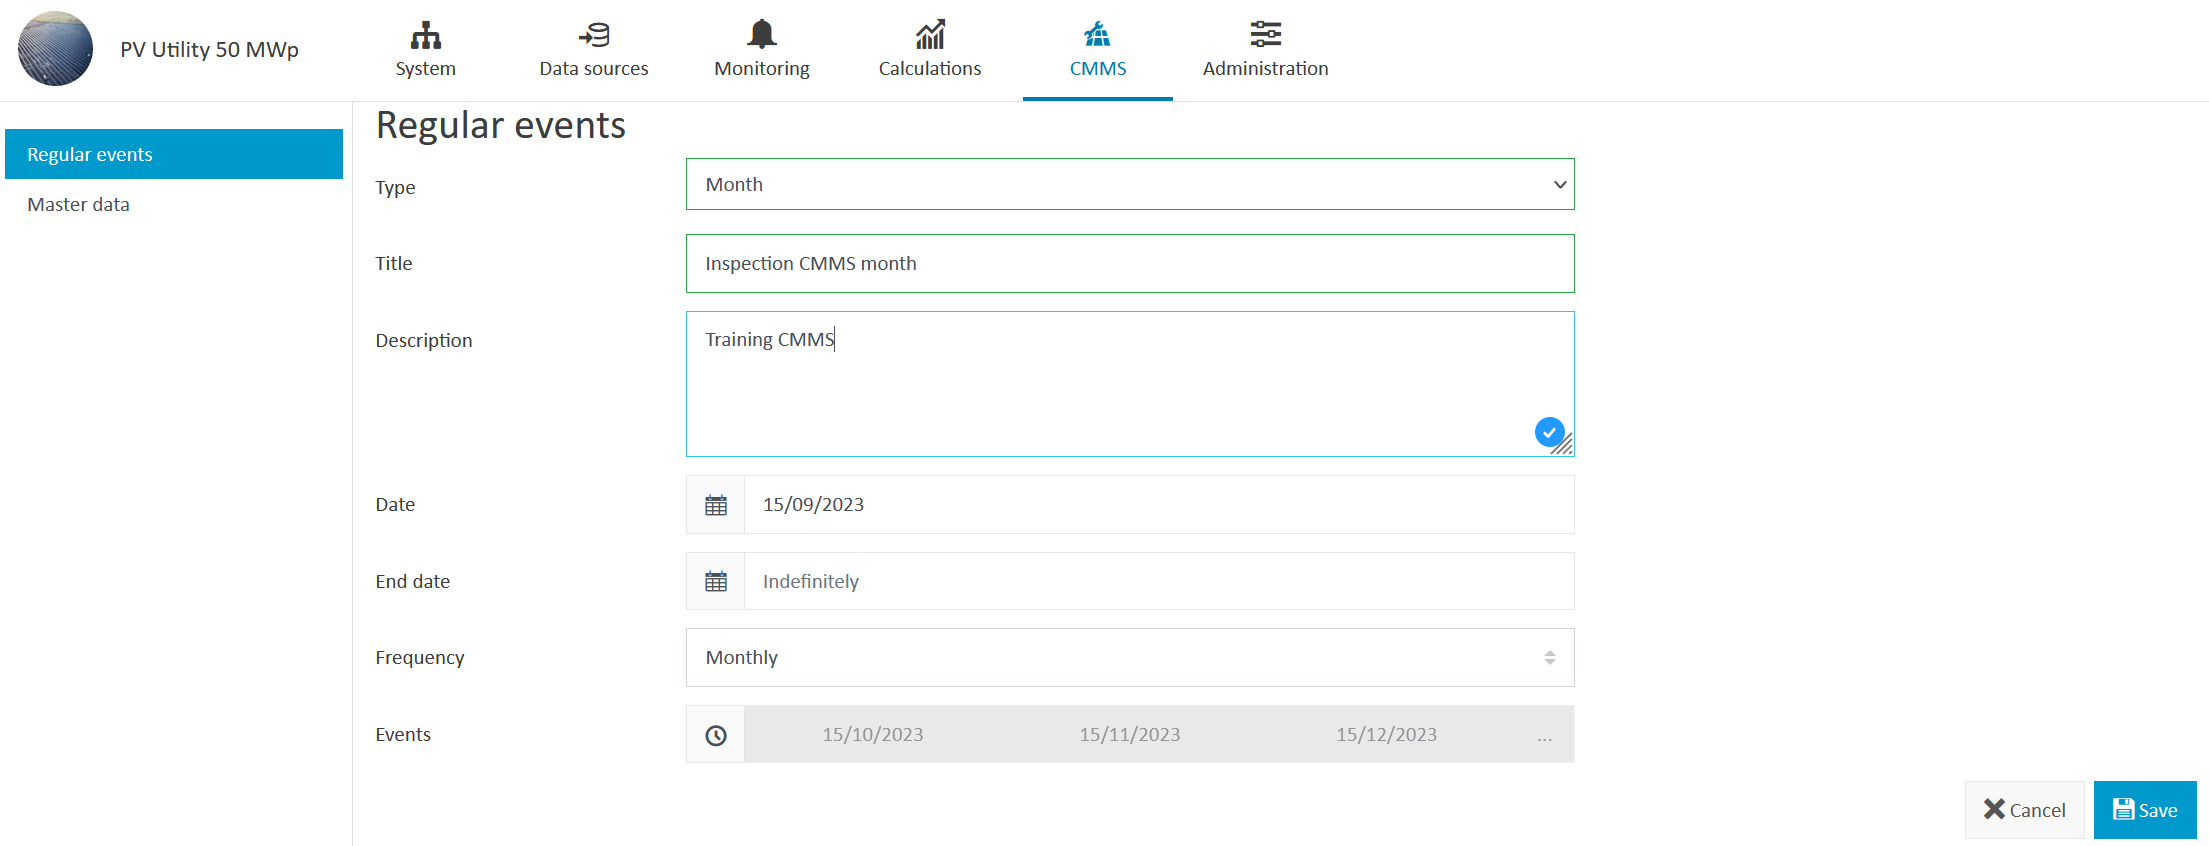
You define how often recurring events occur, e.g. weekly, monthly, twice a month, etc.
VCOM: regular events
The overview lists the regular events.
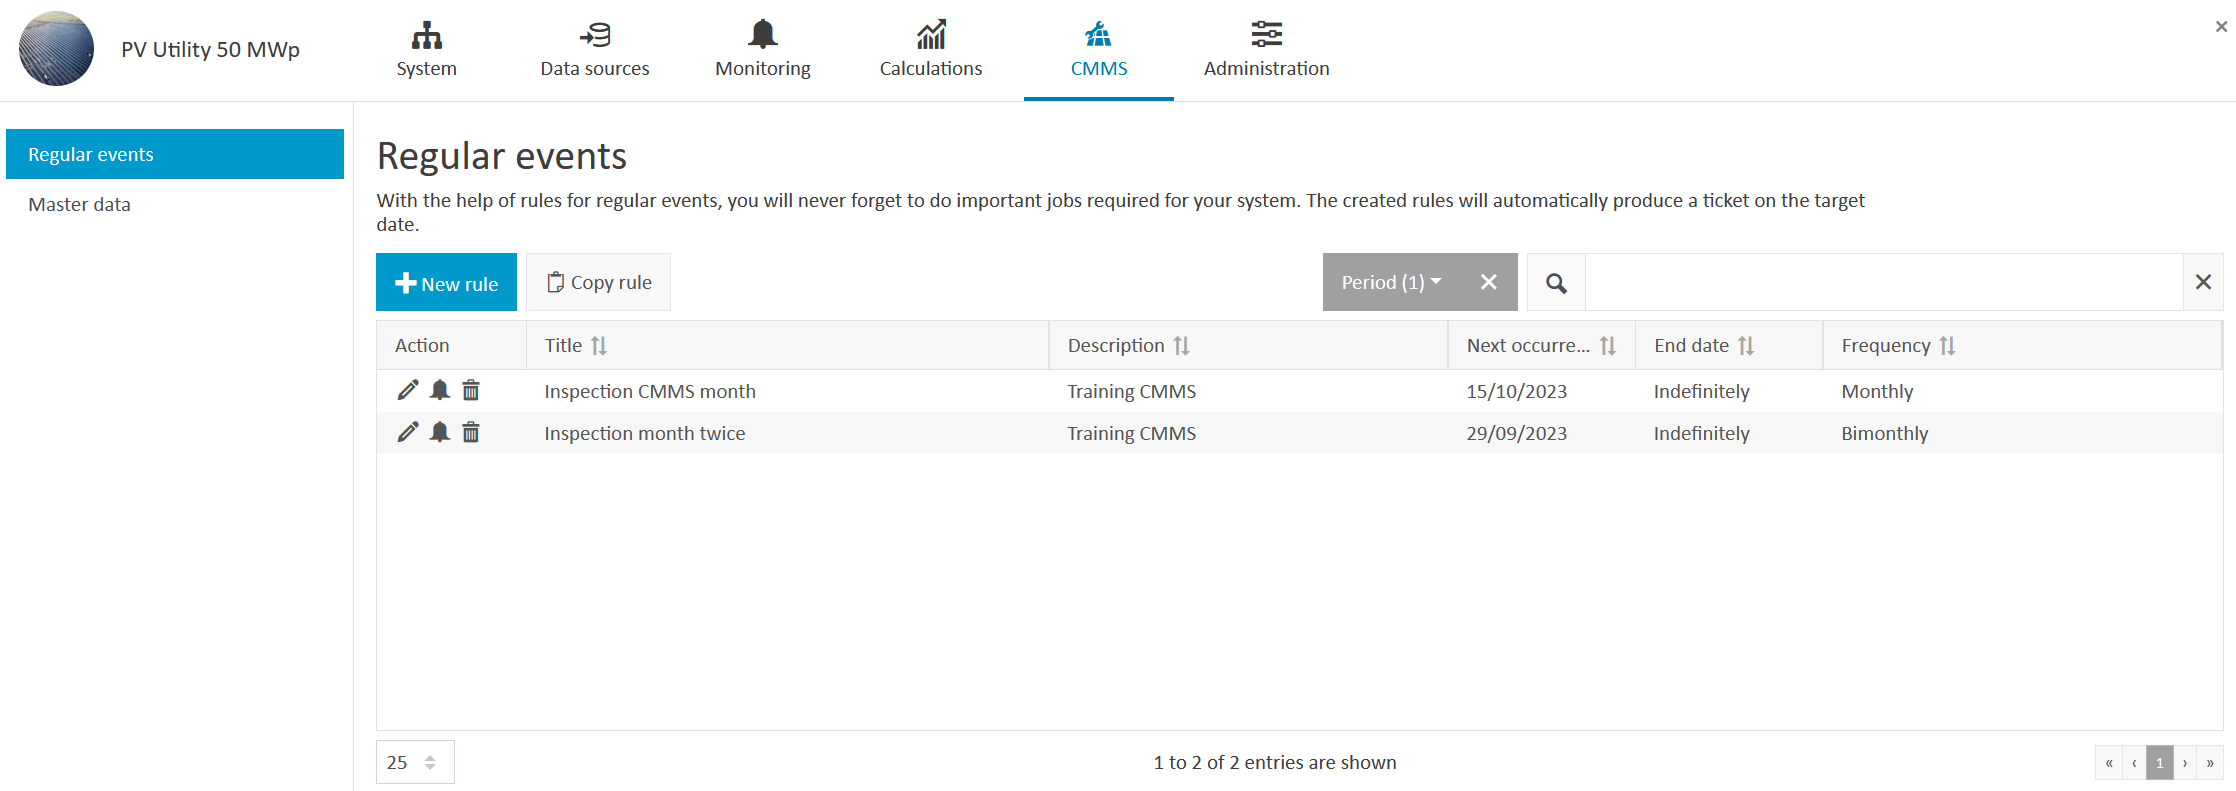
VCOM: regular events overview
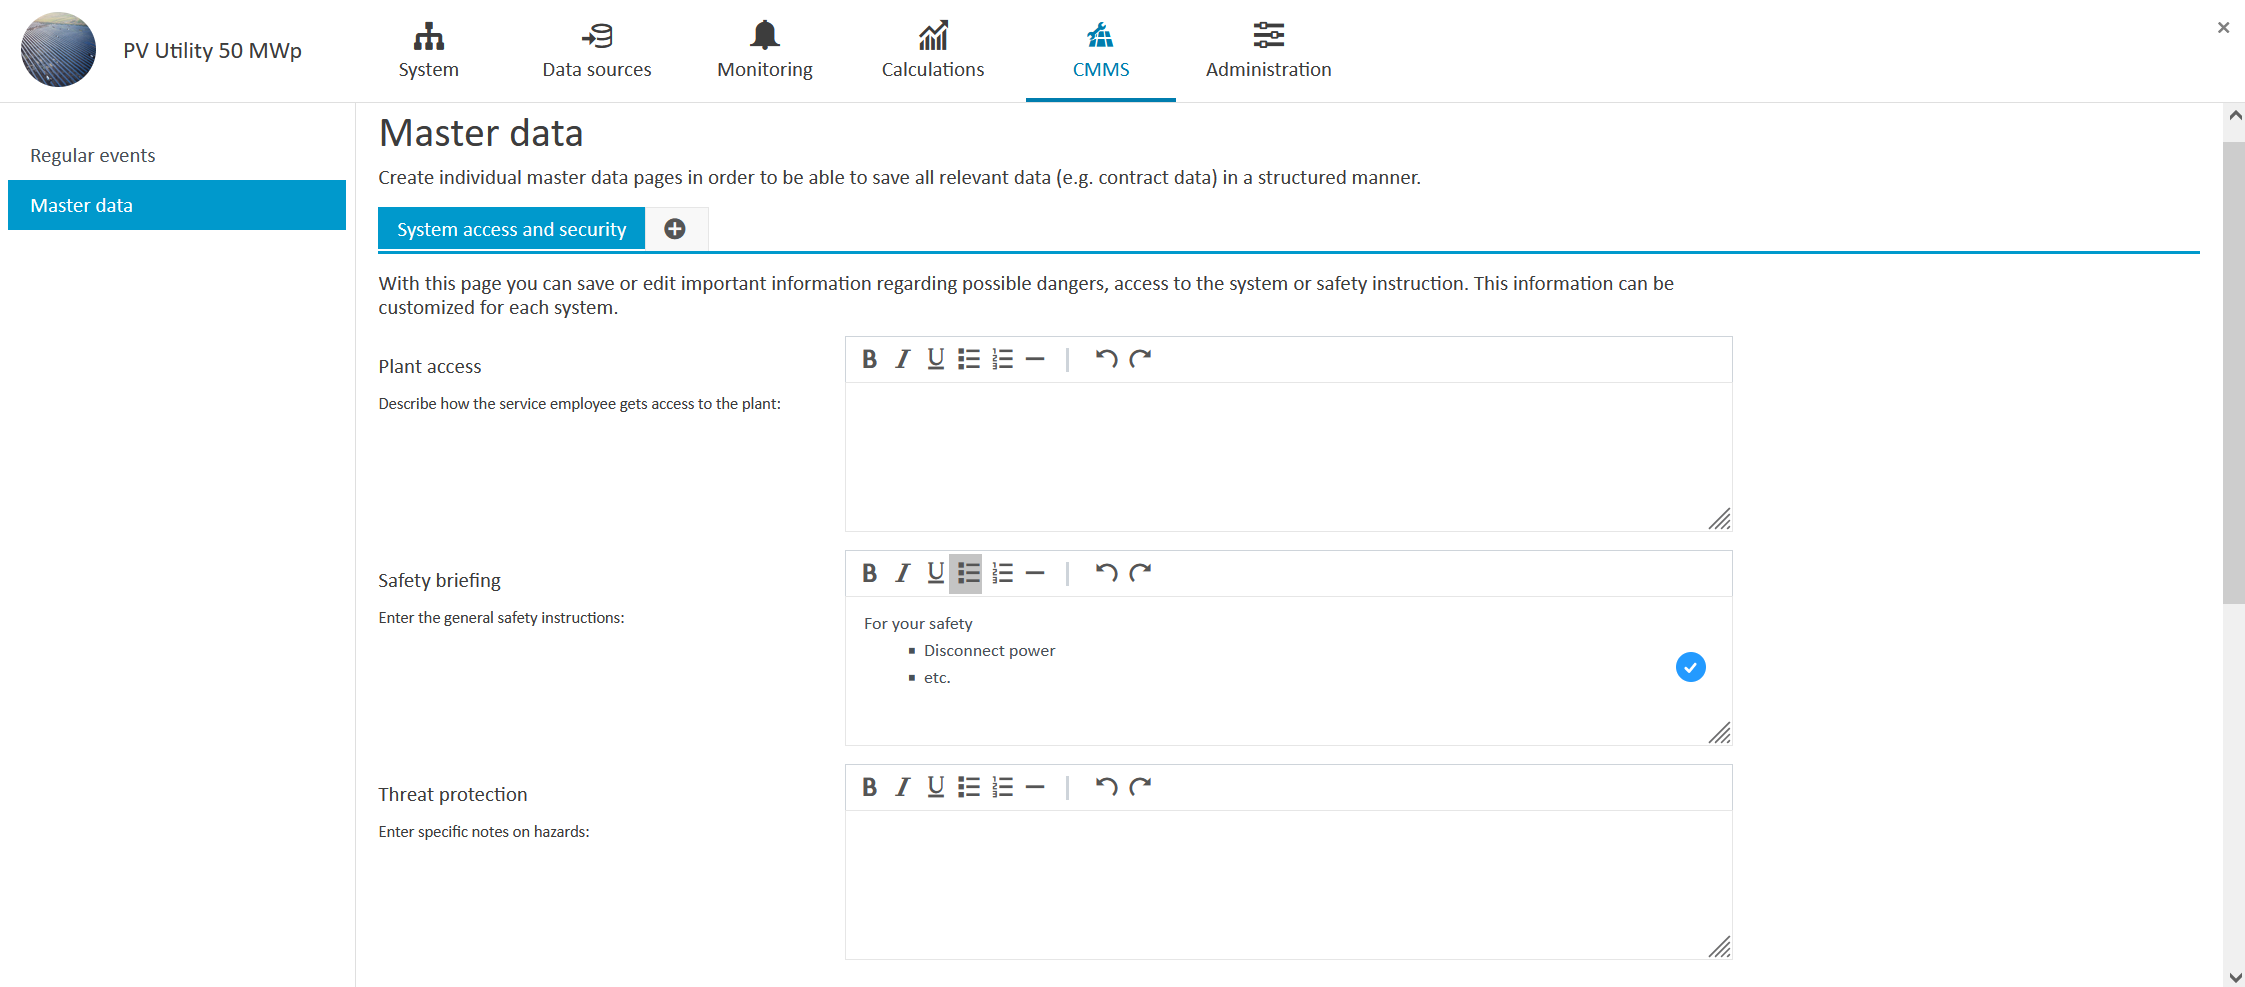
Under System configuration > CMMS > Master data, you can configure details for your work orders and regular events in general, e.g. who has access to a system (Key is with the janitor) and safety briefings (Beware of slippery steps on the roof).
VCOM: master data
View regular events in the regular events portlet
Upcoming regular events are listed in the Regular events portlet to give you an overview of upcoming events. The overview of regular events can help you to assign work orders. For example, you can combine work orders linked to a current ticket (e.g. exchanging an inverter) with a regular event (e.g. maintenance, cleaning of the air vents) in order to save travel costs.
You can choose the period displayed by the list, e.g. all upcoming events in the next month. You can not edit the regular events or master data in the regular events portlet. See Add regular events.