Last modified:
About VLAN and the blue’Log
Certain setups, such as control cabinets, require distinct communication networks for grid operators, devices, and the internet/WAN (wide area network). The blue'Log VLAN feature addresses this requirement. The feature uses virtual networks (VLANs) via a managed switch typically located within the control cabinet.
-
The blue'Log functions as a network bridge and uses VLANs to define routes for the networks.
-
Since the blue'Log has only one Ethernet port, physical network segmentation is handled by a managed switch where multiple VLANs are configured.
-
It is essential to match the blue'Log's VLAN configurations with those on the managed switch.
-
This configuration can also extend to the firewall settings.
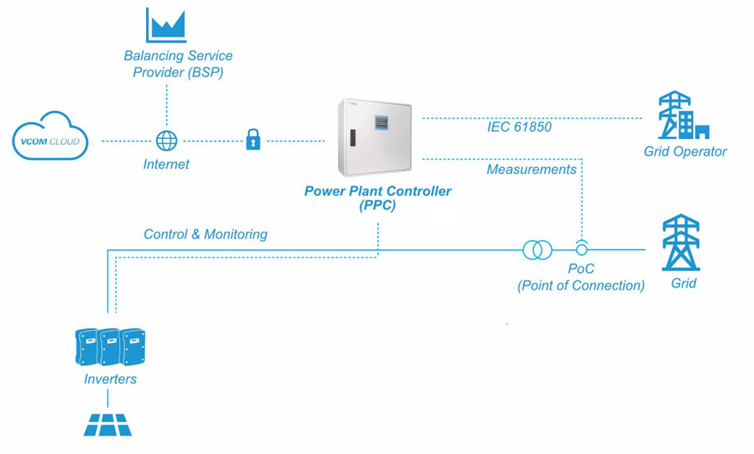
The graphic below shows how VLAN can be used to provide separate communication networks: the WAN (internet), the grid operator (compliant with IEC 61850), and the devices (control and monitoring)

Set up a VLAN
Prerequisites
-
blue'Log XC or blue'Log XM
-
Firmware 28.0.2 or higher
Steps
-
Go to System > VLAN.
-
Select the Plus icon to add a new VLAN.
-
Fill in the mandatory fields:
-
VLAN ID (range 1-4094)
-
IP address
-
Subnet mask
-
-
Optional: Fill in if needed:
-
Default gateway
-
Primary DNS server
-
Secondary DNS server
-
Modify the MTU (Default: 1500).
-
-
Select the Disk icon to save.
-
If all settings are correct, a virtual LAN interface matching the VLAN settings will be created. All configured VLANs will be displayed in the list.
-
Optional: Adjust firewall settings if required.
Further actions
Edit or delete VLANs
-
To edit or delete a VLAN, use the options next to its name in the list.
-
For bulk actions, select multiple VLANs by ticking their checkboxes, or tick the checkbox in the table header to select all.
-
Use the Save, Cancel, and Delete buttons next to each VLAN to apply changes, but these only affect the specific row where they are selected.